Managed Identity in Azure DevOps Service Connections
I recently noticed that there is a now an option to use Managed Identity Authentication for Azure DevOps Connection Services besides Service Principal Authentication.
For those not familair with Azure DevOps Connection Services, you use them to connect to external and remote services to execute tasks for a build or deployment.
In this blog post I’m going to explain how to use Managed Identity Authentication for the Azure DevOps Connection Service.
Managed Identity
What is Managed Identity (formaly know as Managed Service Identity)?
It’s a feature in Azure Active Directory that provides Azure services with an automatically managed identity. You can use this identity to authenticate to any service that supports Azure AD authentication without having any credentials in your code.
Managed Identities only allows an Azure Service to request an Azure AD bearer token.
The here are two types of managed identities:
-
A system-assigned managed identity is enabled directly on an Azure service instance. When the identity is enabled, Azure creates an identity for the instance in the Azure AD tenant that’s trusted by the subscription of the instance. After the identity is created, the credentials are provisioned onto the instance. The lifecycle of a system-assigned identity is directly tied to the Azure service instance that it’s enabled on. If the instance is deleted, Azure automatically cleans up the credentials and the identity in Azure AD.
-
A user-assigned managed identity is created as a standalone Azure resource. Through a create process, Azure creates an identity in the Azure AD tenant that’s trusted by the subscription in use. After the identity is created, the identity can be assigned to one or more Azure service instances. The lifecycle of a user-assigned identity is managed separately from the lifecycle of the Azure service instances to which it’s assigned.
Why use Managed Identity?
A common challenge when building cloud applications is how to manage the credentials in your code for authenticating to cloud services. Keeping the credentials secure is an important task. Ideally, the credentials never appear on developer workstations and aren’t checked into source control. Azure Key Vault provides a way to securely store credentials, secrets, and other keys, but your code has to authenticate to Key Vault to retrieve them. The managed identities for Azure resources feature in Azure Active Directory (Azure AD) solves this problem.
If you use the Managed Identity enabled on a (Windows) Virtual Machine in Azure you can only request an Azure AD bearer token from that Virtual Machine, unlike a Service Principal.
Steps to use a Service Connection with Managed Identity
High-level you need to execute the following steps:
- Create a Service Connection of the type Azure Resource Manager with Managed Identity authentication
- Create an Azure Virtual Machine private Azure DevOps Agent
- Enable Managed Identity on Azure Virtual Machine
- Authorize the Managed Identity
- Configure the Managed Identity Service Connection in your pipelines
Step 1. Create a Service Connection of the type Azure Resource Manager with Managed Identity authentication
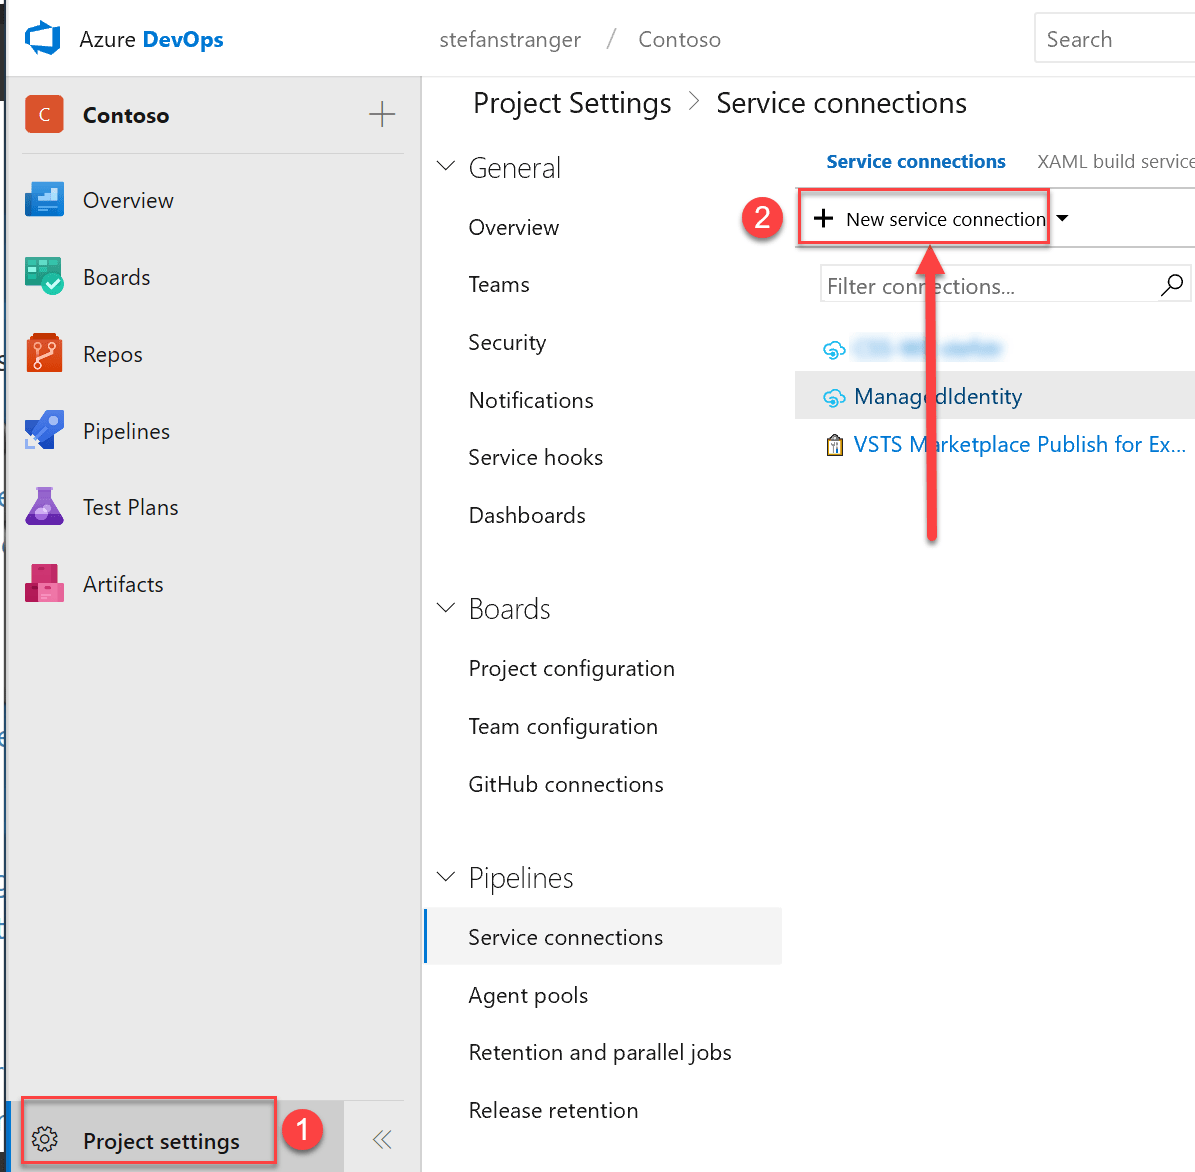
Open your Azure DevOps Project Settings and select Service Connections, and select New service connection.
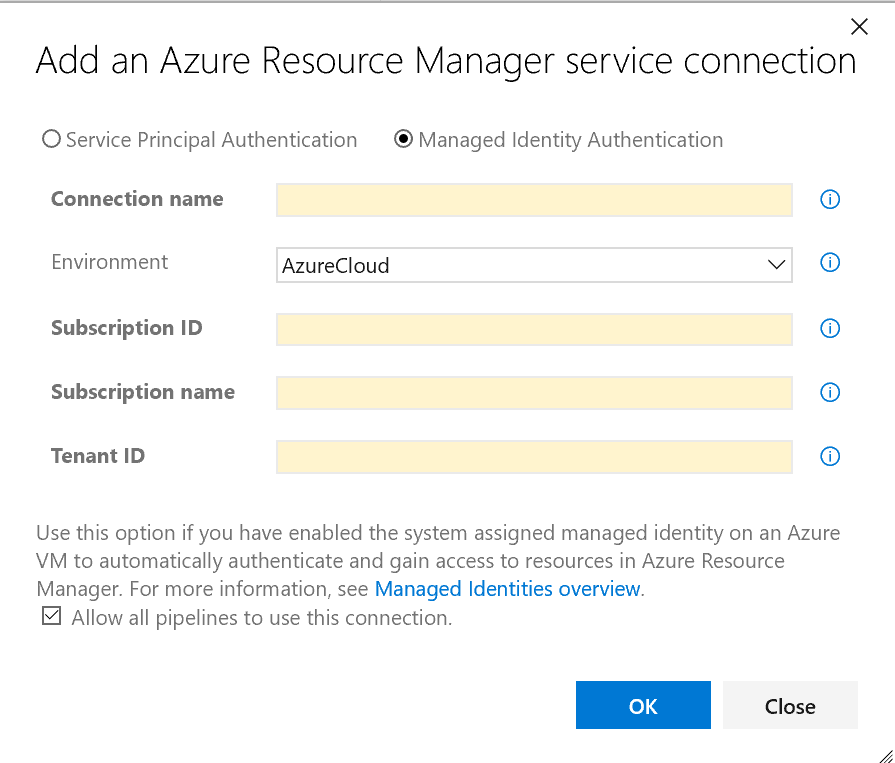
Select type of Service Connection (Azure Resource Manager) and select Managed Identity Authentication. Enter a Connection name, Subscription ID, Subscription name and Tenant ID.
After the creation of the Service Connection we need to create the Azure Virtual Machine private build agent.
Step 2. Create an Azure Virtual Machine private Azure DevOps Agent
An agent that you set up and manage on your own to run build and deployment jobs is called a self-hosted agent. You can use self-hosted agents in Azure Pipelines or Team Foundation Server (TFS). Self-hosted agents give you more control to install dependent software needed for your builds and deployments. Also, machine-level caches and configuration persist from run to run, which can boost speed.
You can install the agent on Linux, macOS, or Windows machines. You can also install an agent on a Linux Docker container.
We are going to create a Windows private Azure DevOps Agent (self-hosted Windows Agent).
The Microsoft Azure DevOps team uses Packer to build Azure Virtual Machine images that are being used to create Azure Virtual Machine in Hosted Agent Pools. You can view the Packer config that Microsoft uses at https://github.com/Microsoft/vsts-image-generation where the whole Agent config is open source.
Packer is an open source tool for creating identical machine images for multiple platforms from a single source configuration. Packer is lightweight, runs on every major operating system, and is highly performant, creating machine images for multiple platforms in parallel.
Wouter de Kort wrote a great blog series about how to Build your own Hosted VSTS Agent Cloud. Please look at the References section for all his blog posts.
You can also find more information on create Azure Virtual Machine images using Packer on Microsoft Docs.
Install Packer
You can install Packer on your local development machine using Chocolatey, which is a Windows Package Manager like apt-get on Linux. Open elevated PowerShell host and run:
choco install packer
Create Azure Resource Group
During the build process, Packer creates temporary Azure resources as it builds the source Virtual Machine. To capture that source Virtual Machine for use as an image, you must define a resource group. The output from the Packer build process is stored in this Azure Resource Group.
Run the following PowerShell commands from a PowerShell host after logging into Azure.
$ResoureGroupName = "[Enter Resource Group Name]"
$Location = "westeurope"
New-AzureRmResourceGroup -Name $ResourceGroupName -Location $Location
Create Azure credentials
Packer authenticates with Azure using a service principal (now also Managed Identity is supported). An Azure service principal is a security identity that you can use with apps, services, and automation tools like Packer. You control and define the permissions as to what operations the service principal can perform in Azure.
Run the following PowerShell commands from a PowerShell host after logging into Azure.
$ServicePrincipal = New-AzureRmADServicePrincipal -DisplayName "[Enter a Name for the Azure Packer Service Principal]" `
    -Password (ConvertTo-SecureString "[Enter password]" -AsPlainText -Force)
Sleep 20
New-AzureRmRoleAssignment -RoleDefinitionName Contributor -ServicePrincipalName $ServicePrincipal.ApplicationId
To authenticate to Azure, you also need to obtain your Azure tenant and subscription IDs with Get-AzureRmSubscription.
Run the following PowerShell commands from a PowerShell host after logging into Azure.
$sub = Get-AzureRmSubscription -SubscriptionName "[Enter SubscriptionName]"
$sub.TenantId
$sub.SubscriptionId
You need to use the Azure Tenantid and SubscriptionId values in the Packer Settings file you are creating in the next steps. So save them some somewhere.
Packer Build
We can use Packer to run a local build to create an Azure Virtual Machine image. If we look at the help information from Packer we see that the following commands can be used.
packer --help
Usage: packer [--version] [--help] <command> [<args>]

Available commands are:
    build       build image(s) from template
    fix         fixes templates from old versions of packer
    inspect     see components of a template
    validate    check that a template is valid
    version     Prints the Packer version
For the build step the following arguments are needed.
packer build --help
Usage: packer build [options] TEMPLATE

  Will execute multiple builds in parallel as defined in the template.
  The various artifacts created by the template will be outputted.

Options:

  -color=false                  Disable color output. (Default: color)
  -debug                        Debug mode enabled for builds.
  -except=foo,bar,baz           Build all builds other than these.
  -only=foo,bar,baz             Build only the specified builds.
  -force                        Force a build to continue if artifacts exist, deletes existing artifacts.
  -machine-readable             Produce machine-readable output.
  -on-error=[cleanup|abort|ask] If the build fails do: clean up (default), abort, or ask.
  -parallel=false               Disable parallelization. (Default: parallel)
  -timestamp-ui                 Enable prefixing of each ui output with an RFC3339 timestamp.
  -var 'key=value'              Variable for templates, can be used multiple times.
  -var-file=path                JSON file containing user variables.
The packer build command takes a template and runs all the builds within it in order to generate a set of artifacts. The various builds specified within a template are executed in parallel, unless otherwise specified. And the artifacts that are created will be outputted at the end of the build.
Packer build needs at the minimum two files, a Packer settings file (-var-file) and JSON template file. Templates are JSON files that configure the various components of Packer in order to create one or more machine images. Templates are portable, static, and readable and writable by both humans and computers.
Example Packer Settings file (packersettings.json)
{
    "client_id": "[Enter Application Id of Service Principal]",
    "client_secret": "[Enter Password Service Principal]",
    "tenant_id": "[Enter the Subscription Tenant ID]",
    "subscription_id": "[Enter Subscription ID]",
    "location": "[Enter Location of Resource Group. Example 'WestEurope']",
    "managed_image_resource_group_name": "[Enter Resource Group Name where to store the Azure Virtual Machine image]",
    "managed_image_name": "[Enter Azure Virtual Machine Image name. Example 'windows-image']"
}
Save and update the packersettings.json file with your configurations in c:\temp folder.
Example Simple Azure Virtual Machine template (simple-windows.json)
{
    "variables": {
        "client_id": "",
        "client_secret": "",
        "subscription_id": "",
        "tenant_id": "",
        "object_id": "",
        "location": "",
        "managed_image_resource_group_name": "",
        "managed_image_name": ""
    },
    "builders": [{
        "type": "azure-arm",
        "client_id": "",
        "client_secret": "",
        "subscription_id": "",
        "object_id": "",
        "tenant_id": "",
        "location": "",
        "vm_size": "",
        "managed_image_resource_group_name": "",
        "managed_image_name": "",
        "os_type": "Windows",
        "image_publisher": "MicrosoftWindowsServer",
        "image_offer": "WindowsServer",
        "image_sku": "2016-Datacenter",
        "communicator": "winrm",
        "winrm_use_ssl": "true",
        "winrm_insecure": "true",
        "winrm_timeout": "4h",
        "winrm_username": "packer"
    }],
    "provisioners": [{
        "type": "powershell",
        "inline": [
            "if( Test-Path $Env:SystemRoot\\windows\\system32\\Sysprep\\unattend.xml ){ rm $Env:SystemRoot\\windows\\system32\\Sysprep\\unattend.xml -Force}",
            "& $env:SystemRoot\\System32\\Sysprep\\Sysprep.exe /oobe /generalize /quiet /quit",
            "while($true) { $imageState = Get-ItemProperty HKLM:\\SOFTWARE\\Microsoft\\Windows\\CurrentVersion\\Setup\\State | Select ImageState; if($imageState.ImageState -ne 'IMAGE_STATE_GENERALIZE_RESEAL_TO_OOBE') { Write-Output $imageState.ImageState; Start-Sleep -s 10  } else { break } }"
        ]
    }]
}
Save above simple-server.json file in c:\temp folder.
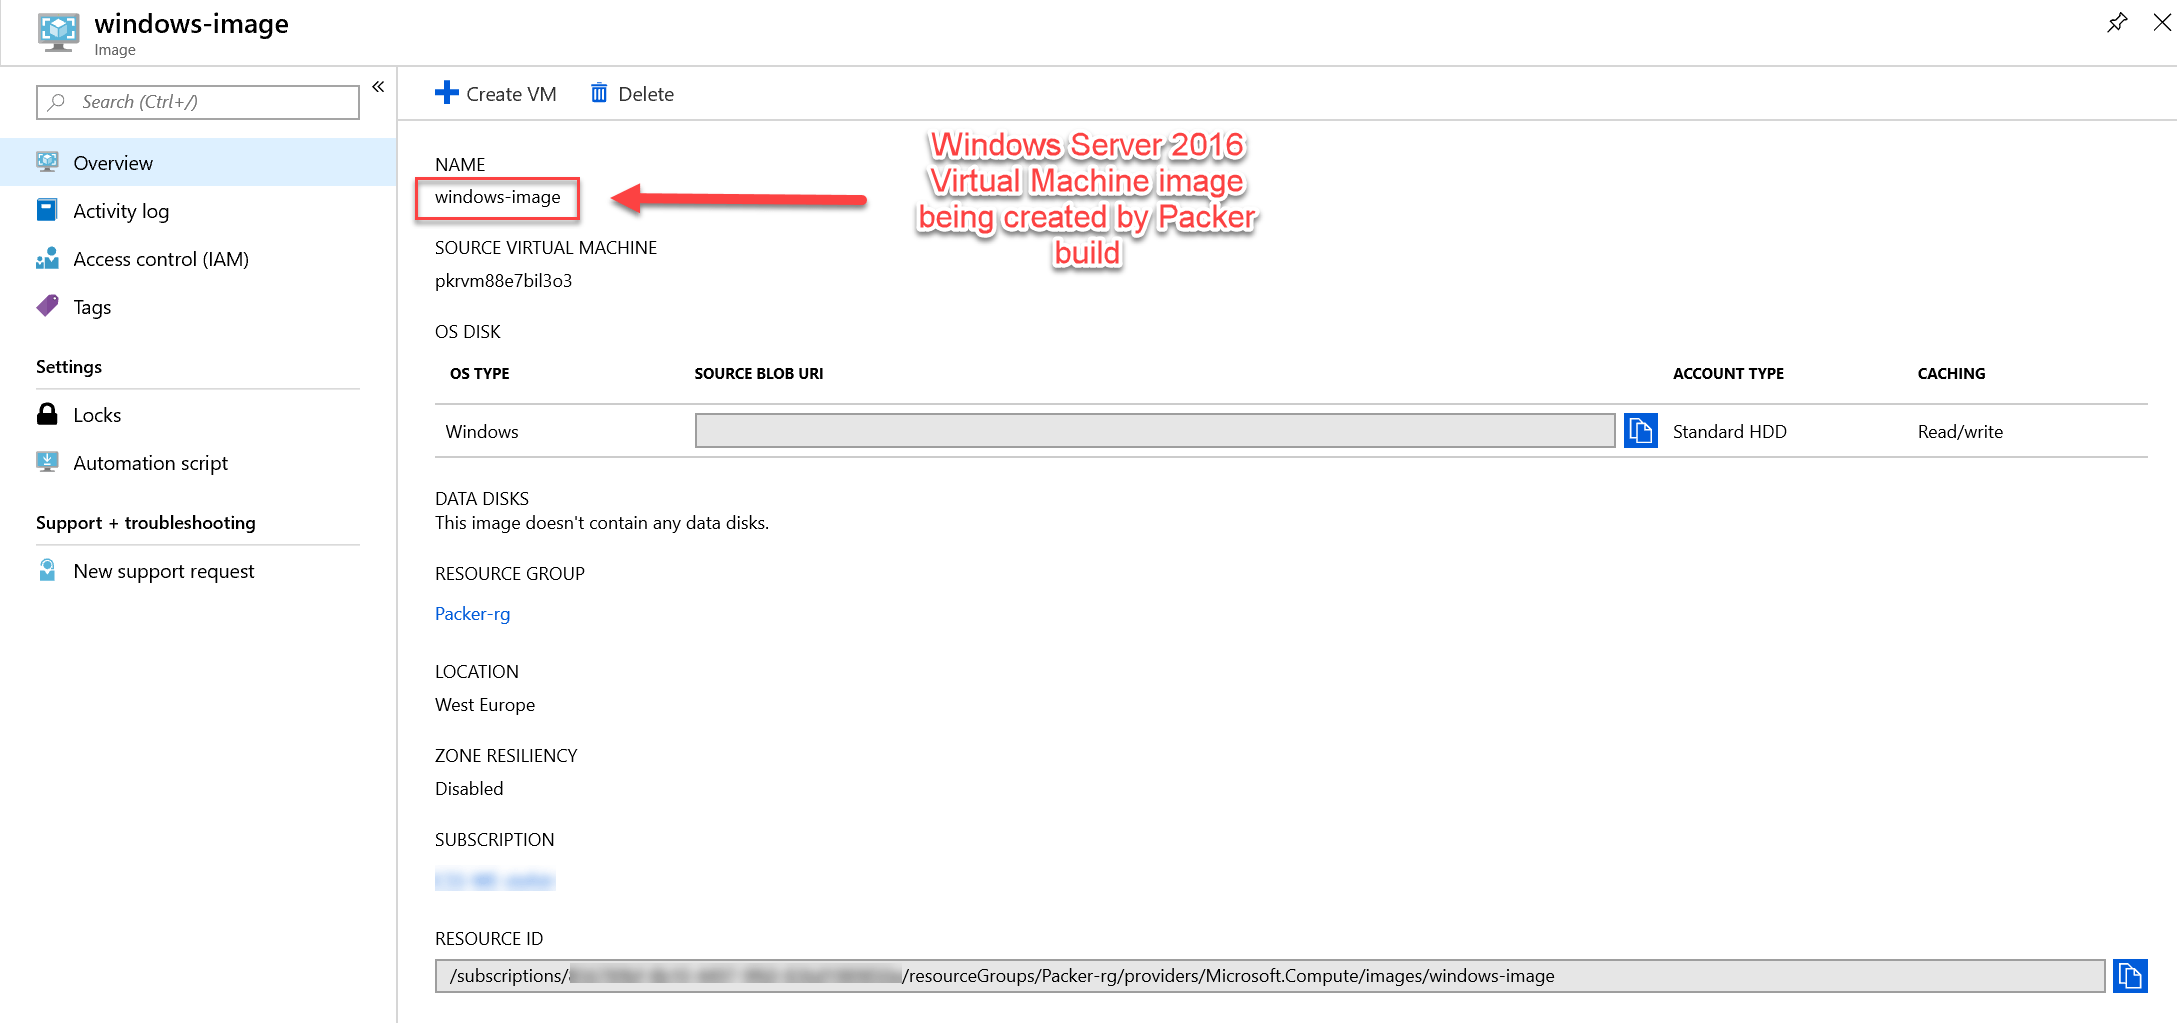
With this Packer Template file a Windows Server 2016 Azure Virtual Machine image is being created.
To build and deploy this Windows Server 2016 Virtual Image to Azure run the following Packer build command from your PowerShell host.
packer build -debug -on-error=ask -var-file=C:\temp\packersettings.json C:\temp\simple-windows.json
Using the debug and on-error parameters you get some more overview of the Packer build and deployment steps in Azure.
Be patient it can take up to 20 minutes before the Windows Server 2016 Azure Virtual Image is being created.
If everything works as expected you would see the following Virtual Image created in your configured Azure Resource Group.
Create Windows Server 2016 from Azure Virtual Machine Image
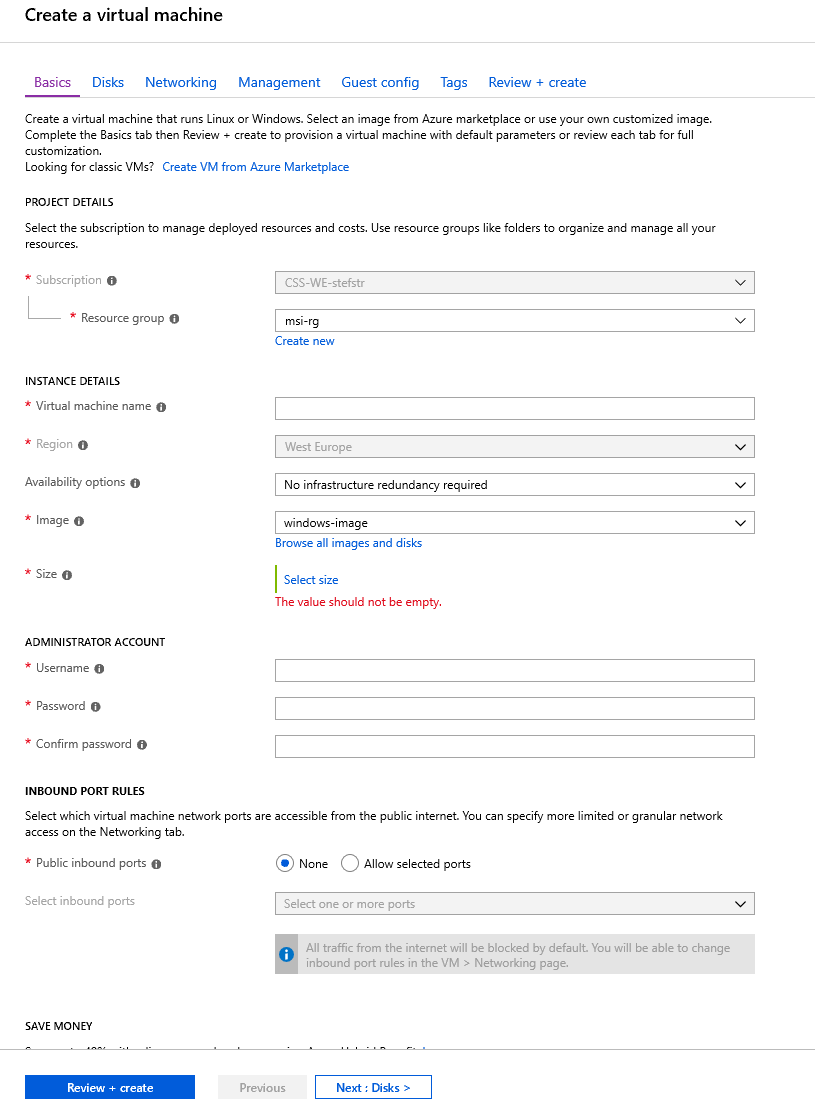
From the Azure Virtual Machine image create an Azure Virtual Machine by selecting create VM in the Virtual Image Pane and go through the configuration options.
| Remarks |
|---|
| When selecting a VM Size make sure you have enough RAM (1 GB RAM is not enough) |
| To be able to install the Azure DevOps Agent manually, enable RDP as Public inbound port. Please be aware that this port will be exposed to the inter |
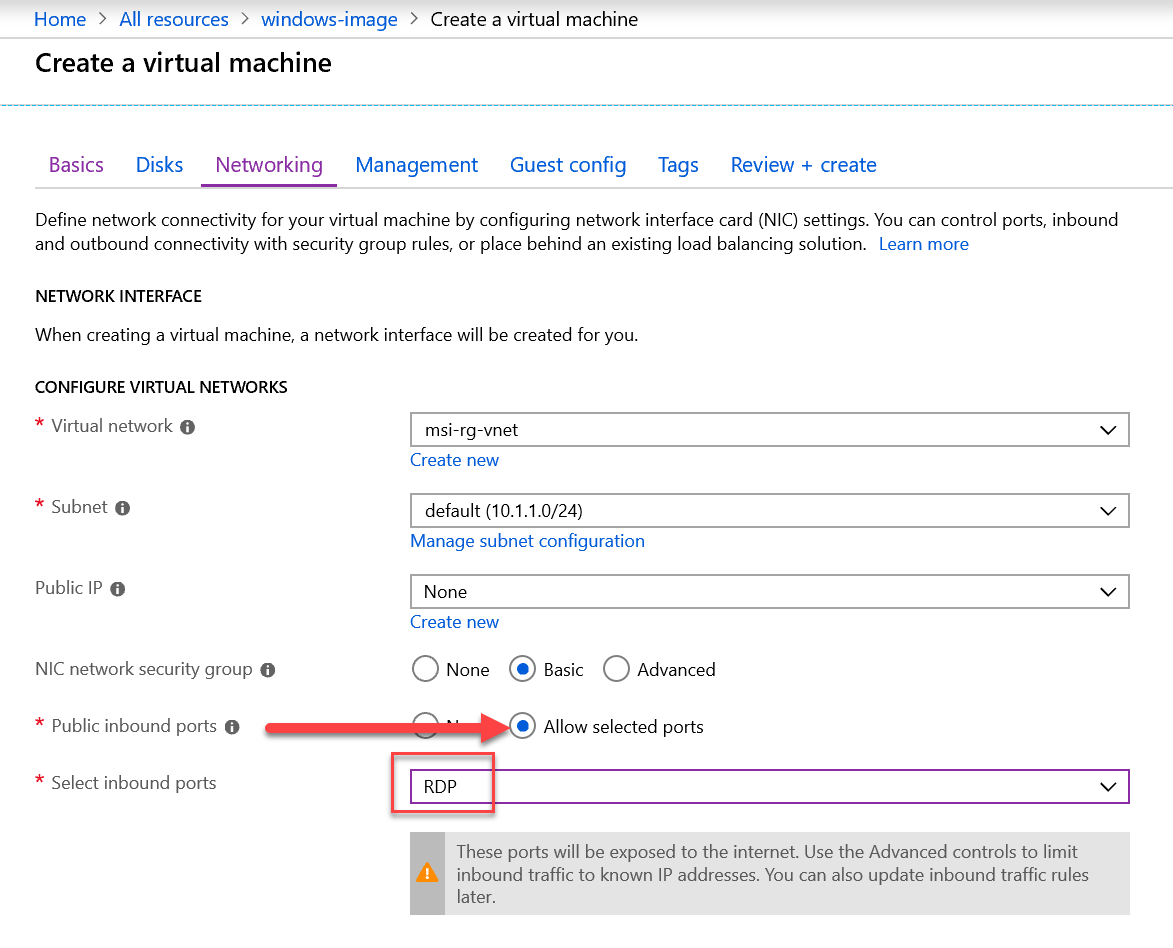
The end result should be a Windows Server 2016 Azure Virtual Machine in your Resource Group.
Install the Azure DevOps Agent
We are manually going to install the Azure DevOps Agent on the Virtual Machine deployed in the previous steps.
Before continuing check the prerequisites for the Self-hosted Windows Agents. For now you should be good to go.
For configuring the Azure DevOps Agent we need to have a Personal Access Token (PAT) from the Azure DevOps Project where we want to use the private Build Agents.
Follow the steps documented here to create the PAT.
Connect to Azure Virtual Machine and install Azure DevOps Agent
In the next step we are going to install the Azure DevOps Agent manually by connecting to the Azure Virtual Machine via RDP.
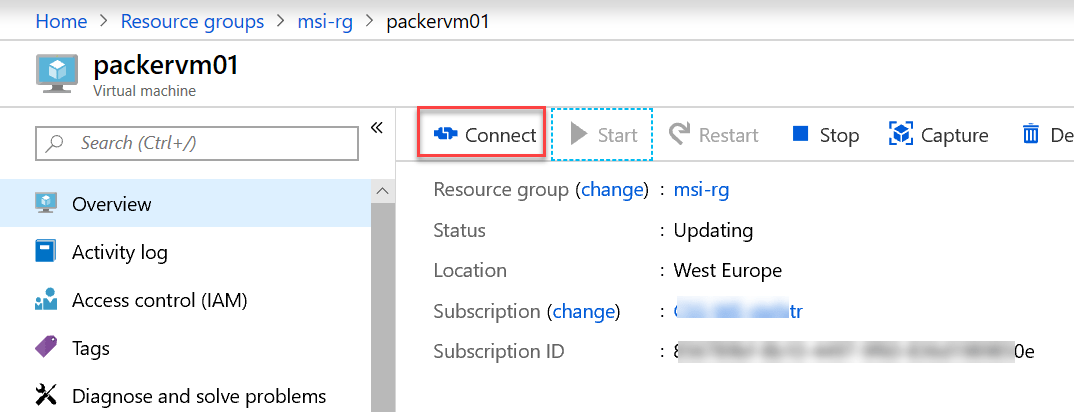
Select the Connect button in the Azure Portal to connect to the Azure Virtual Machine.
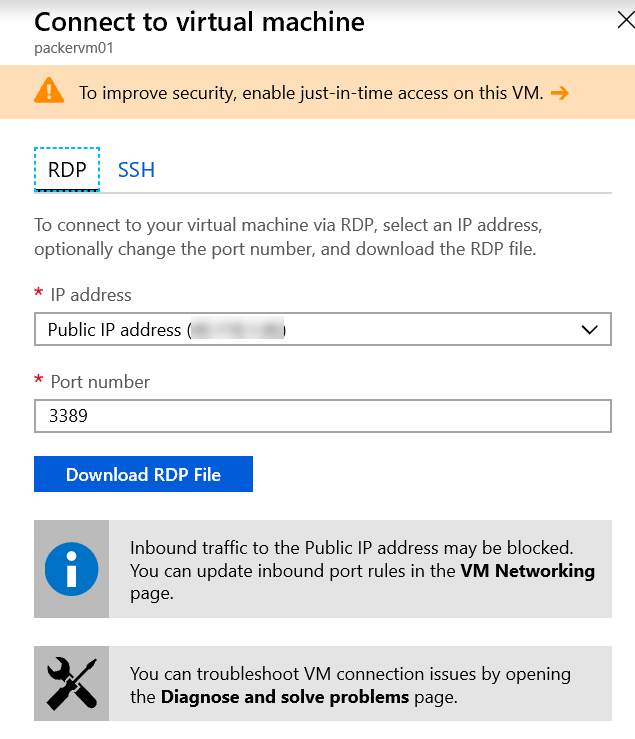
Download the RDP file and connect with the useraccount and password you configured earlier.
- In your web browser, sign in to Azure Pipelines, and navigate to the Agent pools tab:
- Azure Pipelines: https://dev.azure.com/{your_organization}/_admin/_AgentPool
-
Click Download agent.
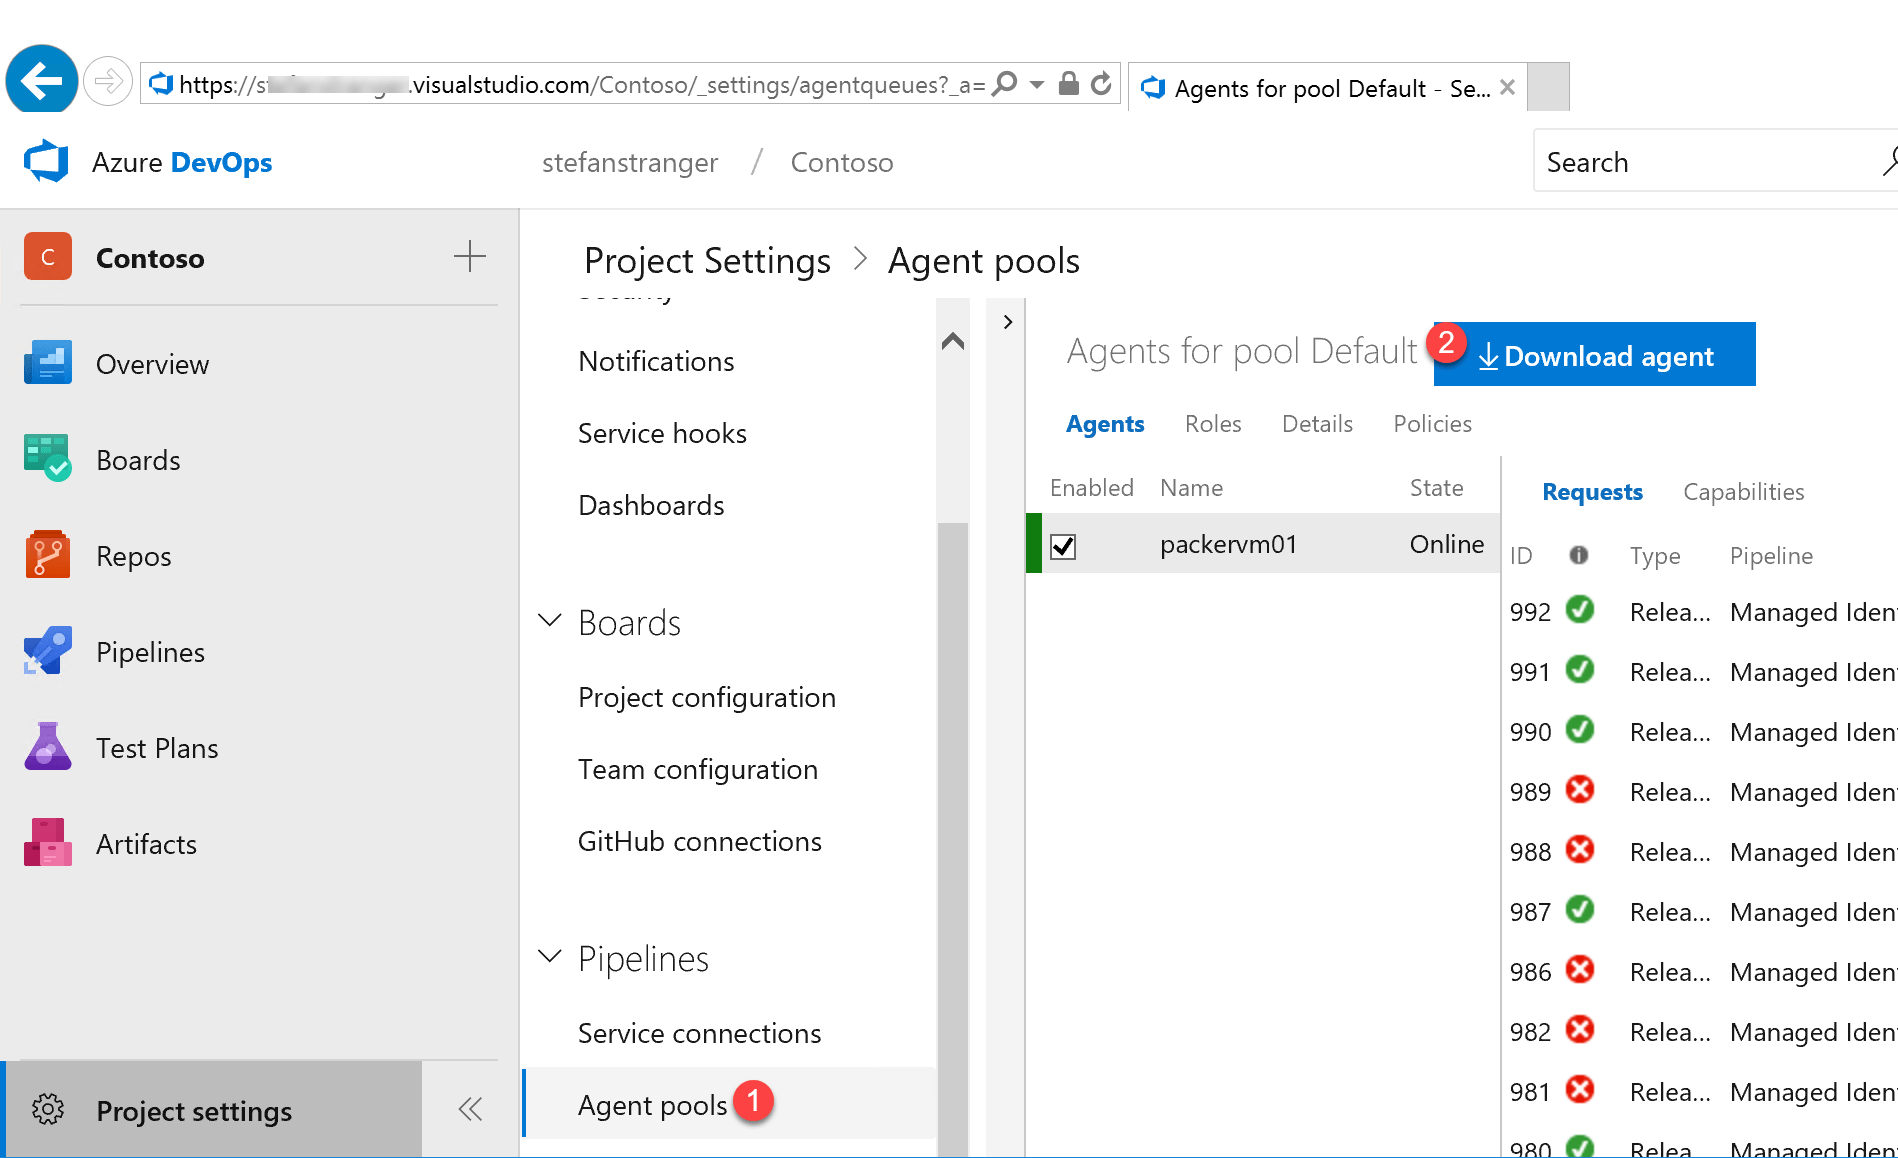
- On the Get agent dialog box, click Windows.
- On the left pane, select the processor architecture of your machine (x86 or x64).
- On the right pane, click the Download button.
- Follow the instructions on the page to download the agent.
-
Unpack the agent into the directory of your choice. Then run config.cmd.
Make sure you have the Azure DevOps Server URL and Personal Access Token available when running the config.cmd on the Azure Virtual Machine.
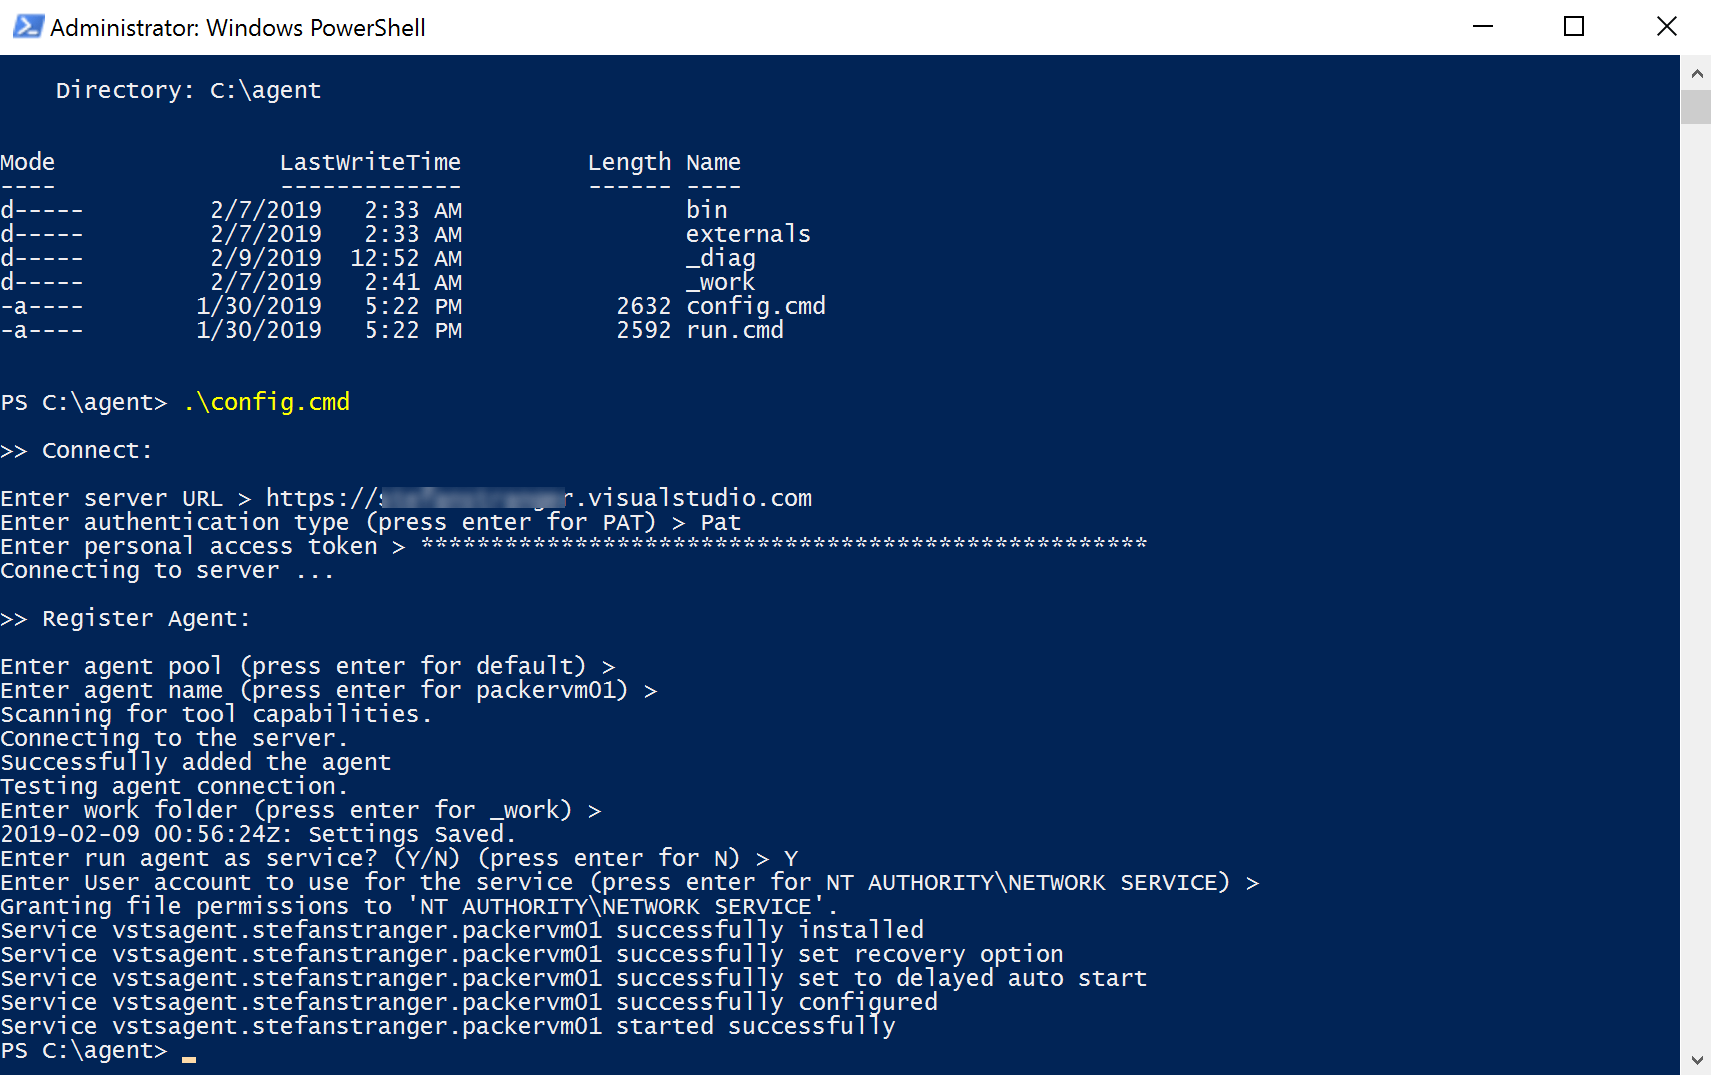
Install Azure AZ PowerShell modules on Self-Hosted Agent in Azure. We need these modules for the PowerShell Task script we want to run in the Azure DevOps Pipelines.
| Remark |
|---|
| At the moment of writing this blog article the Azure PowerShell Tasks didn’t support PowerShell AZ Modules yet. So we need to authenticate against Azure within the PowerShell script used in the PowerShell task. |
Run the following PowerShell command on the Self-Hosted Agent Azure Virtual Machine.
Install-Module -Name Az -Scope AllUsers
We are going to use the Azure Az PowerShell modules within the PowerShell Tasks of the Azure DevOps Pipelines.
Step 3. Enable Managed Identity on Azure Virtual Machine
Go to the Azure Portal and go the Windows Virtual Machine you deployed in step 2. and select Identity and change the status to on.

If you copy the Object ID you can the check the Principal Key Credentials with PowerShell.
Get-AzureADServicePrincipalKeyCredential -ObjectId "[Enter Object ID]" -OutVariable MICredential
New-TimeSpan -Start $MICredential.StartDate -End $MICredential.EndDate | Select Days
| Remark |
|---|
| I didn’t use the Get-AzADServicePrincipal from the Az.Resources PowerShell module because this returns less information than the Get-AzureADServicePrincipalKeyCredential. |
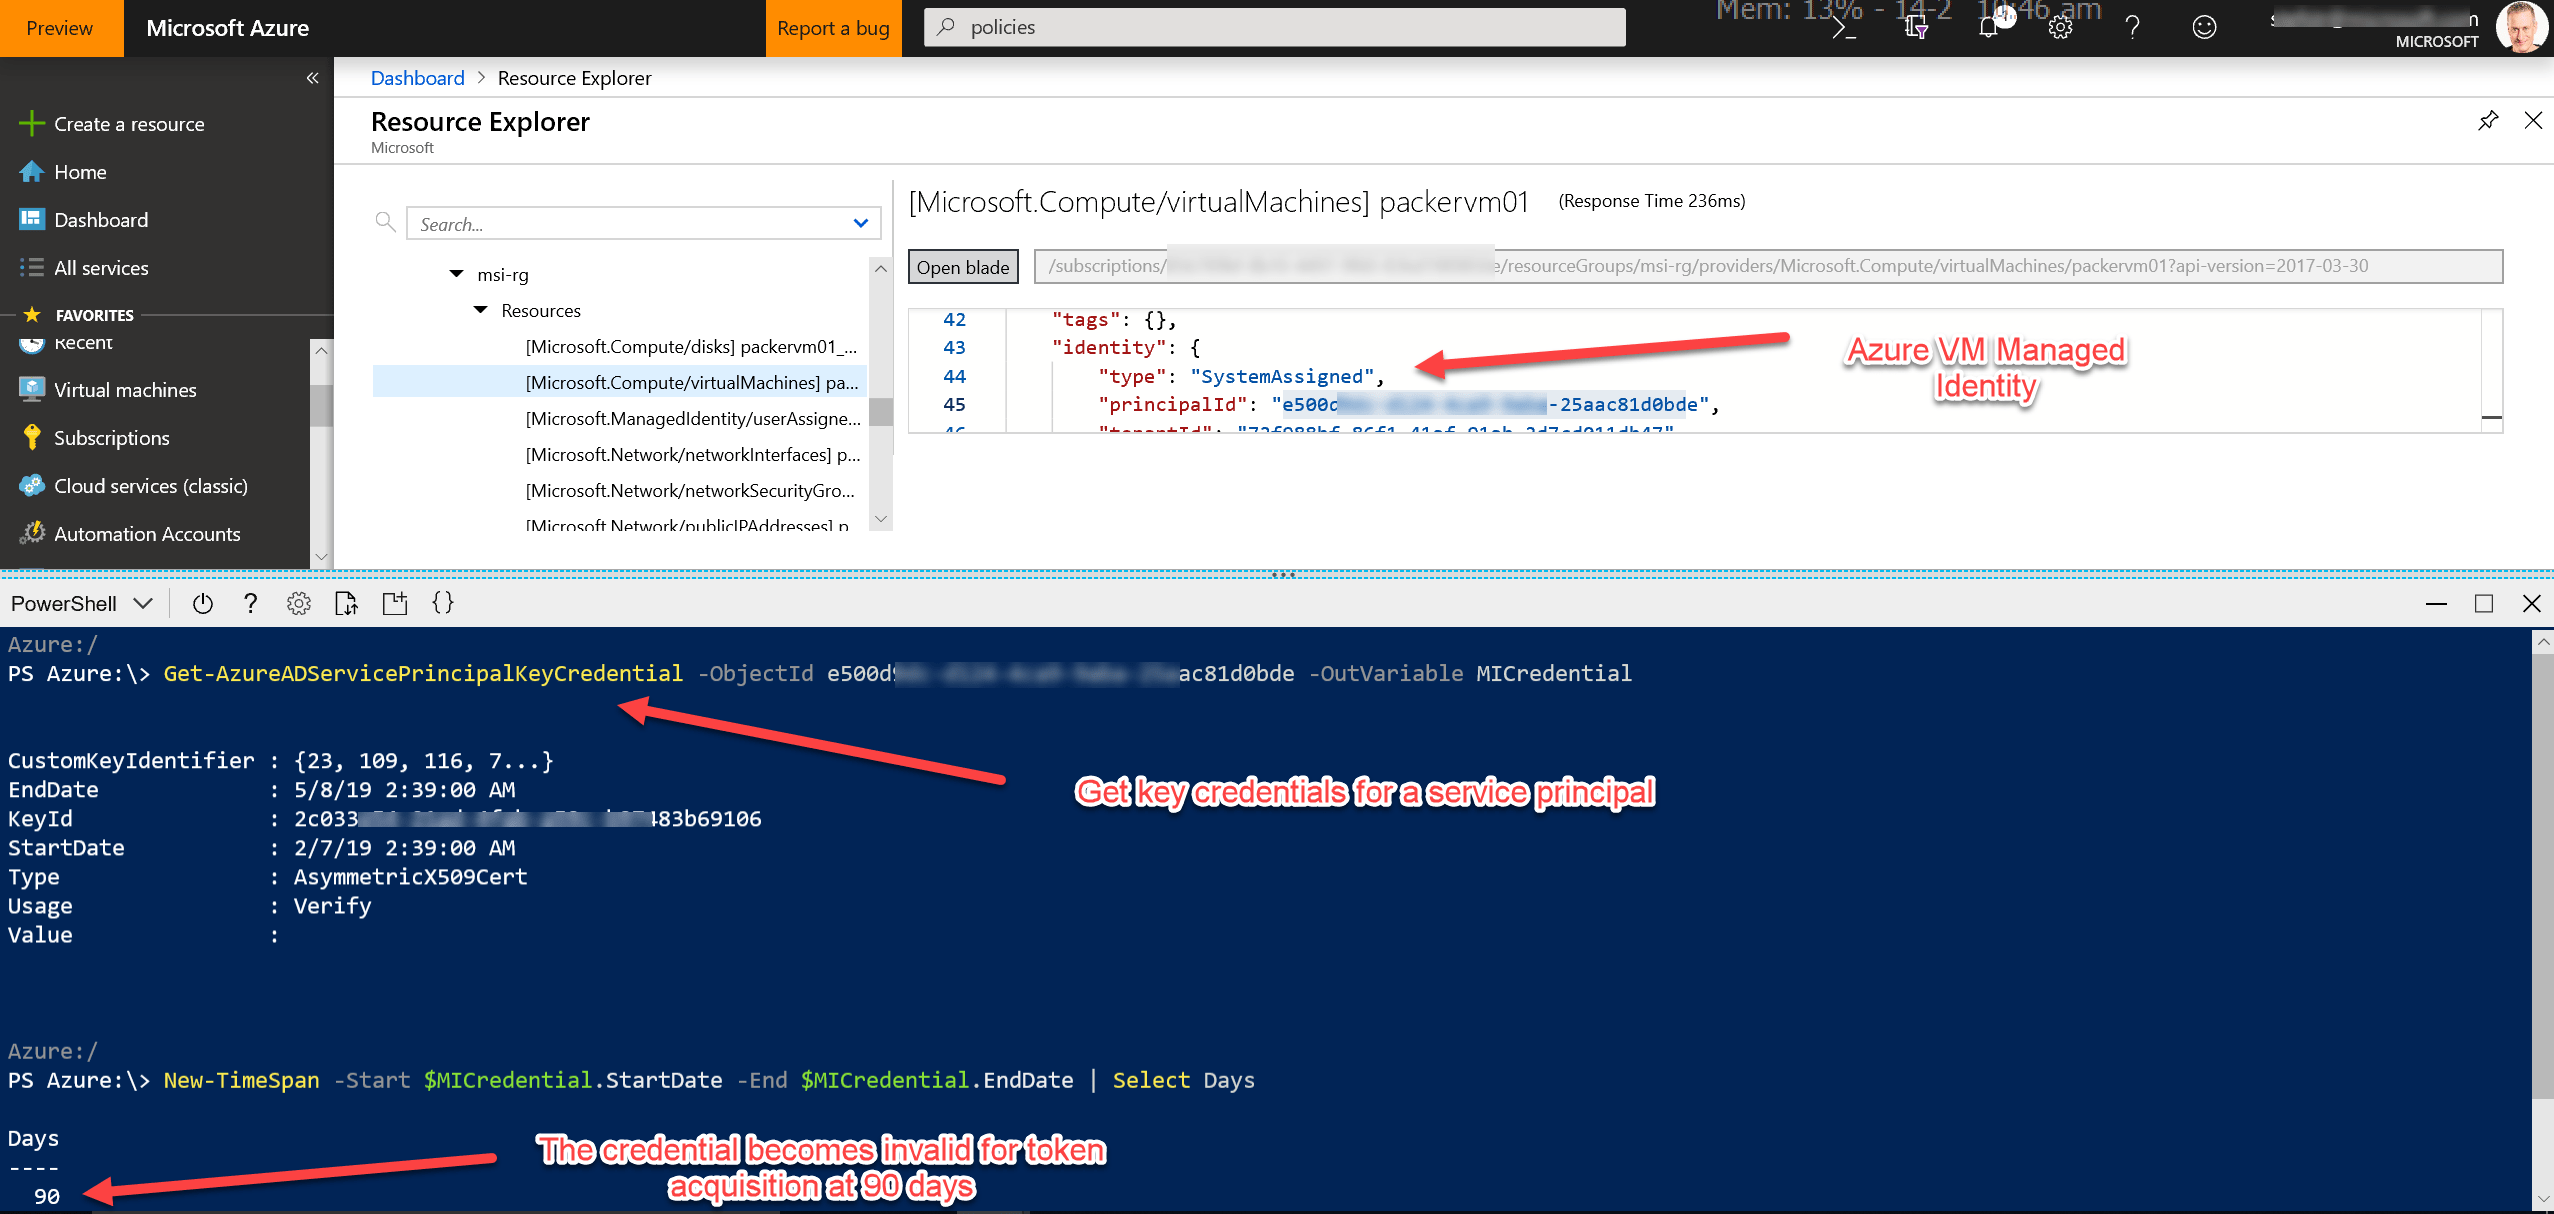
Step 4. Authorize the Managed Identity
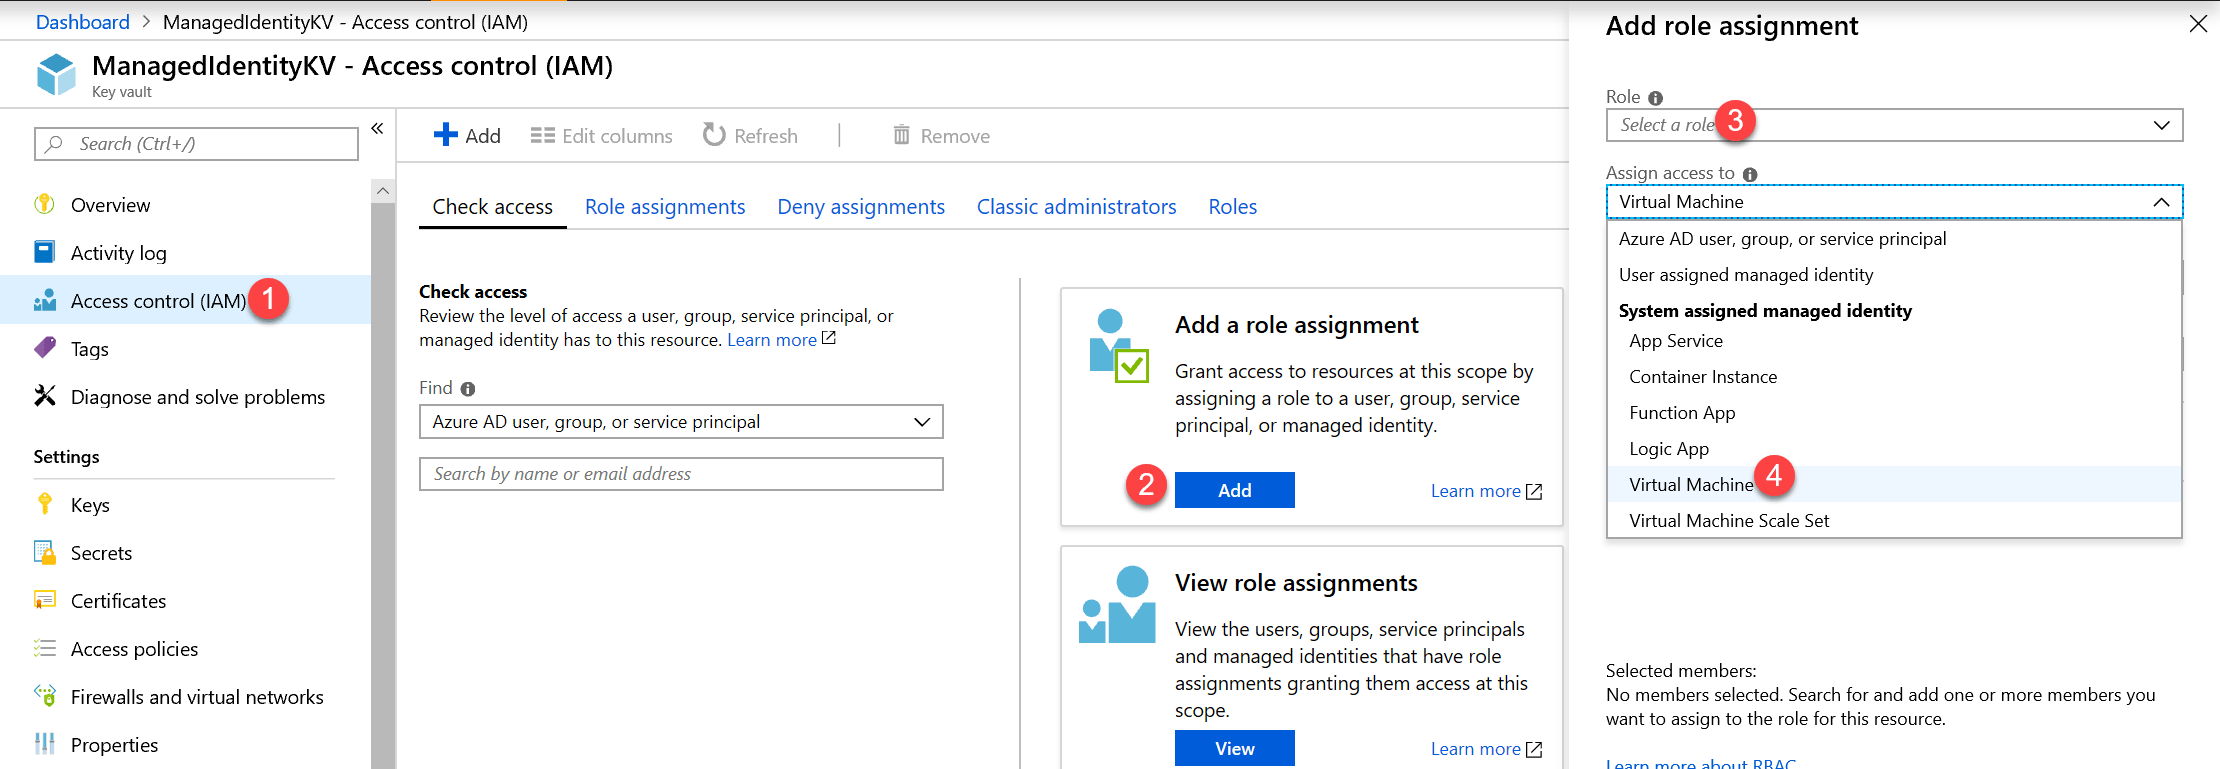
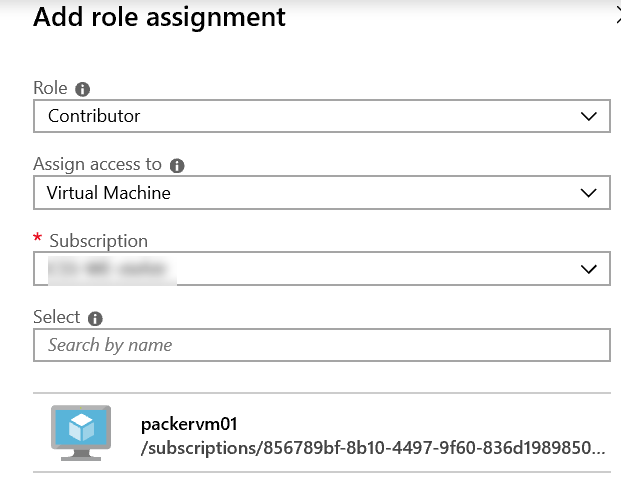
We are authorizing the Virtual Machine Identity on an already existing Key Vault located in another Resource Group then where the Virtual Machine is deployed.
Go to the Key Vault Resource in the Azure Portal and authorize the Managed Identity.
Step 5. Configure the Managed Identity Service Connection in your pipelines
In the last step we are going to create a Release Pipeline using the self-hosted Windows Virtual Machine configured as Managed Identity.
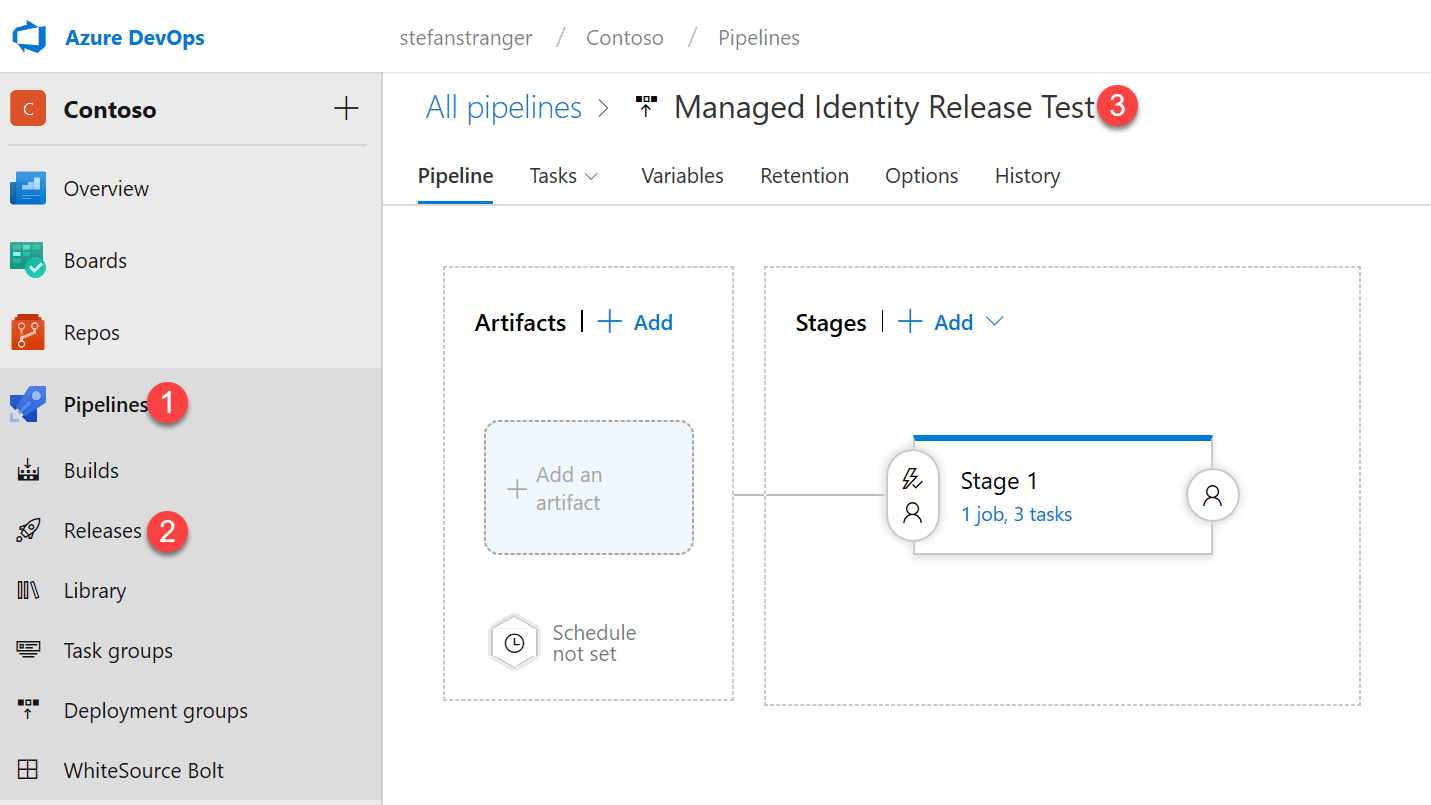
Go to your Azure DevOps Project and select Releases under Pipelines and create a new Release.
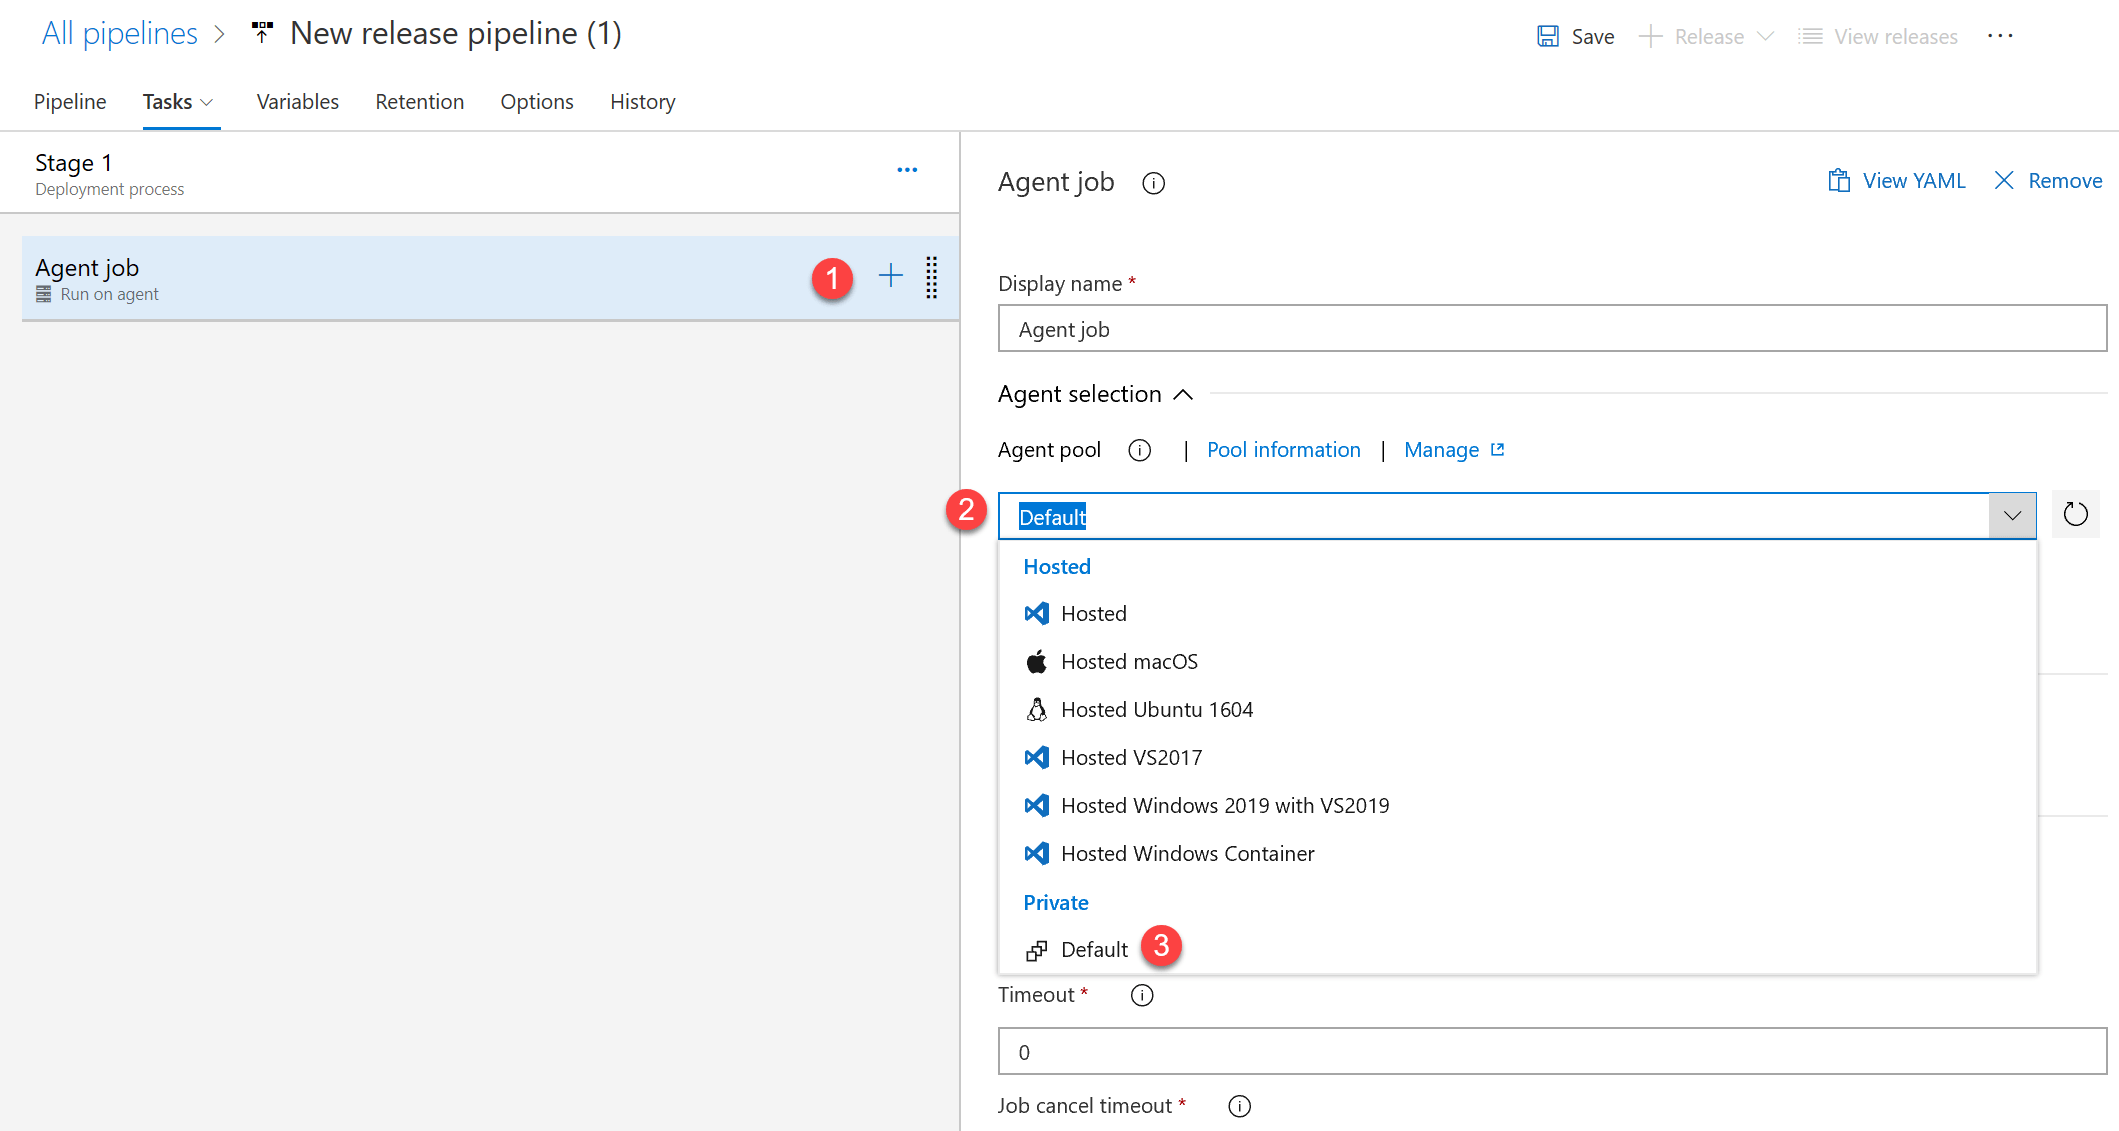
Configure the Agent job to use the Private (Default) Agent Pool.
Add a PowerShell Task to run a PowerShell script on the self-hosted Windows Virtual Machine.
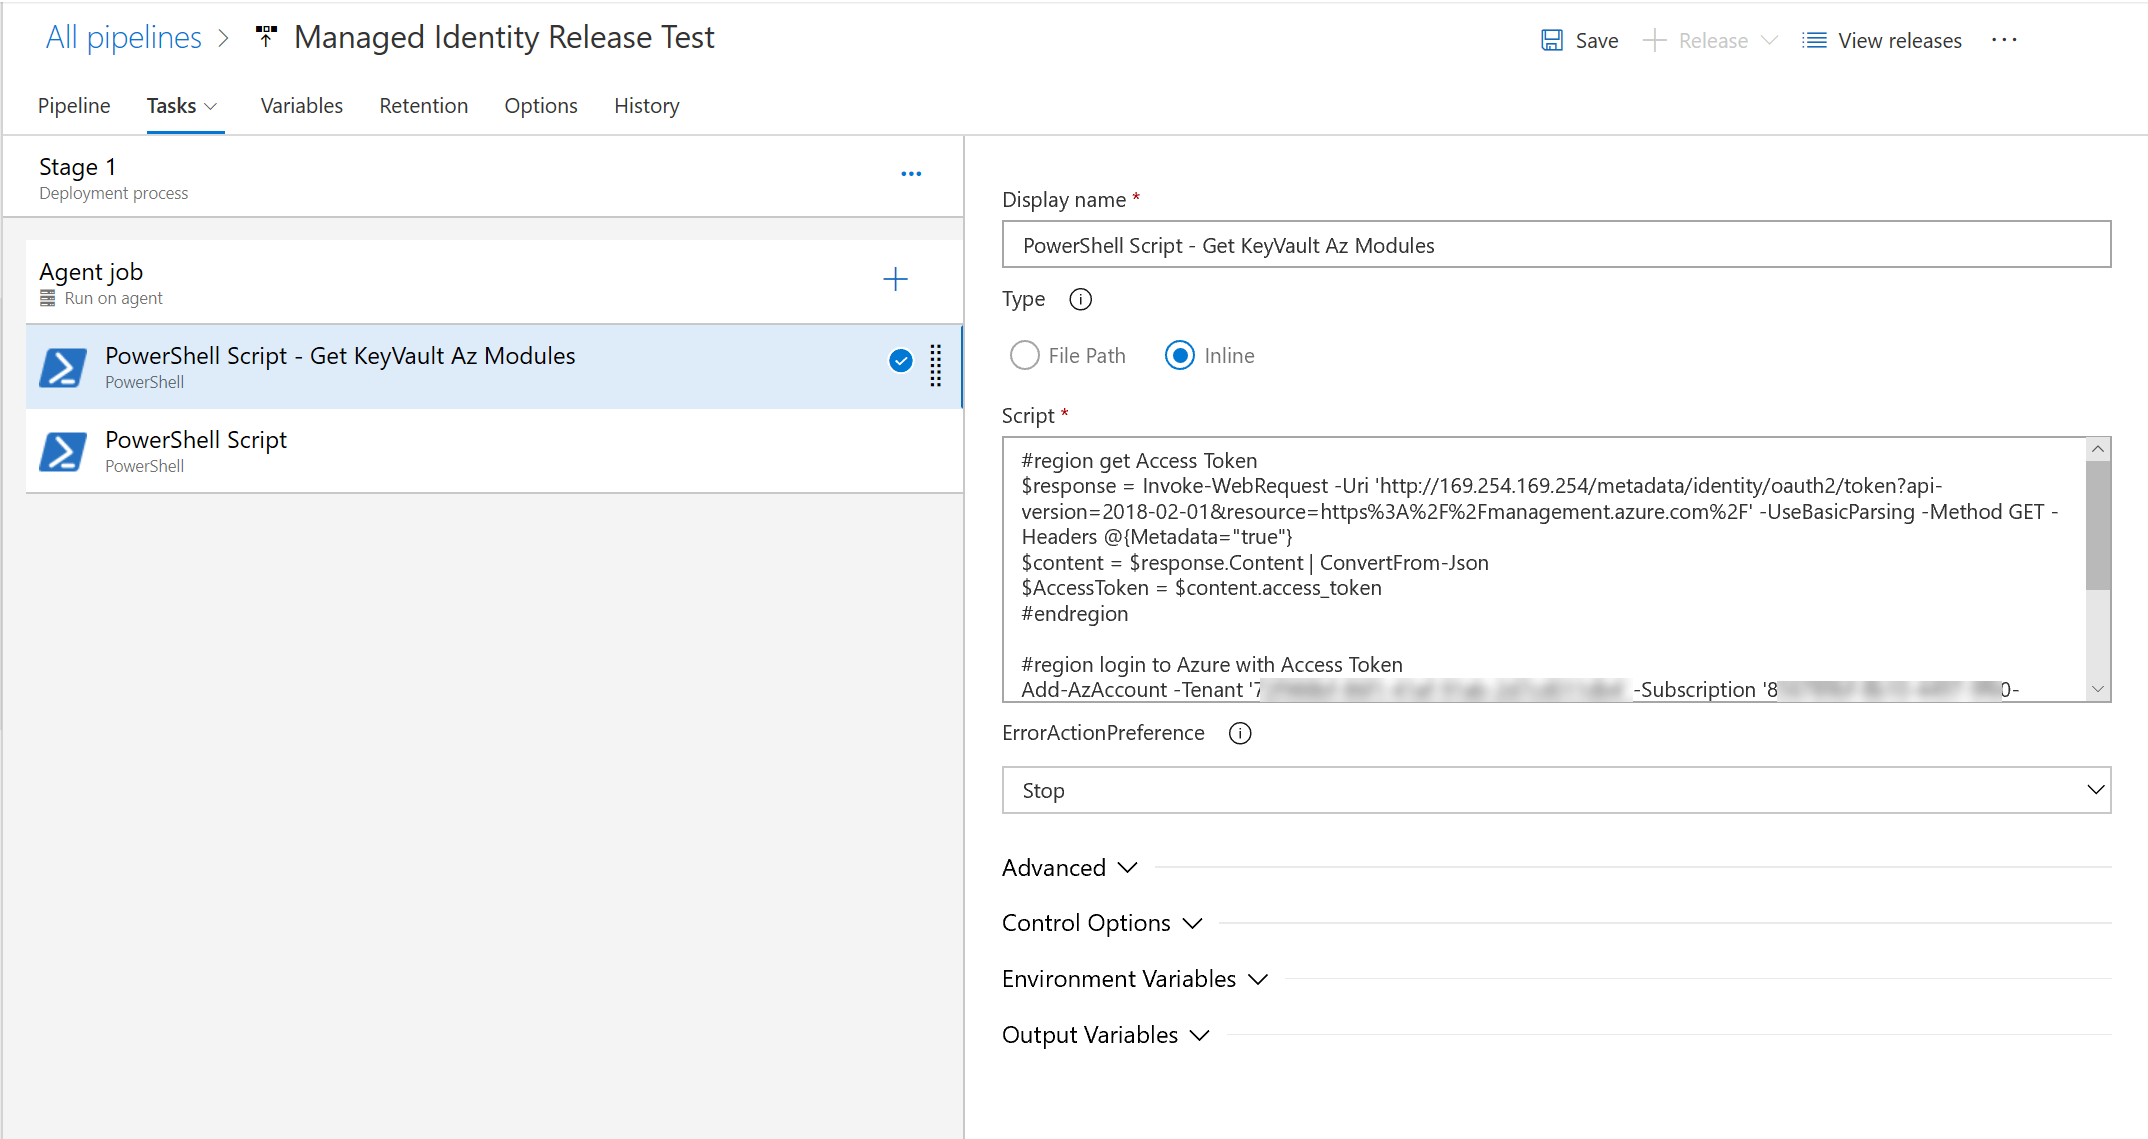
With this task we are going to retrieve the properties for the Key Vault for which we authenticated the Managed Identity.
Use the following PowerShell script:
#region get Access Token
$response = Invoke-WebRequest -Uri 'http://169.254.169.254/metadata/identity/oauth2/token?api-version=2018-02-01&resource=https%3A%2F%2Fmanagement.azure.com%2F' -UseBasicParsing -Method GET -Headers @{Metadata="true"}
$content = $response.Content | ConvertFrom-Json
$AccessToken = $content.access_token
#endregion

#region login to Azure with Access Token
Add-AzAccount -Tenant '[Enter tenantid]' -Subscription '[Enter SubscriptionId]' -KeyVaultAccessToken $AccessToken -AccessToken $AccessToken -AccountId 'ManagedIdentity;'
#endregion

#region Get Key Vault Resource
Get-AzKeyVault -VaultName "[Enter Key Vault Name]"" -ResourceGroupName "[Enter Resource Group Name where Key Vault is stored]"
#endregion
Azure Instance Metadata Service
To retrieve the Managed Identity Access Token I used the Azure Instance Metadata Service.
The Azure Instance Metadata Service provides information about running virtual machine instances that can be used to manage and configure your virtual machines. This includes information such as SKU, network configuration, and upcoming maintenance events. For more information on what type of information is available, see metadata categories.
Azure’s Instance Metadata Service is a REST Endpoint accessible to all IaaS VMs created via the Azure Resource Manager. The endpoint is available at a well-known non-routable IP address (169.254.169.254) that can be accessed only from within the VM.
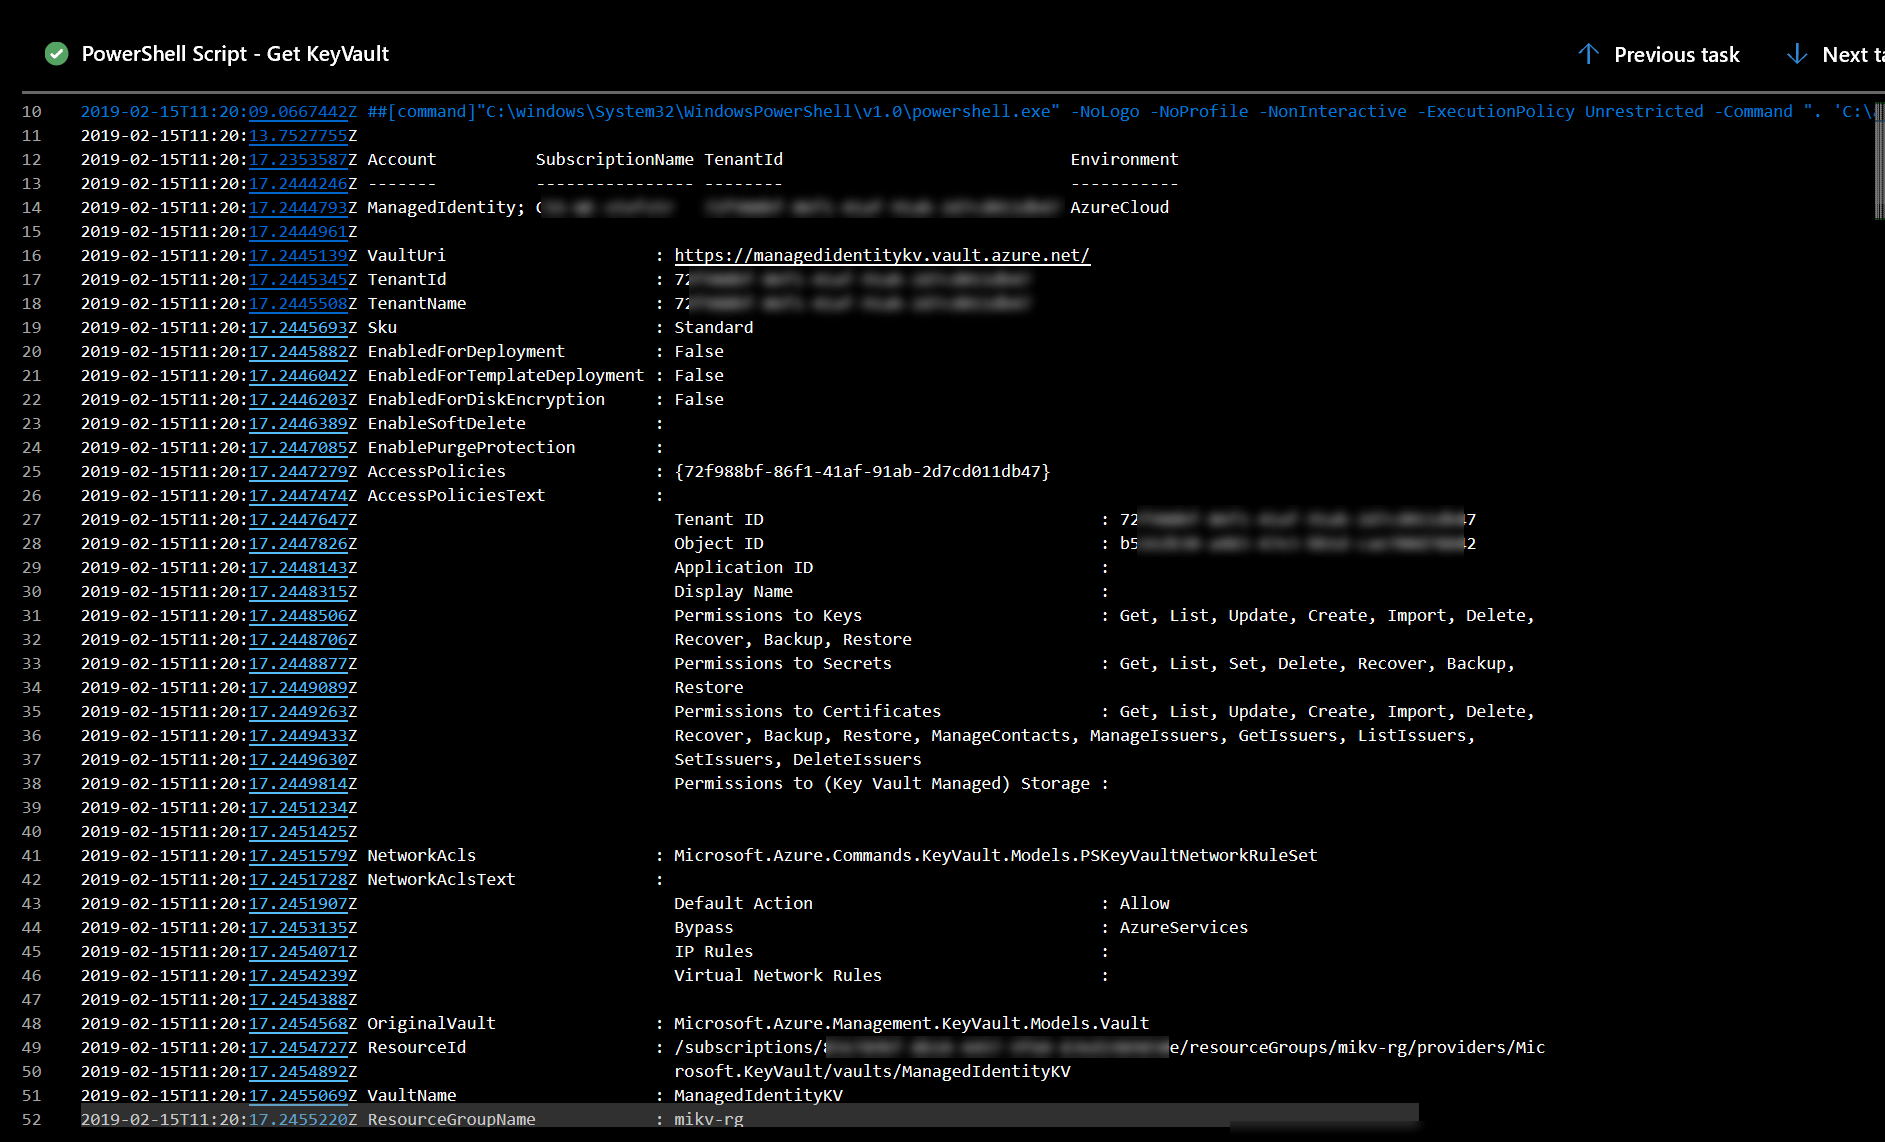
When we run the release with this task we should be able to retrieve the properties of the Key Vault.
If we want to get some more information about the Access Token we can use the PowerShell psjwt Module.
We can use this module in a PowerShell Task in our Release Pipeline. Create a new PowerShell task in your Release Pipeline.
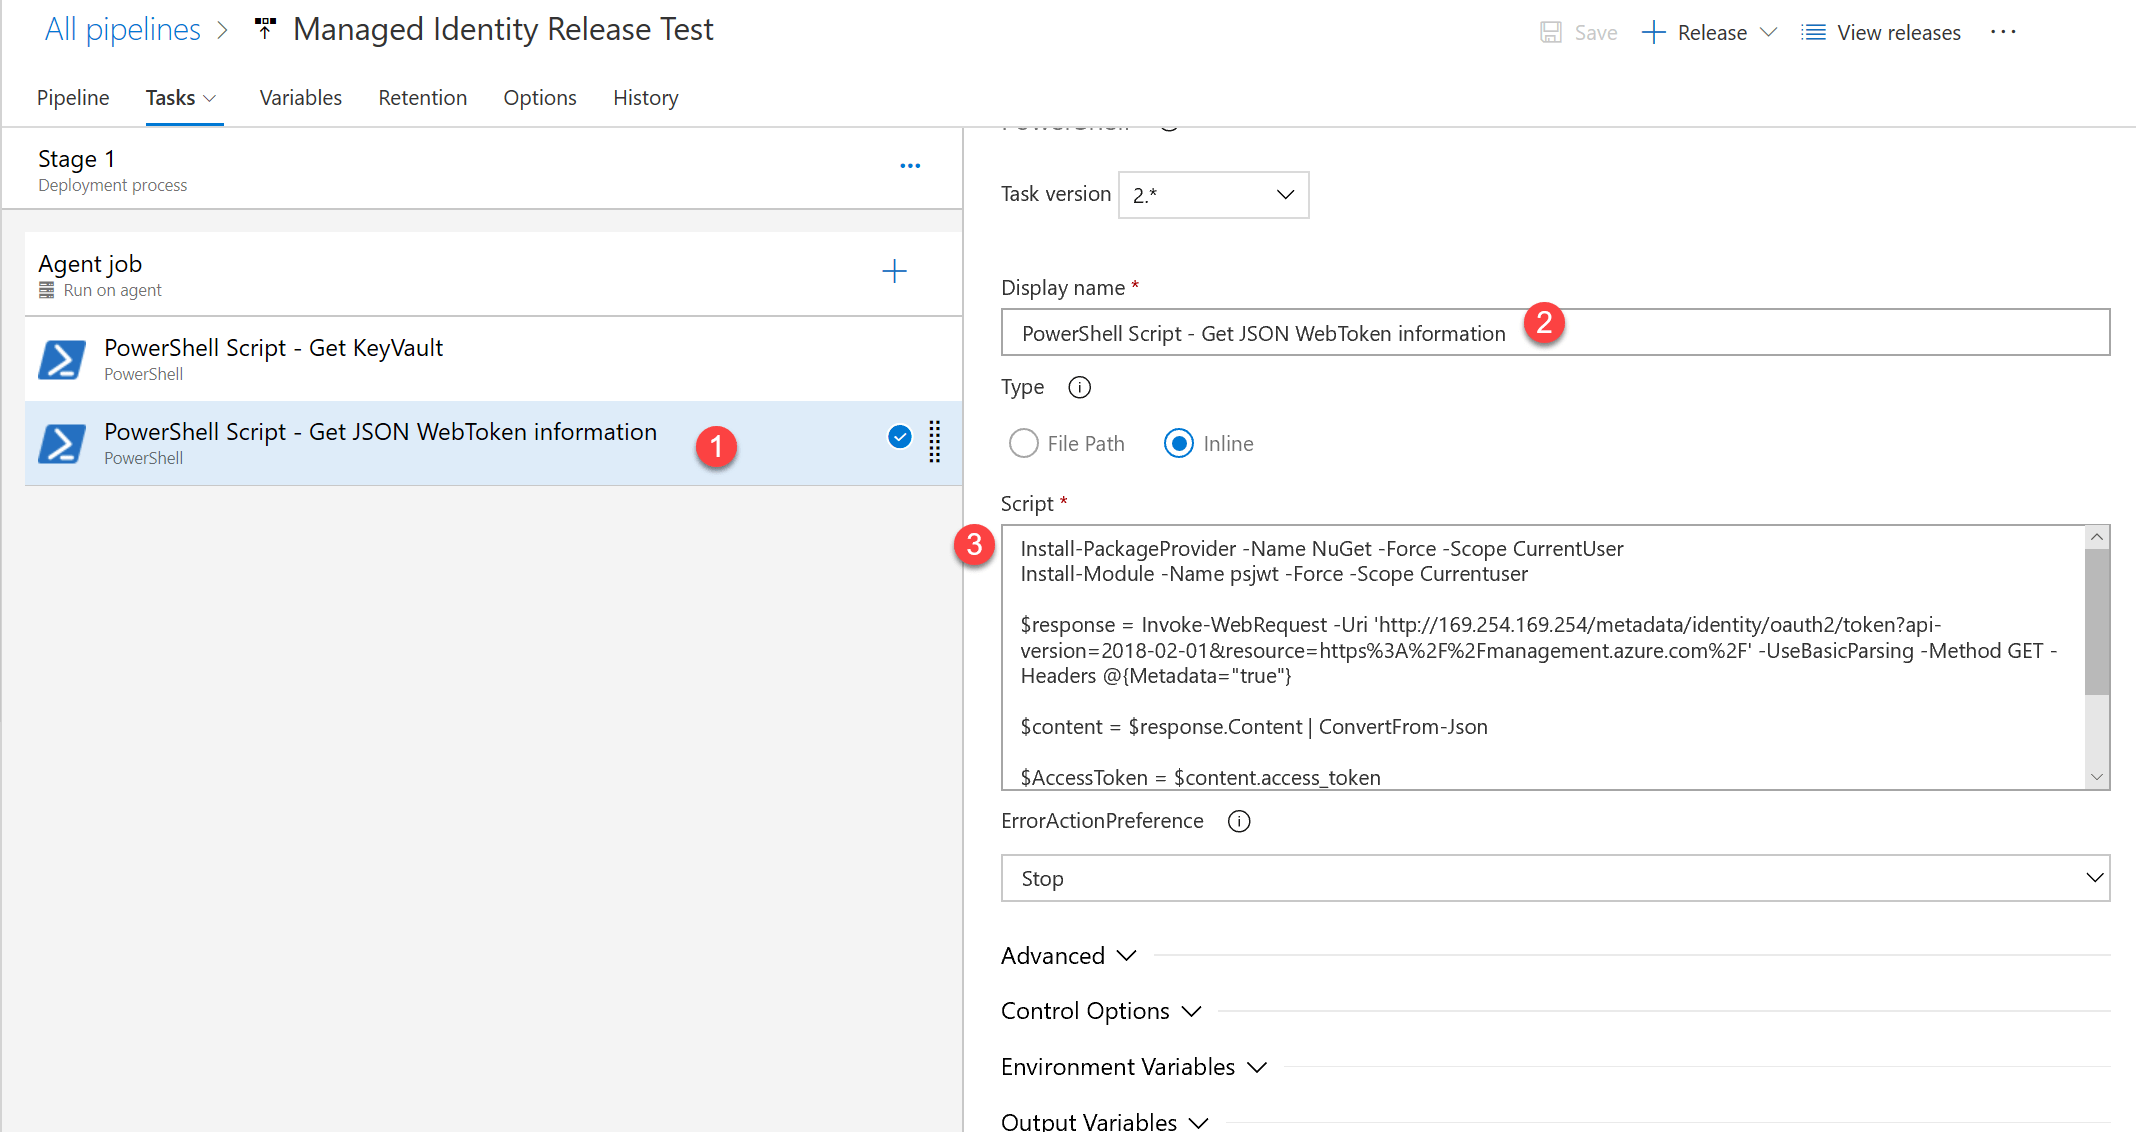
Use the following PowerShell code as inline script:
#region install psjwt module from PSGallery
Install-PackageProvider -Name NuGet -Force -Scope CurrentUser
Install-Module -Name psjwt -Force -Scope Currentuser
#endregion

#region retrieve Access Token
$response = Invoke-WebRequest -Uri 'http://169.254.169.254/metadata/identity/oauth2/token?api-version=2018-02-01&resource=https%3A%2F%2Fmanagement.azure.com%2F' -UseBasicParsing -Method GET -Headers @{Metadata="true"}

$content = $response.Content | ConvertFrom-Json

$AccessToken = $content.access_token
#endregion

#region Convert JWT Access Token
Convertfrom-Jwt -Token $AccessToken
#endregion
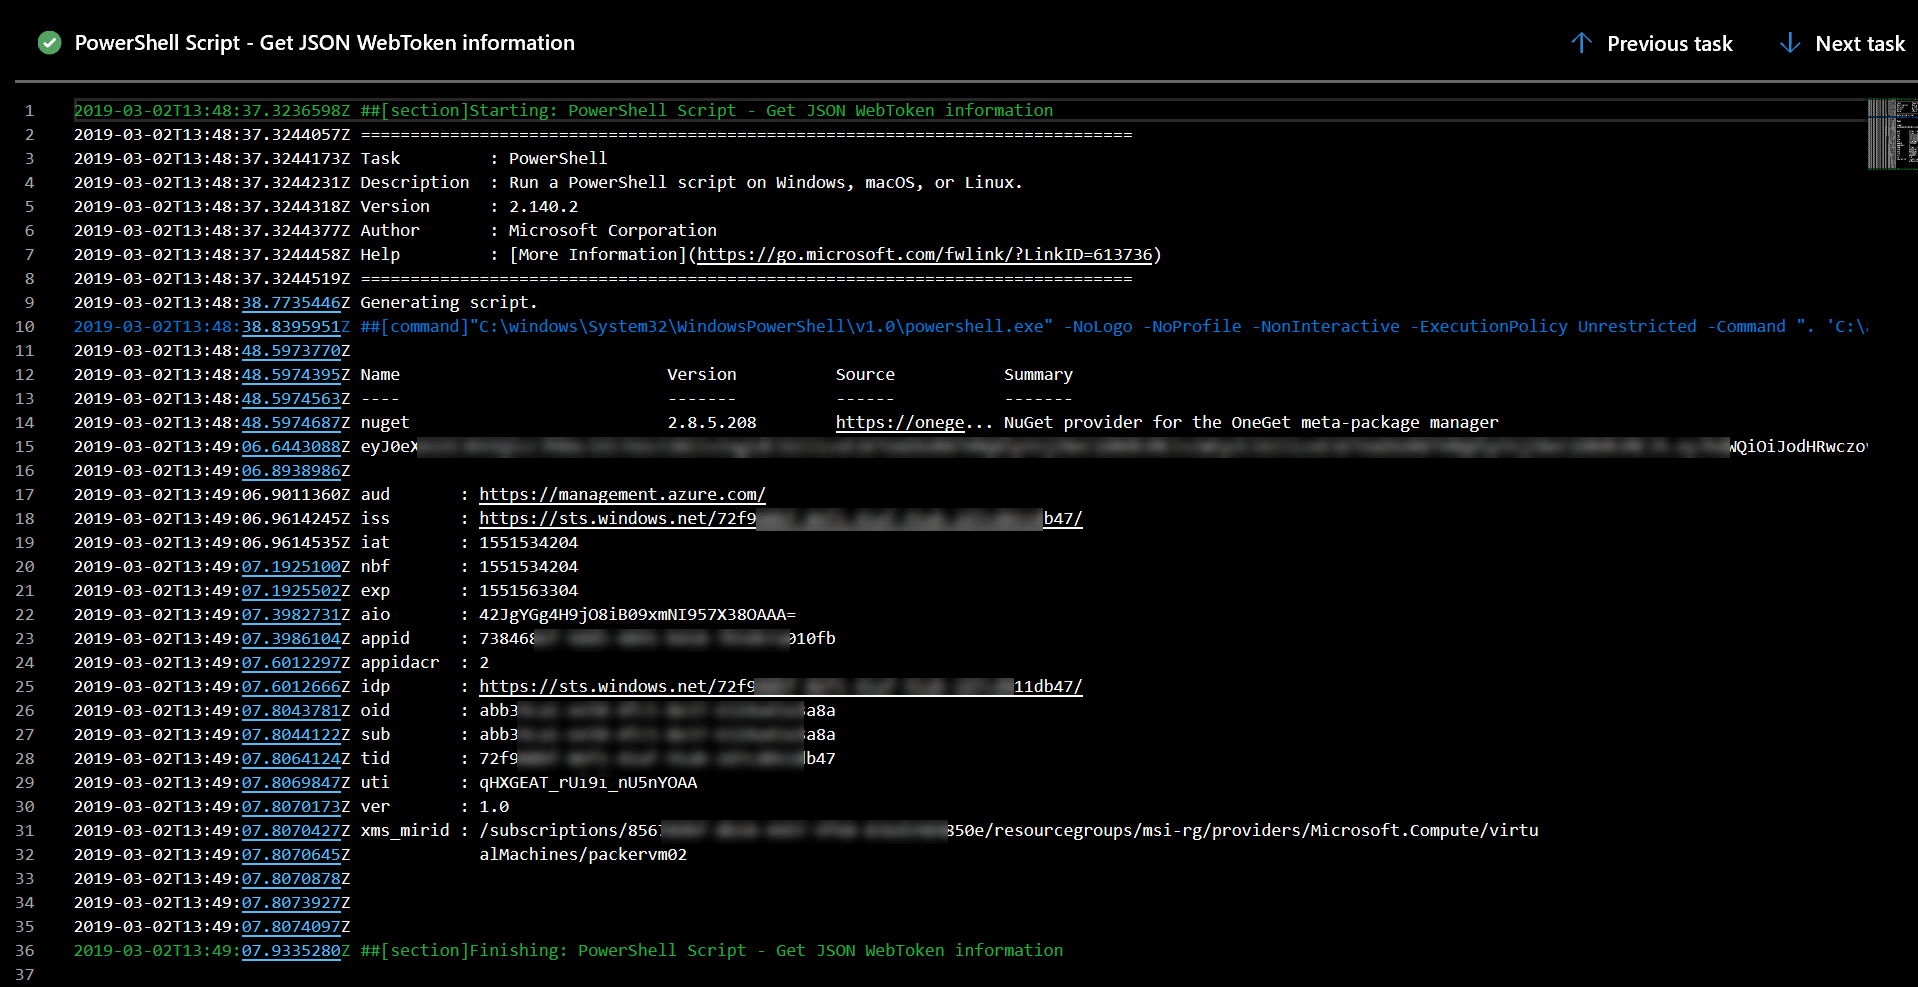
The result of above PowerShell task.
If you are interested you can find more information about Azure Active Directory ID token headers here.
Hope you learned how to start using Managed Identity in your Azure DevOps Connections.
References:
- Service connections for builds and releases
- Azure AD managed identities for Azure resources documentation
- What is managed identities for Azure resources?
- Pluralsight - Implementing Managed Identities for Microsoft Azure Resources
- Selfhosted Windows Agents
- Introduction to Packer
- Build your own Hosted VSTS Agent Cloud: Part 1 – Build
- Build your own Hosted VSTS Agent Cloud: Part 2 – Deploy
- Build your own Hosted VSTS Agent Cloud: Part 3 – Automate
- Build your own Hosted VSTS Agent Cloud: Part 4 – Customize
- Blog post - Demystifying Managed Service Identities on Azure
- Azure Instance Metadata service