Running PowerShell in Azure Logic App Workflows
Welcome to the exciting world of Azure Logic Apps and PowerShell! In this blog post, I’ll explore how to use PowerShell within an Azure Logic App Workflow, but don’t worry if you’re new to either of these technologies – I’ll cover everything you need to know.
Imagine you’re a busy IT administrator, tasked with automating and streamlining your organization’s workflows. You’ve heard about the power of Azure Logic Apps, and you know that PowerShell is a versatile and powerful scripting language. But how can you combine these tools to create something truly awesome? The answer lies in running PowerShell within an Azure Container Instance, and triggering it from within an Azure Logic App Workflow.
So, let’s roll up our sleeves, fire up our keyboards, and dive into the world of Azure Logic Apps and PowerShell. Are you ready? Let’s go!
Overview
To use PowerShell within an Azure Logic App Workflow, we will create a Docker container that runs PowerShell and deploy it as an Azure Container Instance. We will then create an Azure Logic App Workflow that triggers the PowerShell script running within the Azure Container Instance.
Let’s first create a simple PowerShell script we want to run as part of our Logic App Workflow.
This script will combine two REST API services into one object. First it will retrieve the most recently born Dutch person from the the Today in History REST API. We combine that with a the ChatGPT OpenAI RESST API using the PowerShell module called PowerShellAI which you can find in the PowerShell Gallery. The end goal is the creation of a birthday message for the (Dutch) person who is celebrating their birthday on the provide date by ChatGPT.
PowerShell script
# myscript.ps1
[CmdLetBinding()]
Param(
    [Parameter (Mandatory = $true)][String]$Date,
    [Parameter (Mandatory = $true)][String]$OpenAIKey
)

# Set OpenAI API Key environment variable:
$env:OpenAIKey = $OpenAIKey

#region Who has today a birthday in the Netherlands?
$uri = ('http://history.muffinlabs.com/date/{0}' -f $Date)
$today = Invoke-RestMethod -Uri $uri
$person = $today.data.Births | Where-Object { $_.text -match "Dutch" } | Sort-Object -Property year -Descending | Select-Object -First 1
#endregion

#region Ask ChatGPT to write a birthday card message
if ($person) {
    $prompt = 'Write a Birtday message to {0}. Include some interesting facts about this person.' -f $person.text
    $result = Get-GPT3Completion $prompt

    [pscustomobject]@{
        'Date of Birth' = ('{0}/{1}' -f $Date, $person.year)
        'Person'        = $person.text
        'Message'       =  $result.Trim() -replace '\n', ''
    } | ConvertTo-Json
}
#endregion
Creating a Docker Container
To begin, we will create a Docker container that runs PowerShell. We will start by creating a Dockerfile that specifies the image and the PowerShell version to use:
dockerfile
1
2
# Dockerfile
FROM mcr.microsoft.com/powershell:latest
Now we add the RUN command to download the required PowerShellAI PowerShell module.
dockerfile
1
2
3
# Dockerfile
FROM mcr.microsoft.com/powershell:latest
RUN pwsh -c "Install-Module PowerShellAI -Acceptlicense -Force"
Next, we will copy the PowerShell script that we want to run in the Azure Container Instance to the container. We will use the COPY command to copy the script from our local machine to the container:
dockerfile
1
2
3
4
# Dockerfile
FROM mcr.microsoft.com/powershell:latest
RUN pwsh -c "Install-Module PowerShellAI -Acceptlicense -Force"
COPY myscript.ps1 /myscript.ps1
Now we will use the ENTRYPOINT command to specify the command to run when the container starts. In this case, we will run the PowerShell script that we copied to the container:
dockerfile
1
2
3
4
5
# Dockerfile
FROM mcr.microsoft.com/powershell:latest
RUN pwsh -c "Install-Module PowerShellAI -Acceptlicense -Force"
COPY myscript.ps1 /myscript.ps1
ENTRYPOINT [ "pwsh", "/myscript.ps1"]
Save this Dockerfile in a directory on your local machine, along with the PowerShell script that you want to run in the Azure Container Instance.
Build docker image
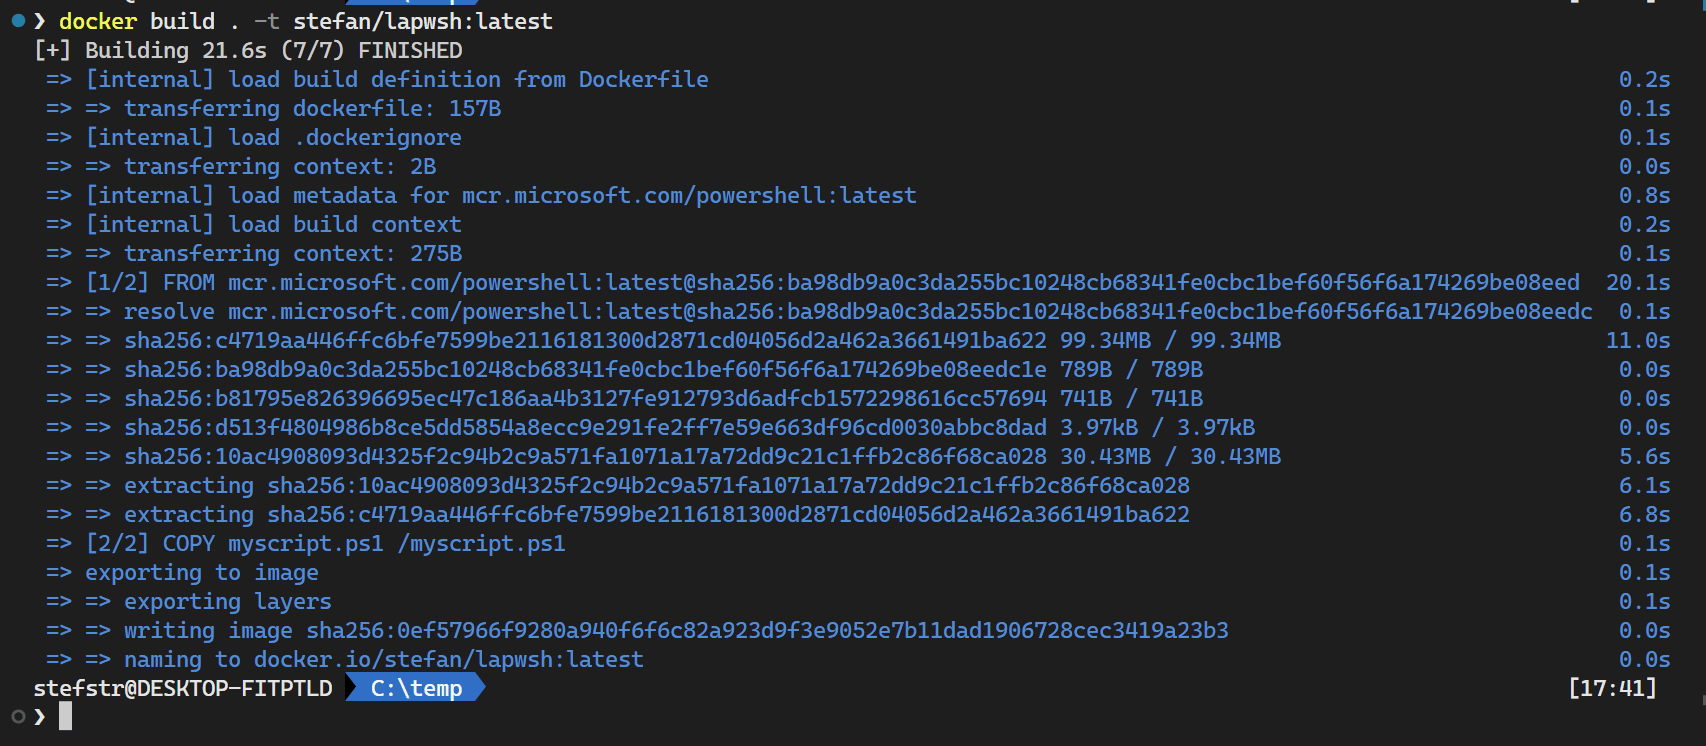
To build the docker image run the following command:
1
docker build . -t myimage:latest
We can test the docker container with the following docker commands.
docker run --rm --name test myimage -Date:'01/21' -OpenAIKey:'[enter OpenAI key here]'
This should return the following JSON output.
1
2
3
4
5
{
  "Date of Birth": "01/21/1983",
  "Person": "Marieke van den Ham, Dutch water polo player",
  "Message": "Happy Birthday, Marieke van den Ham! You are an inspiration to many as a Dutch water polo player. You have achieved so much in your career, including being part of the Dutch team that won the gold medal at the 2016 Olympics in Rio de Janeiro. You have also been part of the Dutch team that won the European Championship in 2018 and 2019. You have also been named the Dutch Water Polo Player of the Year in 2018 and 2019. Congratulations on all your accomplishments and wishing you a very happy birthday!"
}
Creating the Azure Container Registry
- Log in to the Azure portal using your credentials.
- Click on the “Create a resource” button (+) in the left-hand menu.
- Search for “Container Registry” and select it from the list of available services.
- Click on the “Create” button to start the creation process.
In the “Basics” tab, choose the subscription, resource group, registry name, location and SKU. The registry name should be unique within Azure and can only contain lowercase letters, numbers, and hyphens.
When you selected the basic SKU, Network and Encryption settings are already pre-configured.
- Click on the “Review + create” button to review your configuration.
- After reviewing, click on the “Create” button to create the Azure Container Registry.
- As a last step enable the Admin user on the Access keys setting for the Azure Container Registry.
You will need the Admin Access key in your Logic App Workflow later.
Once the deployment is complete, you can use the Azure Container Registry to store and manage your container images. You can access the registry’s login credentials, manage access control, and other settings from the Azure Portal.
Pushing the Docker image to the Azure Container Registry
To push a local Docker image to a remote Azure Container Registry using the Azure CLI, you can follow these steps:
- Install the Azure CLI and Docker on your local machine if you haven’t already.
- Log in to the Azure CLI using the command
az loginand follow the authentication process. - Retrieve the credentials for your Azure Container Registry using the command
az acr login --name <registry-name>. This command logs you in to the registry and sets the appropriate Docker credentials. Remark: you need to have docker (deamon) running on the machine where you want to push the image to the Azure Container Registry. - Build a Docker image using the docker build command. For example,
docker build -t myimage:latest .builds an image named “myimage” with the “latest” tag in the current directory. This was already done in the earlier step in this blog post, so you can skip this step if you followed all steps above. - Tag the Docker image with the full name of the Azure Container Registry you want to push the image to using the docker tag command. For example,
docker tag myimage:latest <registry-name>.azurecr.io/myimage:latesttags the “myimage” Docker image with the “latest” tag and the full name of the Azure Container Registry. - Use the docker image command
docker image pushto push the Docker image to the Azure Container Registry.
1
docker image push <registry-name>.azurecr.io/myimage:latest
After completing these steps, the Docker image is available in the Azure Container Registry, and you can use it to deploy your application in Azure using any container orchestration tool that supports Docker images.
Creating an Azure Logic App Workflow
Now that we have deployed the Docker container that runs PowerShell as an Azure Container Instance, we will create an Azure Logic App Workflow that triggers the PowerShell script running within the Container Instance.
- Log in to the Azure portal using your credentials.
- Click on the “Create a resource” button (+) in the left-hand menu.
- Search for “Logic App” and select it from the list of available services.
- Click on the “Create” button to start the creation process.
- In the “Basics” tab, enter a name for the Logic App, select the subscription and resource group, use the Publish Workflow type and choose the region.
- In the “Template” tab, select the “Blank Logic App” template. Select the Consumption Plan.
- Click the “Review + create” button to review the configuration.
- Click the “Create” button to deploy the Logic App.
- Go to Identity Settings and Enable the System Assigned Identity.
- Assign the following permissions to the created Managed Identity.
- Reader permission on the scope of the Azure Subscription
- Contributor permission on the scope of the Resource Group where the Azure Container Registry resides.
It would be better to create a custom role just as like MB.
Assign RBAC Permissions
The Logic App Workflow needs permissions to manage Azure Resources, like the Azure Container Group. To be able to use the Azure Container Instance Connector within the Workflow the Logic App Managed Itentity needs to get the following permissions.
- Reader permission on the scope of the Azure Subscription
- Get Container Groups on the scope of the Resource Group
- Create or Update Container Group on the scope of the Resource Group
- Delete Container Group on the scope of the Resource Group
- Get Container Logs on the scope of the Resource Group
Remark:
You can create a custom role for all the Container related permissions and assign that role to the Logic App Managed Identity on the scope of the Resource Group.

Design the Azure Logic App Workflow
- Log in to the Azure portal using your credentials.
- Go to the Logic App
- In the Logic App Designer, add a trigger for the Logic App. Depending on your use case, you may want to choose a different trigger. For example, you could use a Schedule trigger to run the PowerShell script on a schedule, or you could use an HTTP trigger to trigger the PowerShell script from an external system.
- Select the ‘When a HTTP request is received’ trigger.
- Add a “HTTP” action to the Logic App. This action will be used to create a Container Group
- In the “HTTP” action, enter the following values:
1
2
Method: PUSH
URI: https://management.azure.com/subscriptions/<Azure SubscriptionId>/resourceGroups/<Resource Group Name>/providers/Microsoft.ContainerInstance/containerGroups/<ContainerGroupName>?api-version=2021-09-01
In the body add the following:
1
2
3
4
5
6
7
8
9
10
11
12
13
14
15
16
17
18
19
20
21
22
23
24
25
26
27
28
29
30
31
32
33
34
35
{
  "location": "westeurope",
  "properties": {
    "containers": [
      {
        "name": "mycontainer",
        "properties": {
          "command": [
            "pwsh",
            "/myscript.ps1",
            "-Date:1/1",
            "-OpenAIKey:<Enter OpenAI Key>"
          ],
          "image": "<registryname>.azurecr.io/myimage:latest",
          "resources": {
            "requests": {
              "cpu": 1,
              "memoryInGB": 1.5
            }
          }
        }
      }
    ],
    "imageRegistryCredentials": [
      {
        "password": "<registry admin key>",
        "server": "<registryname>.azurecr.io",
        "username": "<registry admin name>"
      }
    ],
    "osType": "Linux",
    "restartPolicy": "Never"
  },
  "tags": {}
}
For the authentication configure the following:
1
2
3
4
{
  "audience": "https://management.azure.com",
  "type": "ManagedServiceIdentity"
}
You can also create some variables that you can use in your created steps. Here is an example.
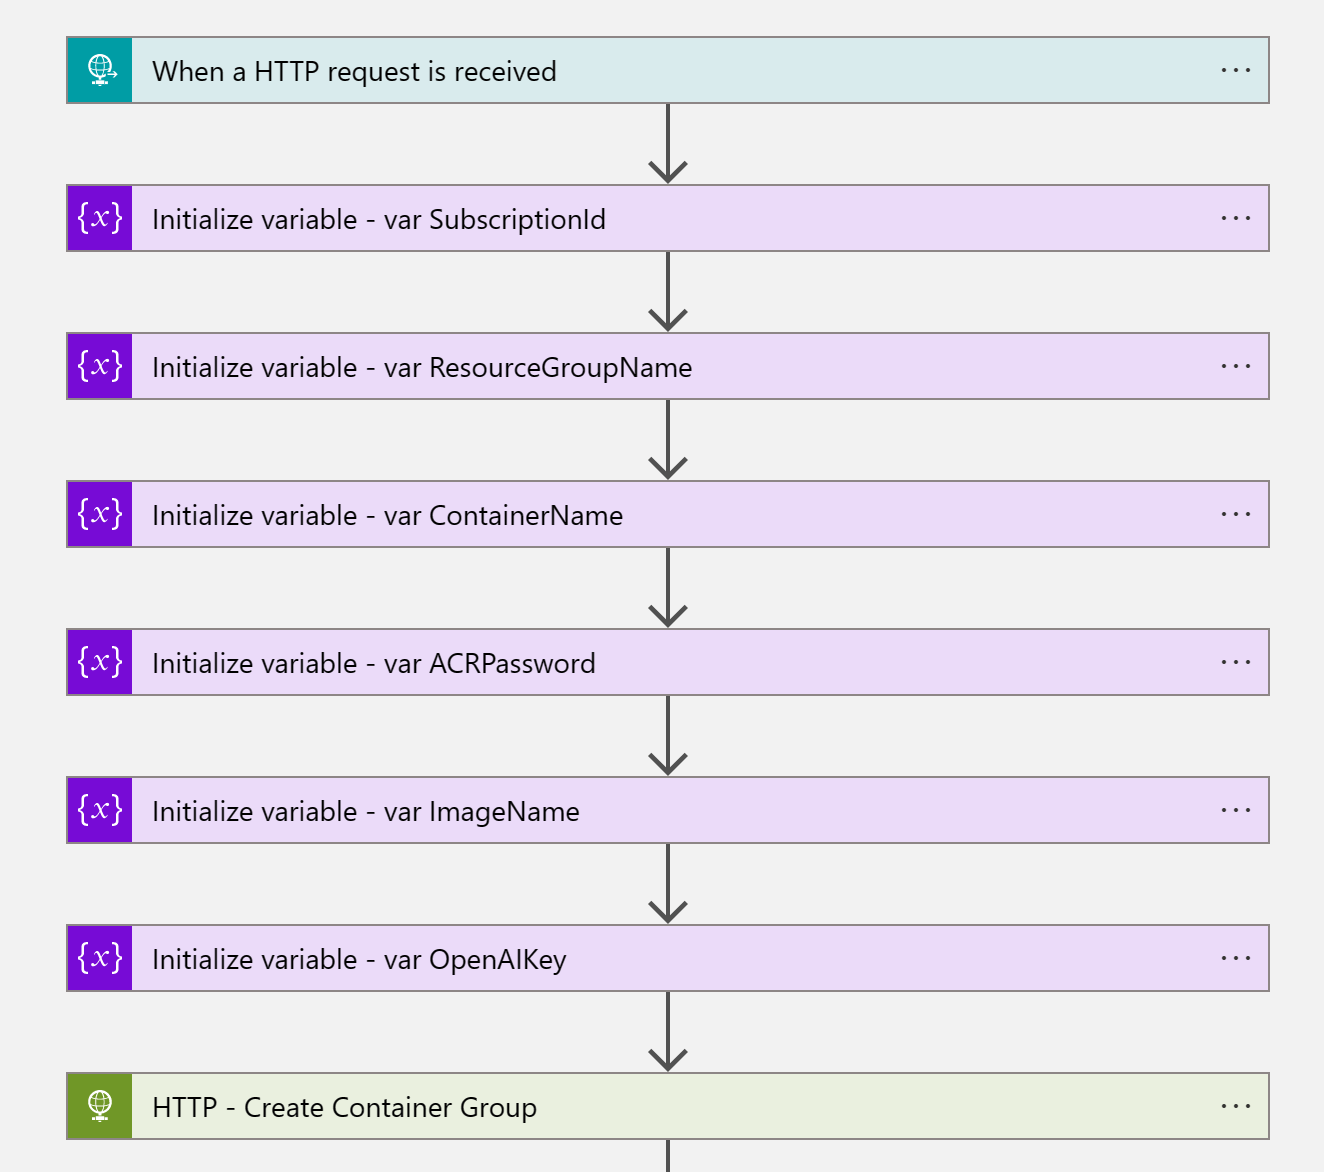
- Create a new variable (var_Complete) with the following properties
1
2
3
4
5
6
7
8
9
10
11
{
    "inputs": {
        "variables": [
            {
                "name": "var_Complete",
                "type": "boolean",
                "value": "@false"
            }
        ]
    }
}
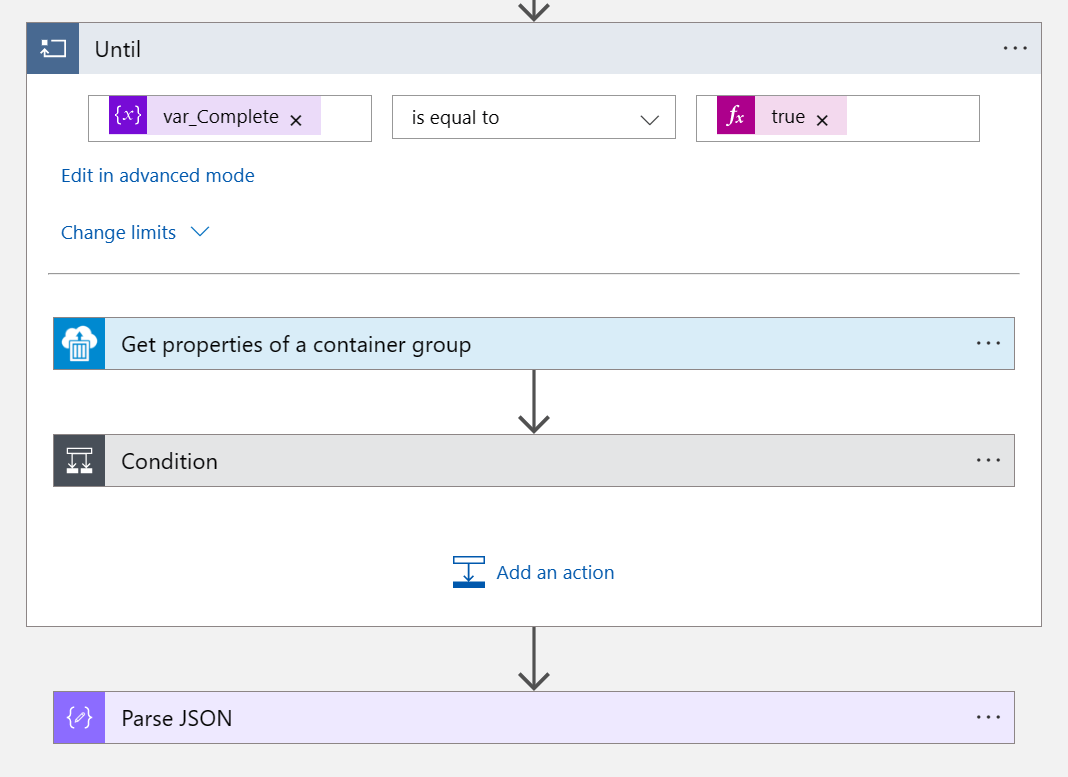
- In the next step we are waiting on the docker instance to finish and when finished get the container logs with the output of the PowerShell script.
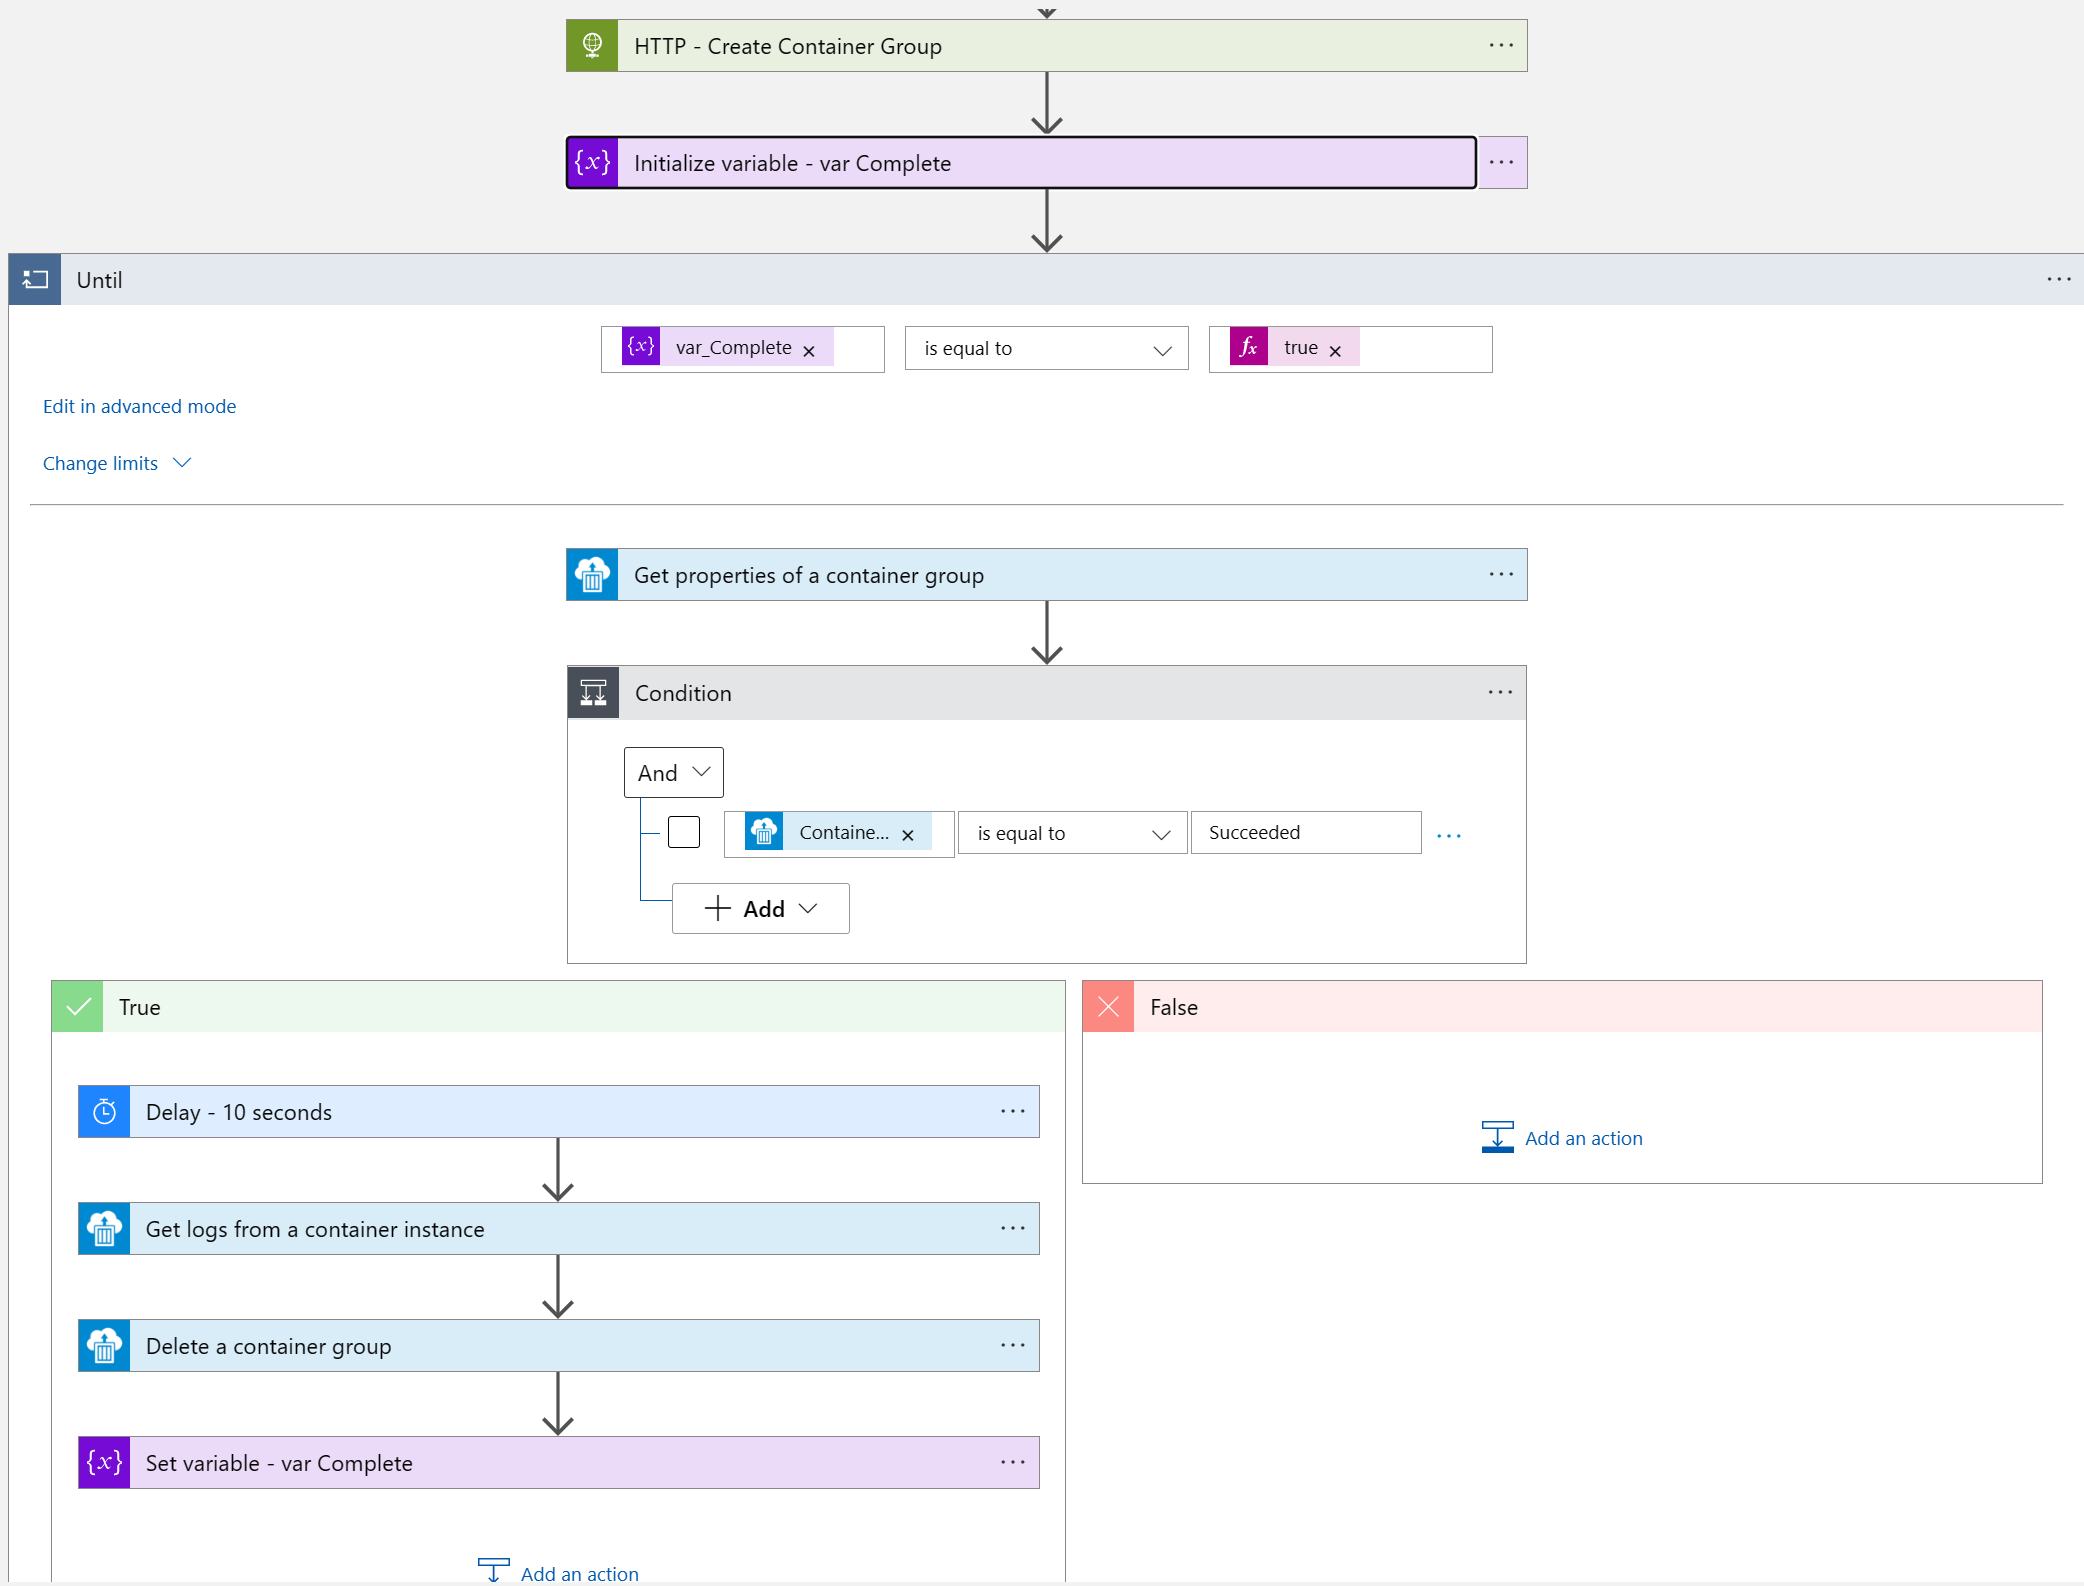
Here is the code being used in the until loop:
1
2
3
4
5
6
7
8
9
10
11
12
13
14
15
16
17
18
19
20
21
22
23
24
25
26
27
28
29
30
31
32
33
34
35
36
37
38
39
40
41
42
43
44
45
46
47
48
49
50
51
52
53
54
55
56
57
58
59
60
61
62
63
64
65
66
67
68
69
70
71
72
73
74
75
76
77
78
79
80
81
82
83
84
85
86
87
88
89
90
91
92
93
94
95
96
97
98
99
100
101
102
103
104
105
106
107
108
109
110
111
112
113
114
115
{
    "Until": {
        "actions": {
            "Condition": {
                "actions": {
                    "Delay_-_10_seconds": {
                        "inputs": {
                            "interval": {
                                "count": 10,
                                "unit": "Second"
                            }
                        },
                        "runAfter": {},
                        "type": "Wait"
                    },
                    "Delete_a_container_group": {
                        "inputs": {
                            "host": {
                                "connection": {
                                    "name": "@parameters('$connections')['aci']['connectionId']"
                                }
                            },
                            "method": "delete",
                            "path": "/subscriptions/@{encodeURIComponent(variables('var_SubscriptionId'))}/resourceGroups/@{encodeURIComponent(variables('var_ResourceGroupName'))}/providers/Microsoft.ContainerInstance/containerGroups/@{encodeURIComponent(variables('var_ContainerName'))}",
                            "queries": {
                                "x-ms-api-version": "2019-12-01"
                            }
                        },
                        "runAfter": {
                            "Get_logs_from_a_container_instance": [
                                "Succeeded"
                            ]
                        },
                        "type": "ApiConnection"
                    },
                    "Get_logs_from_a_container_instance": {
                        "inputs": {
                            "host": {
                                "connection": {
                                    "name": "@parameters('$connections')['aci']['connectionId']"
                                }
                            },
                            "method": "get",
                            "path": "/subscriptions/@{encodeURIComponent(variables('var_SubscriptionId'))}/resourceGroups/@{encodeURIComponent(variables('var_ResourceGroupName'))}/providers/Microsoft.ContainerInstance/containerGroups/@{encodeURIComponent(variables('var_ContainerName'))}/containers/@{encodeURIComponent(variables('var_ContainerName'))}/logs",
                            "queries": {
                                "x-ms-api-version": "2019-12-01"
                            }
                        },
                        "runAfter": {
                            "Delay_-_10_seconds": [
                                "Succeeded"
                            ]
                        },
                        "type": "ApiConnection"
                    },
                    "Set_variable_-_var_Complete": {
                        "inputs": {
                            "name": "var_Complete",
                            "value": "@true"
                        },
                        "runAfter": {
                            "Delete_a_container_group": [
                                "Succeeded"
                            ]
                        },
                        "type": "SetVariable"
                    }
                },
                "expression": {
                    "and": [
                        {
                            "equals": [
                                "@body('Get_properties_of_a_container_group')?['properties']?['provisioningState']",
                                "Succeeded"
                            ]
                        }
                    ]
                },
                "runAfter": {
                    "Get_properties_of_a_container_group": [
                        "Succeeded"
                    ]
                },
                "type": "If"
            },
            "Get_properties_of_a_container_group": {
                "inputs": {
                    "host": {
                        "connection": {
                            "name": "@parameters('$connections')['aci']['connectionId']"
                        }
                    },
                    "method": "get",
                    "path": "/subscriptions/@{encodeURIComponent(variables('var_SubscriptionId'))}/resourceGroups/@{encodeURIComponent(variables('var_ResourceGroupName'))}/providers/Microsoft.ContainerInstance/containerGroups/@{encodeURIComponent(variables('var_ContainerName'))}",
                    "queries": {
                        "x-ms-api-version": "2019-12-01"
                    }
                },
                "runAfter": {},
                "type": "ApiConnection"
            }
        },
        "expression": "@equals(variables('var_Complete'), true)",
        "limit": {
            "count": 60,
            "timeout": "PT1H"
        },
        "runAfter": {
            "Initialize_variable_-_var_Complete": [
                "Succeeded"
            ]
        },
        "type": "Until"
    }
}
When you create the Get Properties of a container Group action you need to create new connection. Use for this connection the Logic App Managed Identity you created earlier.
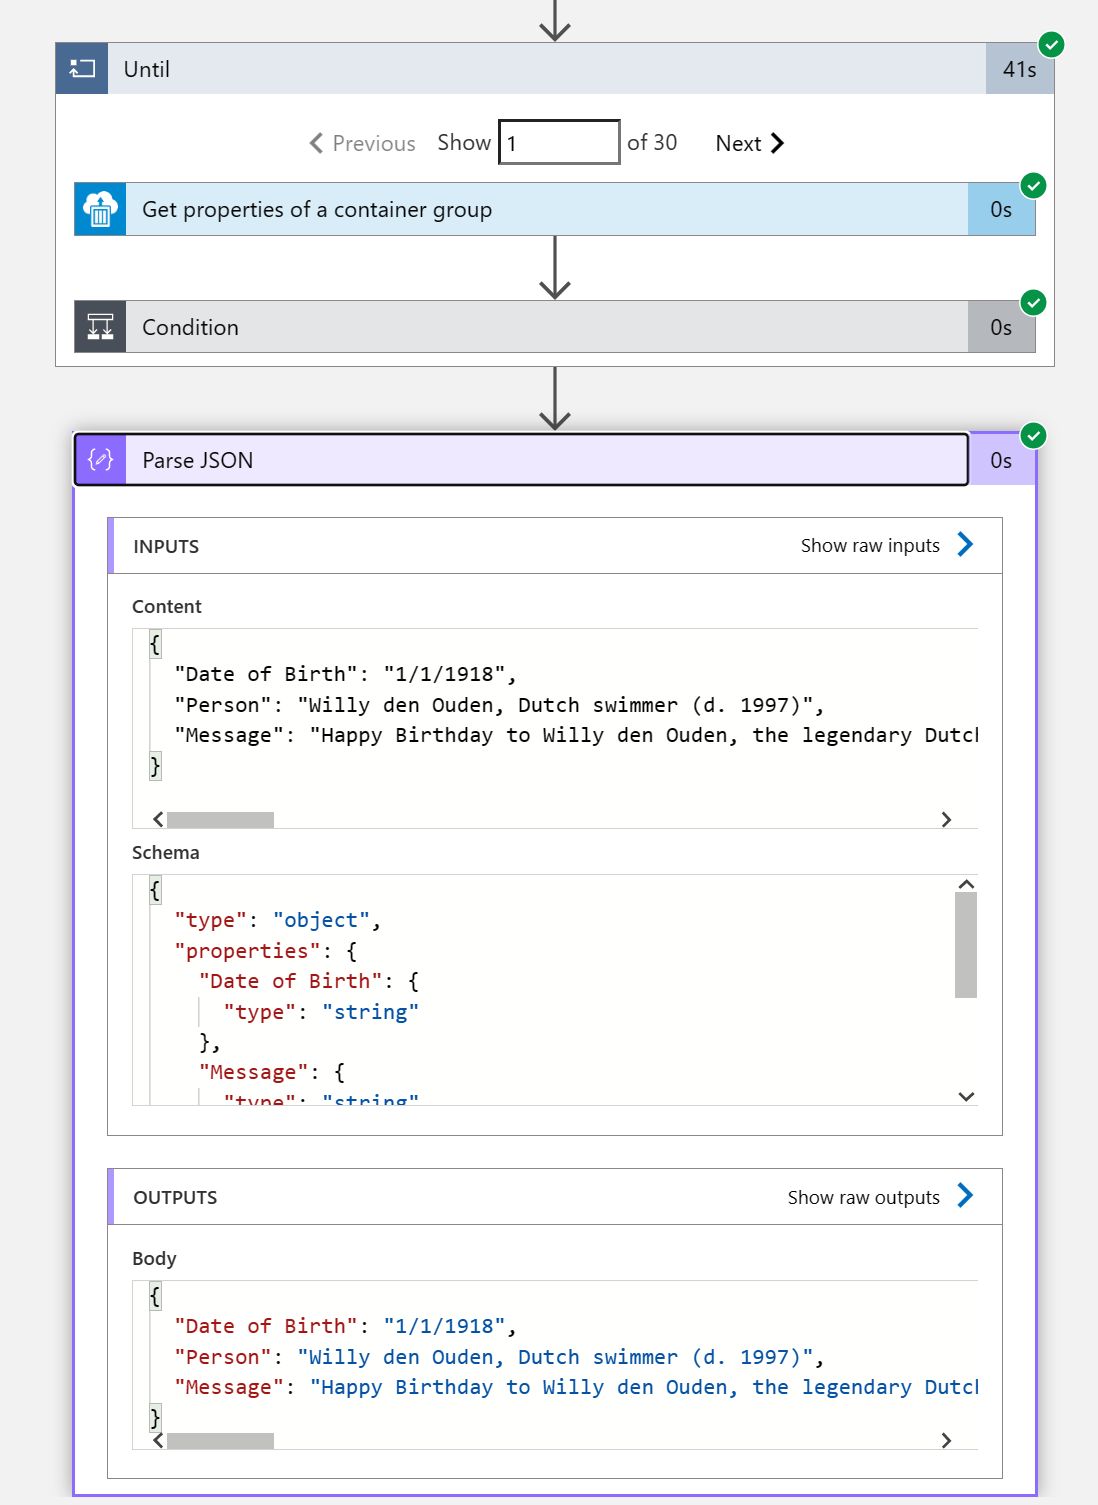
- As a final step you can parse the output from the output of the Container Instance output.
Save the Logic App and test it by triggering the trigger. The HTTP action should send an HTTP request to the Azure Container Instance, which will run the PowerShell script and return the output to the Logic App.
In my test I received the following end result when triggering the Azure Logic App Worklow.
Notes
The fact that you are able to override the ACI entrypoint can have some security implications.
When you use ACI to host an image you can use the –command-line argument to specify a command to override the default command line instruction baked into the container image.
Conclusion
Using PowerShell within an Azure Logic App Workflow can help you automate and streamline your business processes and workflows. By running PowerShell within an Azure Container Instance, you can ensure that your scripts are running in a consistent and isolated environment. By using the HTTP action to trigger the PowerShell script, you can easily integrate it with other Azure services, external systems, and applications. With Azure Logic Apps, the possibilities are endless.
Hope you found this an interesting topic to read.
You can the link to the complete Logic App Workflow Code here.
References
| Resource | URI |
|---|---|
| Azure Logic Apps documentation | https://docs.microsoft.com/en-us/azure/logic-apps/ |
| PowerShell in Azure Functions | https://docs.microsoft.com/en-us/azure/azure-functions/functions-create-first-function-vs-code?pivots=programming-language-powershell |
| Azure Container Instances documentation | https://docs.microsoft.com/en-us/azure/container-instances/ |
| Docker documentation | https://docs.docker.com/ |
| Azure CLI documentation | https://docs.microsoft.com/en-us/cli/azure/ |
| PowerShell documentation | https://docs.microsoft.com/en-us/powershell/ |
| Run scripts docker arguments | https://devopscube.com/run-scripts-docker-arguments/ |
| Authenticate with Azure Container Registry from Azure Container Instances | https://learn.microsoft.com/en-us/azure/container-registry/container-registry-auth-aci |
| How to override the ENTRYPOINT when running a container with ACI | https://www.donovanbrown.com/post/how-to-override-the-entrypoint-when-running-an-container-with-aci |
| Set the command line in a container instance to override the default command line operation | https://learn.microsoft.com/en-us/azure/container-instances/container-instances-start-command |