Use API reverse engineering and decompilation on VanMoof's API
As you might know I own a vanMoof S3 e-bike. This is a Dutch company that makes made e-bikes. They have a mobile app that you can use to lock/unlock your bike, change settings, etc. I was curious about the API that they use for their mobile app. So I decided to do some reverse engineering and decompilation to retrieve the rides information on their API.
They recently went bankrupt (July 2023) and were bought by McLaren Applied’s Lavoie. I don’t know if they will change their API in the future and for how long the existing back-end servers will provide their data, so I decided to write this blog post to document my findings.
There is already quite some unofficial documentation on their API, but not for the rides endpoint. When I tried to search GitHub vanMoof repositories for more information about the rides information, I could not find anything on the Rides endpoint: https://github.com/search?q=vanmoof&type=repositories
I already created and documented how you could use their API to retrieve your vanMoof’s encryption key. You can find it here. In this blog post I’m describing the steps I did to find the hidden vanMoof’s Rides REST API endpoints.
TL;TR
Here are the vanMoof’s rides endpoints for those who cannot wait to test them out.
Authenticate
Authenticate with vanMoof’s REST API, with your username and password.
Endpoint:
1
2
Method: POST
URL: https://my.vanmoof.com/api/v8/authenticate
Headers:
| Key | Value | Description |
|---|---|---|
| api-key | fcb38d47-f14b-30cf-843b-26283f6a5819 | This is the default api key found in the decompiler apk package |
| Authorization | Basic <base64 encoded username and password> | See example PowerShell code below |
With the following PowerShell code you can create the Authorization header for the Authentication REST API call.
$UserName = 'john.doe@outlook.com'
$Password = 'superSecretPassword'
('Basic {0}' -f [Convert]::ToBase64String([Text.Encoding]::ASCII.GetBytes(('{0}:{1}' -f $UserName, $Password)))  )
Output example
1
2
3
4
{
  "token": "eyJ0eXAiOiJKV1QiLCJhbGciOiJIUzI1NiJ9.eyJpc3MiOiJodHRwOlwvXC9hcGkudmFubW9vZi1hcGkuY29tIiwiaWF0IjoxNjk1dfjsakfjuYmYiOjE2OTU3MTY2NjgsImV4cCI6MTcyNzI1MjY2OCwidXNlciI6MjM5NzEwLCJhcGlfa23413jfdKJHZpY2UiOm51bGwsInJlZnJlc2hfdG9rZW4iOiJkMzgyMzQxZi1mZmQ4LTQzZDEtOTdmYy01NzRhOTMwYjg0MTgifQ._ezeldEn56kjfkldsaiClUtIaSNqcxLW0cn80Y",
  "refreshToken": "44e60821-1ff4-494f-9bb6-bced77b6e362"
}
Get Customer Data (include Bike Details)
Get Customer Data.
Endpoint:
1
2
Method: GET
URL: https://my.vanmoof.com/api/v8/v1/getCustomerData?IncludeBikeDetails
Headers:
| Key | Value | Description |
|---|---|---|
| api-key | fcb38d47-f14b-30cf-843b-26283f6a5819 | This is the default api key found in the decompiler apk package and in the pymoof module |
| Authorization | Bearer <JWT token> | retrieved from call to https://my.vanmoof.com/api/v8/authenticate endpoint. |
Output example
1
2
3
4
5
6
7
8
9
10
11
12
13
14
15
16
17
18
19
20
21
22
23
24
25
26
27
28
29
30
31
32
33
34
35
36
37
38
39
40
41
42
43
44
45
46
47
48
49
50
51
52
53
54
55
56
57
58
59
60
61
62
63
64
65
66
67
68
69
70
71
72
73
74
75
76
77
78
79
80
81
82
83
84
85
86
87
88
89
90
91
92
93
94
95
96
97
98
99
100
101
102
103
104
105
106
107
108
109
110
111
112
113
114
115
116
117
118
119
120
121
122
123
124
125
126
127
128
129
130
131
132
133
134
135
136
137
138
139
140
141
142
143
144
145
146
147
148
149
150
151
152
153
154
155
156
157
158
159
160
161
162
163
{
  "data": {
    "uuid": "b3f75db5-487f-4651-b6b2-93bfc347aa26",
    "name": "John Doe",
    "email": "john.doe@outlook.com",
    "confirmed": true,
    "privacyPolicyAccepted": true,
    "phone": "+31 61 1234567",
    "country": "NL",
    "bikes": [
      {
        "id": 12345,
        "name": "VanMoof S3",
        "frameNumber": "ASY1234567",
        "bikeId": "ASY1234567",
        "frameSerial": null,
        "pendingSmartmoduleMacAddress": null,
        "macAddress": "F8:8A:5E:4F:E7:12",
        "mainEcuSerial": null,
        "bleProfile": "ELECTRIFIED_2020",
        "controller": "2020 S",
        "eLock": true,
        "speaker": true,
        "smartmoduleCurrentVersion": "1.9.1",
        "smartmoduleDesiredVersion": "1.9.3",
        "highestAvailableSpeedLimit": null,
        "tripDistance": 24045,
        "modelName": "VM01-200-2G EU",
        "modelColor": {
          "name": "Dark",
          "primary": "#25282a",
          "secondary": "#25282a"
        },
        "frameShape": "S",
        "customerRole": "owner",
        "permissions": [
          "ADD_USER",
          "FIRMWARE_UPDATES",
          "REMOVE_USER",
          "REPORT_FOUND",
          "REPORT_STOLEN",
          "SEND_STATISTICS",
          "BACKUP_CODE",
          "BIKE_NAME",
          "VIEW_THEFT_CASES",
          "ALARM_SETTINGS",
          "COUNTRY_SETTINGS",
          "LIGHTS",
          "MOTOR_SUPPORT_LEVEL",
          "UNLOCK",
          "READ_VALUES",
          "STOLEN_MODE",
          "SWAP_SMARTMODULE"
        ],
        "isTracking": false,
        "stolen": {
          "isStolen": false,
          "dateStolen": null,
          "status": "not_stolen",
          "latestLocation": null
        },
        "links": {
          "thumbnail": "https://my.vanmoof.com/image/model/67",
          "show": "http://my.vanmoof.com/v8/getBikeData/12345"
        }
      }
    ],
    "hasPendingBikeSharingInvitations": false,
    "links": {
      "hash": "http://my.vanmoof.com/v8/getCustomerDataHash",
      "devices": "http://my.vanmoof.com/v8/getDevices",
      "resendConfirmation": null,
      "update": "http://my.vanmoof.com/v8/updateCustomer",
      "addBike": "http://my.vanmoof.com/v8/registerBikeToCurrentUser",
      "addFcmToken": "http://my.vanmoof.com/v8/registrationToken"
    },
    "bikeDetails": [
      {
        "id": 12345,
        "name": "VanMoof S3",
        "frameNumber": "ASY1234567",
        "bikeId": "ASY1234567",
        "frameSerial": null,
        "ownerName": "John Doe",
        "tripDistance": 24045,
        "pendingSmartmoduleMacAddress": null,
        "macAddress": "F8:8A:5E:4F:E7:12",
        "mainEcuSerial": null,
        "smartmoduleCurrentVersion": "1.9.1",
        "smartmoduleDesiredVersion": "1.9.3",
        "changeBackupCode": false,
        "isTracking": false,
        "highestAvailableSpeedLimit": null,
        "messageAvailable": false,
        "modelName": "VM01-200-2G EU",
        "modelDetails": {
          "Gears": "Automatic 4 speed shifting gears",
          "Motor": "250 - 500 W front-wheel hub motor",
          "Top Speed": "25 km/h (EU speed)",
          "Range": "60 km (full power) ~ 150 km (economy mode)",
          "Edition": "ES-3 2G"
        },
        "modelColor": {
          "name": "Dark",
          "primary": "#25282a",
          "secondary": "#25282a"
        },
        "frameShape": "S",
        "manufacturer": "muco",
        "controller": "2020 S",
        "updateMethod": "OAD (encrypted)",
        "eLock": true,
        "gsmModule": "2G",
        "speaker": true,
        "bleProfile": "ELECTRIFIED_2020",
        "bleVersion": null,
        "messagesViaBLE": "BLEv2",
        "customerRoleFamily": "Responsible",
        "customerRole": "owner",
        "permissions": [
          "ADD_USER",
          "FIRMWARE_UPDATES",
          "REMOVE_USER",
          "REPORT_FOUND",
          "REPORT_STOLEN",
          "SEND_STATISTICS",
          "BACKUP_CODE",
          "BIKE_NAME",
          "VIEW_THEFT_CASES",
          "ALARM_SETTINGS",
          "COUNTRY_SETTINGS",
          "LIGHTS",
          "MOTOR_SUPPORT_LEVEL",
          "UNLOCK",
          "READ_VALUES",
          "STOLEN_MODE",
          "SWAP_SMARTMODULE"
        ],
        "key": {
          "encryptionKey": "<secret>",
          "passcode": "<secret>",
          "userKeyId": 1
        },
        "isFactoryKey": false,
        "customerCount": 2,
        "invitationCount": 0,
        "stolen": {
          "isStolen": false,
          "dateStolen": null,
          "status": "not_stolen",
          "latestLocation": null
        },
        "hasPeaceOfMind": false,
        "peaceOfMind": null,
        "links": {
          "hash": "http://my.vanmoof.com/v8/getBikeDataHash/12345",
          "thumbnail": "https://my.vanmoof.com/image/model/67"
        }
      }
    ]
  },
  "hash": "<secret>"
}
Get Application Token
Get Application Token to use in Authorization Header to get Rides information.
Endpoint:
1
2
Method: GET
URL: https://api.vanmoof-api.com/v8/getApplicationToken
Headers:
| Key | Value | Description |
|---|---|---|
| api-key | fcb38d47-f14b-30cf-843b-26283f6a5819 | This is the default api key found in the decompiler apk package and in the pymoof module |
| Authorization | Bearer <JWT token> | retrieved from call to https://my.vanmoof.com/api/v8/authenticate endpoint. |
Output example
1
2
3
{
  "token": "eyJ0eXAiOiJKV1QiLCJhbGciOiJSUzI1NiJ9.eyJpc3MiOiJodHRwOlwvXC9hcGkudmFjfkladsjf889tIiwiaWF0IjoxNjk1NzE3NzUwLCJuYmYiOjE2OTU3MTc3NTAsImV4cCI6MTY5NTcyNDk1MCwidXNlciI6InN0ZWZhbi5zdHJhbmdlckBvdXRsb29rLmNvbSIsInV1aWQiOiI3NzI1NjUxMS0zZjBkLTMzMzQtOTU3Yi0xYjU3Y2Y3MzAxOWEiLCJiaWtlcyI6WzY4NzEzXX0.dGmgy09qGSOgMNbiu3uab10W2giQzvVMs6sWryvYsyDkfdsjlksajf-OcTXCobP9tAfkXKu0bbPHQHHU3hCQmA092wKF5ZHfE_ADJ1YVEN6jXX-8eWZylKR3oCcsbAFGKriz6nD9rdbsdiWMMhPfllWwBTraH7h9h7UoMzEseCYWA3iAQYk9RYrYubNfImfIsJb65W6cGugM_wFQM9XRqdXE-q4a9aFEry-tycKF6a0ptuDlFTmBORImlCJUv2O-E4h10l3VDuqBF40bP0G5wEC3IA8AFoA1HZwGc2fuyMnVd97ukZ1JwW6_rQfAwmMT0jwjieMmLdqdVjto31pQ4Ajoq51721ha-LbKF-hNPOwFheqWyXmkDXV6zsFTd5p2IFKp_4j4gpRIfaGjqrceMQd50we46AXdDP573QKswIMld81fHjyyXkCKS0PkMBmOXSSYSzL10vMukTe8vmpyX7SZ-u6VKO3r44HKJFkdjf8saft5haxlddahGJqyfoQH1L0WVOhWQz2u72oUxwxiFZPeBtakE-tQlbHzk_QT5J75DiMMt93W9uFQ42wAdw1PXvYE87Oj7kK5qkrGRXJoidb5bOMJf1FEhX4Iwoc58Duz3T71cPlROxSTBwltXiAJb7nl0wFUSQfEU"
}
Get weekly Rides
Get the vanMoof’s weekly rides per Rider.
Endpoint:
1
2
Method: GET
URL: https://tenjin.vanmoof.com/api/v1/rides/{riderId}/{bikeId}/weekly?lastSeenWeek=2023-08-20&limit=5
Headers:
| Key | Value | Description |
|---|---|---|
| api-key | fcb38d47-f14b-30cf-843b-26283f6a5819 | This is the default api key found in the decompiler apk package and in the pymoof module |
| Authorization | Bearer <JWT token> | retrieved from call to https://api.vanmoof-api.com/v8/getApplicationToken endpoint |
| cache-control | no-cache, private | HTTP header field holds directives (instructions) — in both requests and responses — that control caching in browsers and shared caches |
| accept-language | en_US | Indicates the natural language and locale that the client prefers |
| accept-encoding | gzip | Indicates the content encoding (usually a compression algorithm) that the client can understand |
| timezone | Europe/Amsterdam | Timezone of rider. Has an impact on the lastSeenWeek query parameter. Check wikipedia for a list of timezones. |
Query Parameters:
| Query Parameter | Value | Description |
|---|---|---|
| riderId | b3f75db5-487f-4651-b6b2-93bfc347aa26 | This is the uuid property retrieved using the Get Customer Data REST API call |
| bikeId | 12345 | This is the bikeId from the Get Customer Date rest api call |
| lastSeenWeek | 2023-08-20 | Last day of thew week for which you want to retrieve your rides data in format yyyy-mm-dd. The provided date needs to be a Sunday |
| limit | 1..15 | This set the number of previous startdates for the rides to retrieve. Maximum value is 15 |
Output example
1
2
3
4
5
6
7
8
9
10
11
12
13
14
15
16
17
18
19
20
21
22
23
24
25
26
27
28
29
30
31
32
33
34
35
36
37
38
39
40
41
42
43
44
45
46
47
48
49
50
51
52
53
54
55
56
57
58
59
60
61
62
63
64
65
66
67
68
69
70
71
72
73
74
75
76
77
78
79
80
81
82
83
84
85
86
87
88
89
90
91
92
93
94
95
96
97
98
99
100
101
102
103
104
105
106
107
108
109
110
111
112
113
114
{
    "carousel": {
      "summary": {
        "averageDistance": 10.230088108828005,
        "totalRides": 146,
        "averageDuration": 1500652.2534246575,
        "averageSpeed": 24.34394418130039,
        "totalDistance": 1493.5928638888888
      },
      "world": {
        "averageDistance": 3.93207964678266,
        "totalRides": 226469,
        "averageDuration": 855250.1459714134
      },
      "city": {
        "name": "Amsterdam",
        "averageDistance": 3.6543007353849726,
        "totalRides": 52695,
        "averageDuration": 776877.2192048582
      },
      "week": {
        "averageDistance": 0,
        "totalRides": 0,
        "averageDuration": 0,
        "startDate": "2023-09-24",
        "totalDistance": 0,
        "weekData": [
          {
            "dayName": "S",
            "dayDistance": 0
          },
          {
            "dayName": "M",
            "dayDistance": 0
          },
          {
            "dayName": "T",
            "dayDistance": 0
          },
          {
            "dayName": "W",
            "dayDistance": 0
          },
          {
            "dayName": "T",
            "dayDistance": 0
          },
          {
            "dayName": "F",
            "dayDistance": 0
          },
          {
            "dayName": "S",
            "dayDistance": 0
          }
        ]
      }
    },
    "section": [
      {
        "startDate": "2023-09-10",
        "weeklyRecap": {
          "startDate": "2023-09-10",
          "totalRides": 3,
          "totalDistance": 24.459629444444456,
          "averageDistance": 8.153209814814819,
          "averageDuration": 1116562,
          "longestRide": 1698064,
          "furthestRide": 12.244573611111118,
          "assistanceLevel": null,
          "busiestRide": 7,
          "totalDayRides": 2,
          "totalNightRides": 1,
          "totalRidesLastWeek": 0,
          "weekdays": [
            {
              "date": "2023-09-10",
              "weekday": "S",
              "totalRides": 0,
              "totalDistance": 0,
              "totalDayRides": 0,
              "totalNightRides": 0
            }
          ]
        },
        "rides": [
          {
            "id": "bede8651-e9fa-4a77-b92e-4050a7c906d9",
            "speeds": [
              {
                "speed": 28,
                "date": "2023-09-11T17:46:12.875+02:00"
              },
              {
                "speed": 28,
                "date": "2023-09-11T17:46:17.45+02:00"
              },
              {
                "speed": 25,
                "date": "2023-09-11T17:46:23.406+02:00"
              },
              {
                "speed": 0,
                "date": "2023-09-11T08:13:38.3+02:00"
              }
            ],
            "startDate": "2023-09-11T05:45:20+00:00",
            "distance": 12.244573611111118,
            "durationMilli": 1698064
          }
        ]
      }
    ]
  }
For the complete overview of hidden vanMoof’s rides REST APIs please check my Github vanMoof Repository.
API reverse engineering and decompilation on VanMoof’s API
In the rest of this blog post I’ll describe some of the steps I did to find the hidden vanMoof’s Rides REST API endpoints.
For this I decided to do some reverse engineering and decompilation on their API using their Android Mobile app.
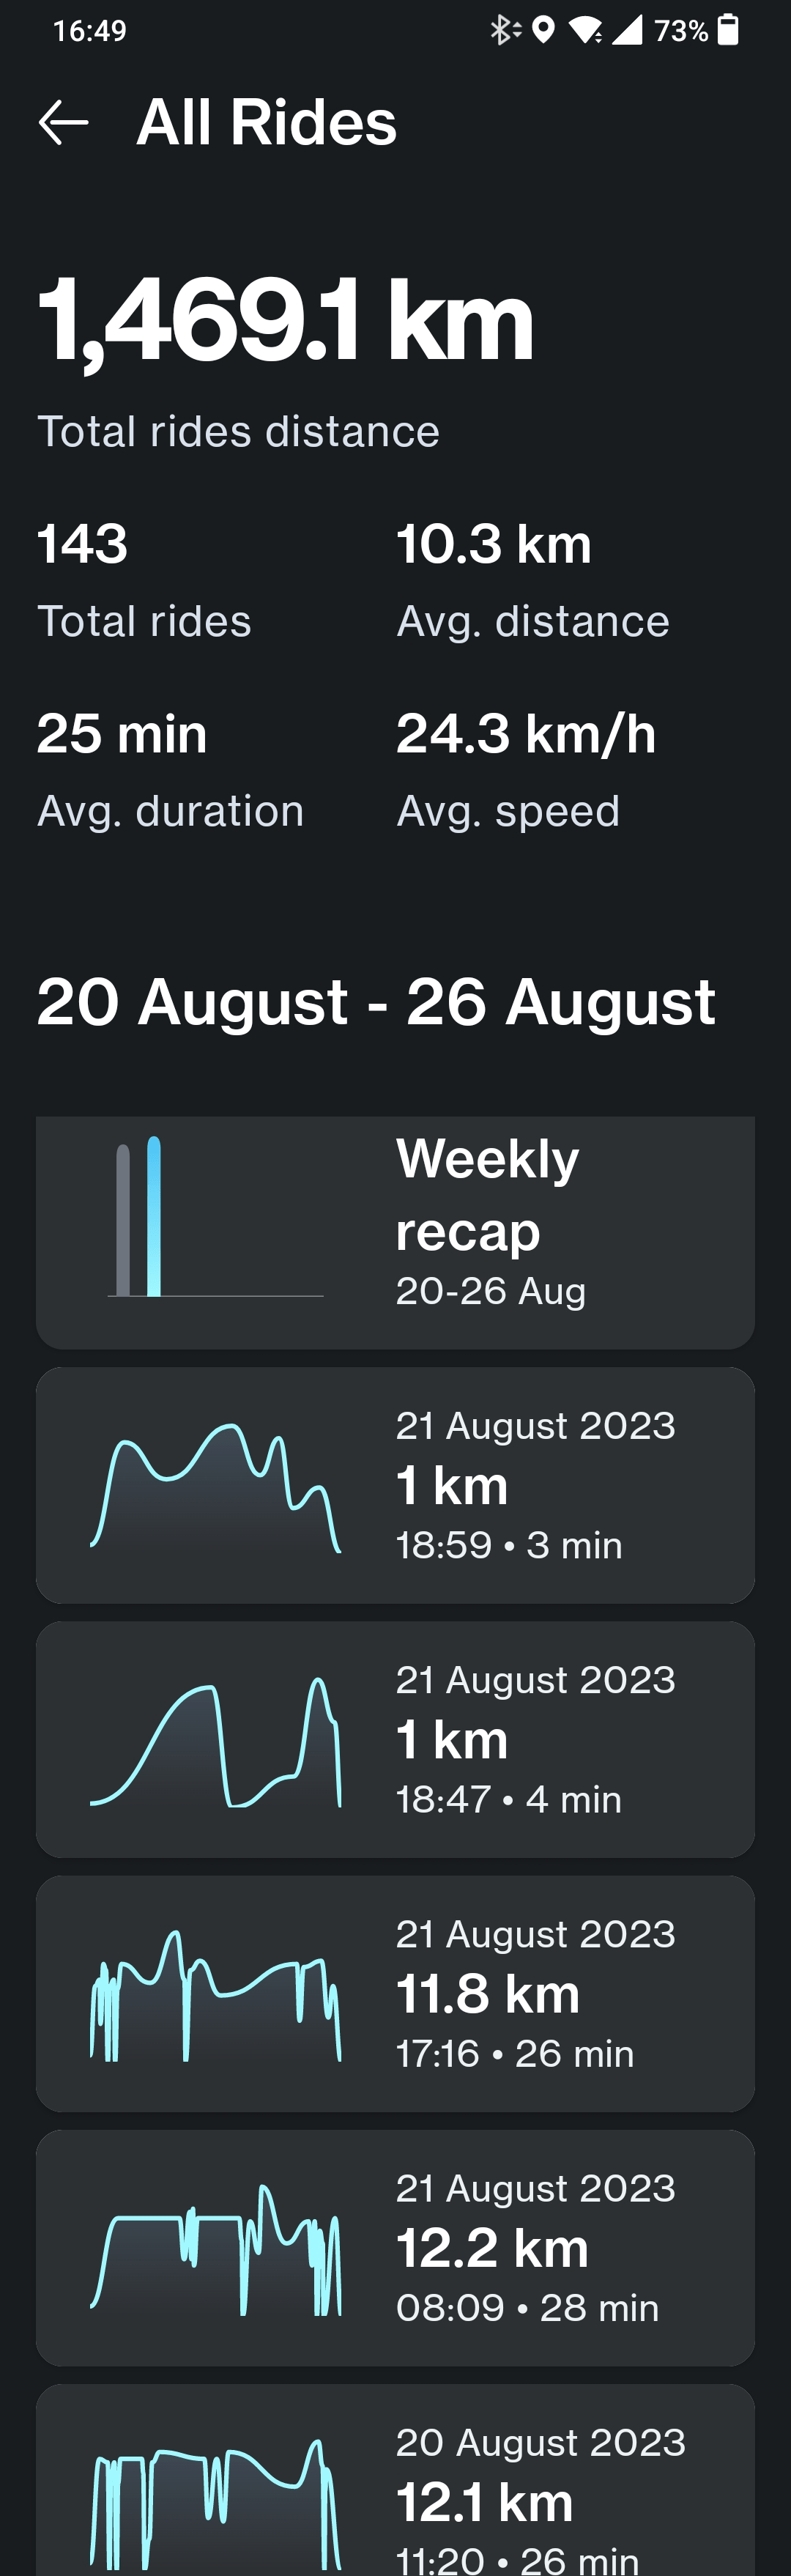
It all started with the idea that I wanted to retrieve the following data being shown in their mobile application.
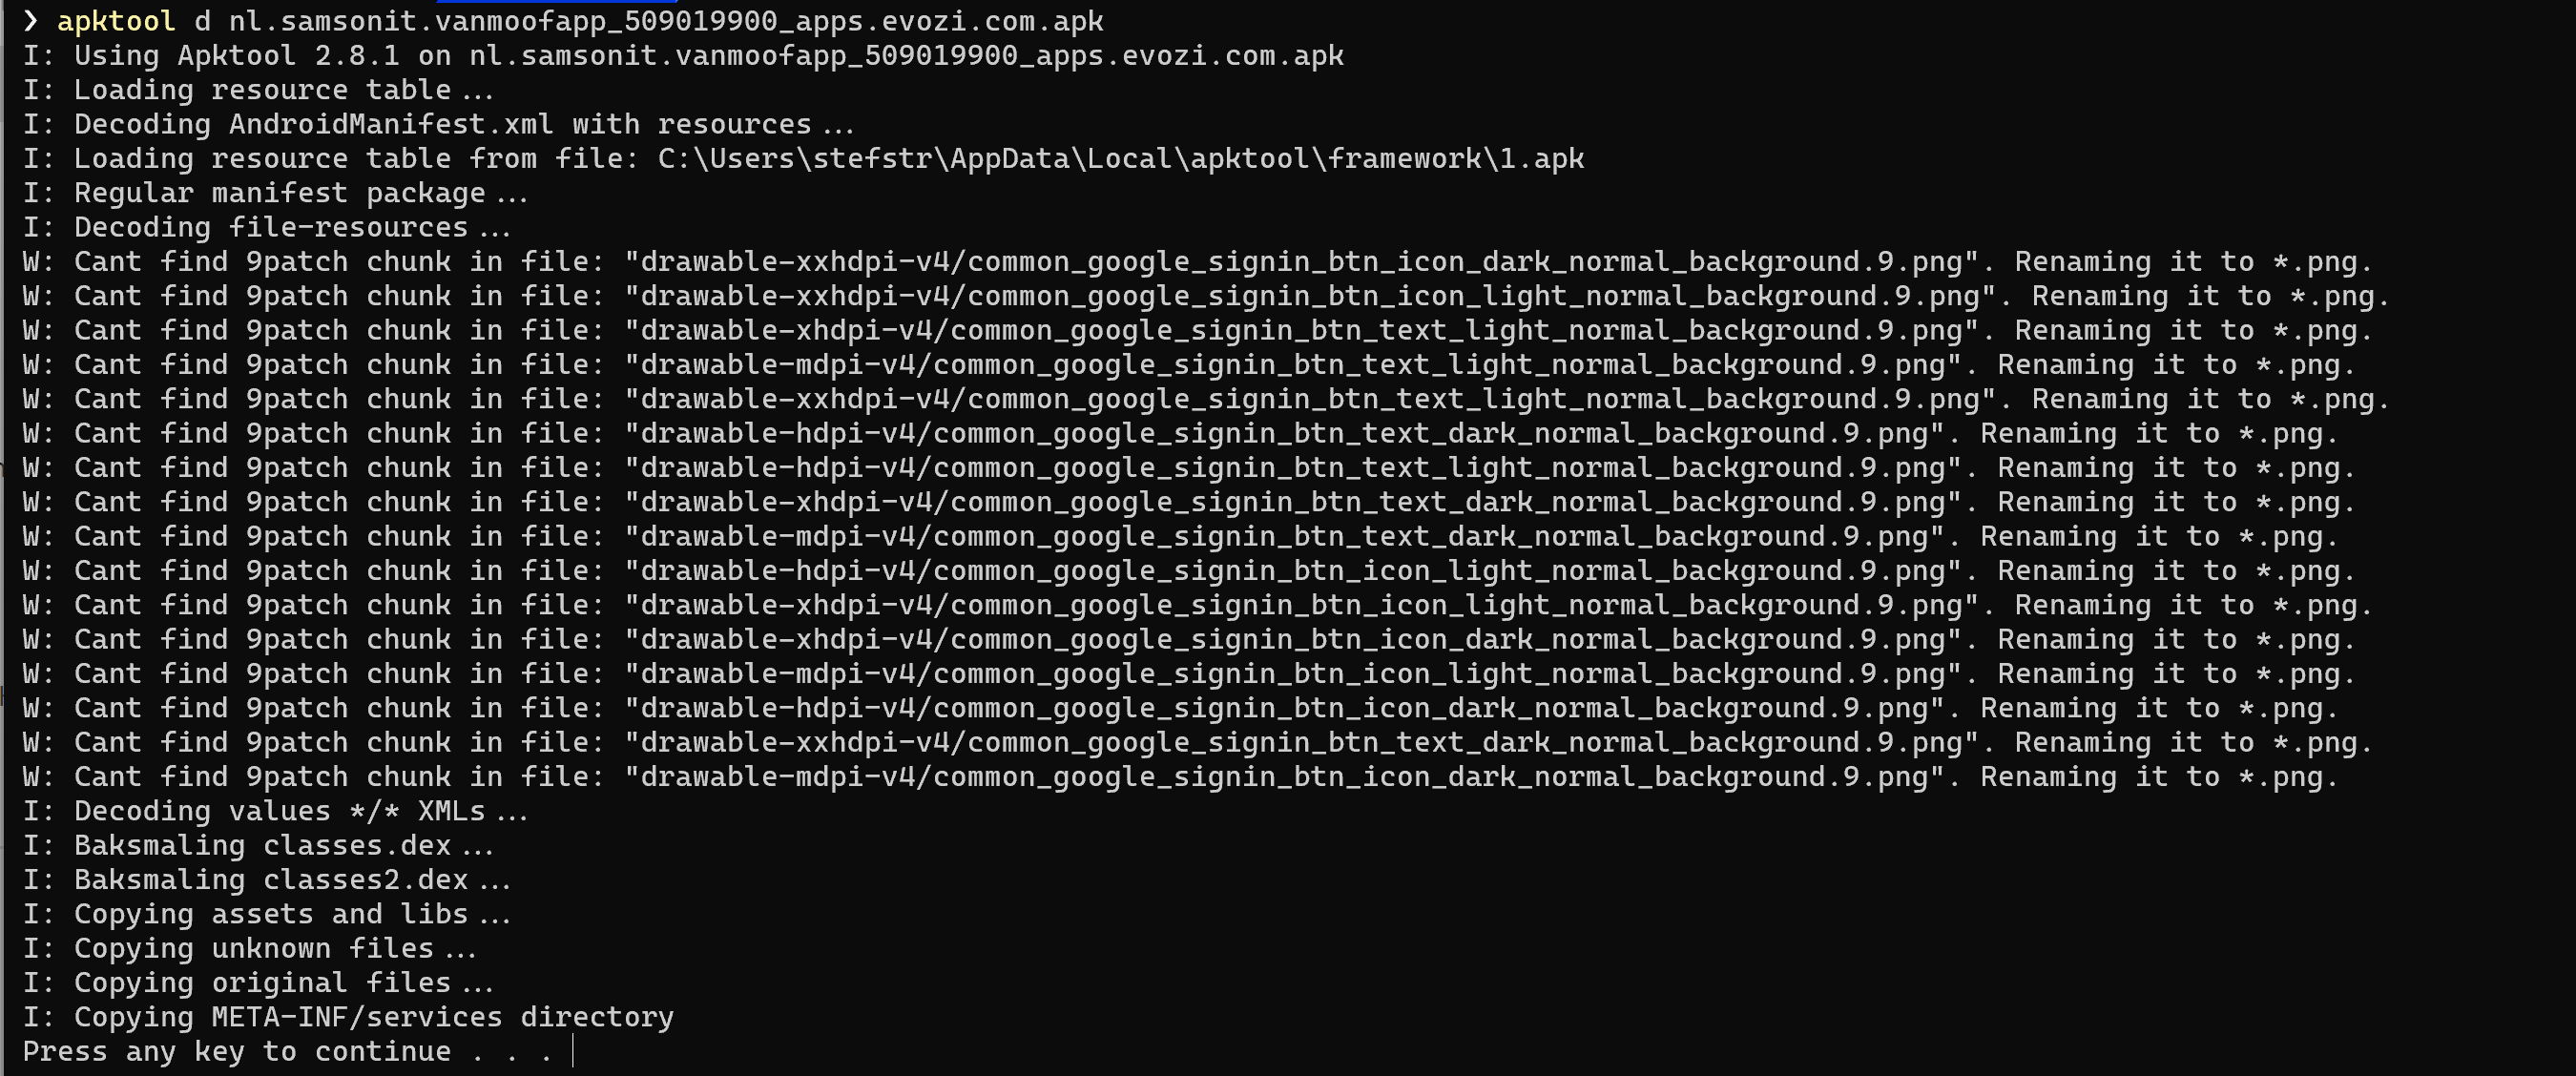
My starting point was the Android vanMoof mobile app. I used the apktool to decompile the vanMoof mobile app. It is a tool for reverse engineering 3rd party, closed, binary Android apps. It can decode resources to nearly original form and rebuild them after making some modifications; it makes possible to debug smali code step by step. Also it makes working with app easier because of project-like files structure and automation of some repetitive tasks like building apk, etc.
I used the following command to decompile the vanMoof mobile app:
1
apktool d vanmoof.apk
For that you first need to download the vanMoof mobile app from the Google Play Store. You can use APKCombo to download the vanMoof mobile app apk file. The reason why I recommend AKPCombo is that they offer also older versions of the Android Apps for which you want to download the apk file for.
After downloading and decompiling the vanMoof’s Android app it’s time to start searching in the code for clues.
For that I used Visual Studio Code where I opened the folder with the decompiled files.
Let’s first start searching for some http(s) endpoints in the code.
If you use the following regular expression it searches in all files for strings containing “https://” but excludes any strings containing “https://github.com”
1
^(?=.*https:\/\/)((?!https:\/\/github\.com).)*$
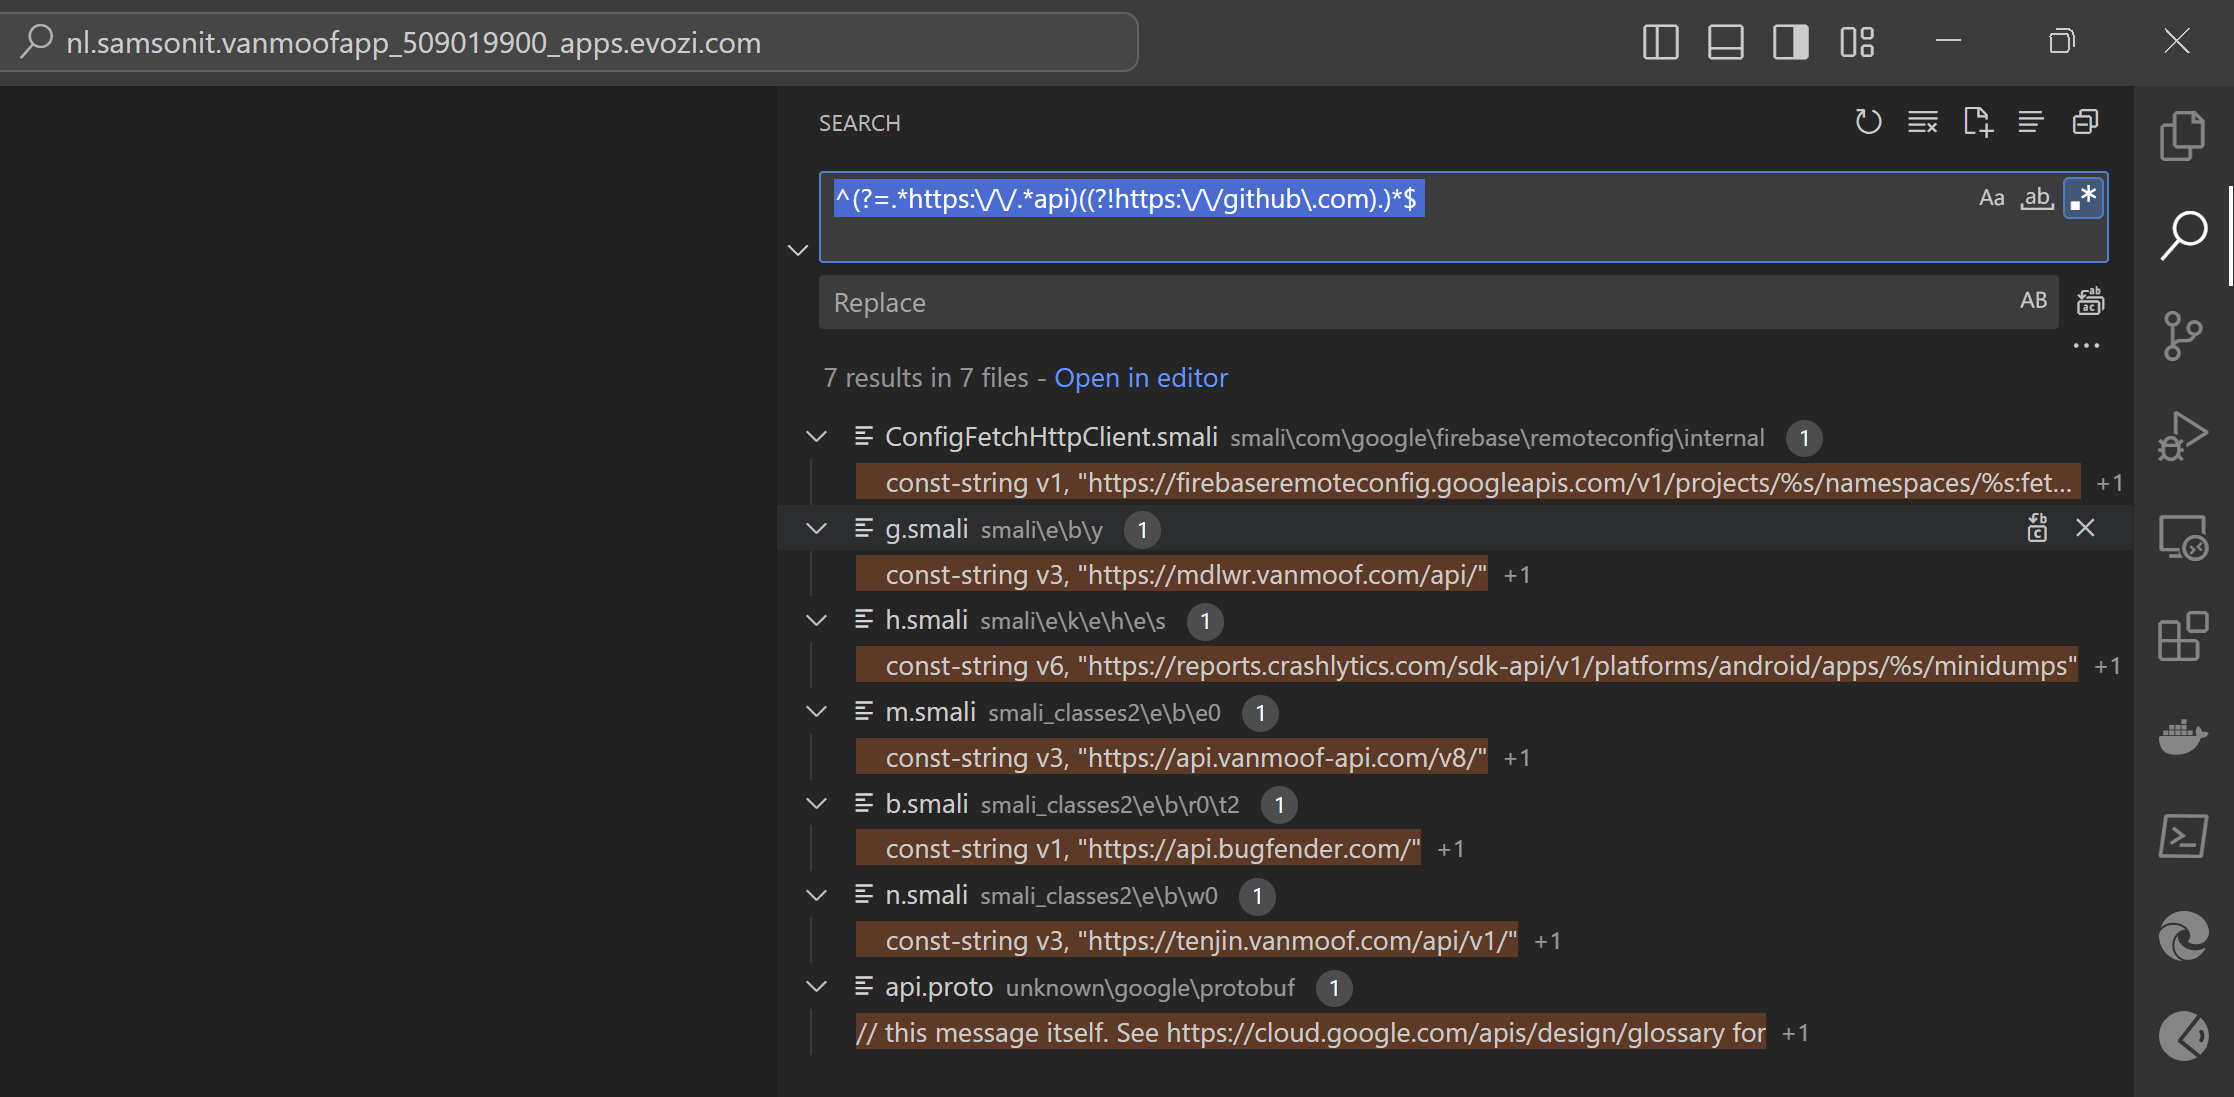
Let’s improve the regex a bit more and add that that we are looking for rest api endpoints.
1
^(?=.*https:\/\/.*api)((?!https:\/\/github\.com).)*$
We have now found the following endpoints in the vanMoof’s Android application code.
Let’s first have a look in the m.smali file that contains the “https://api.vanmoof-api.com/v8” url. Smali is the assembly language used by the Android Dalvik Virtual Machine.
When we look at the contents of the m.smali file we only see that this is probably one of the vanMoof’s rest api endpoints.
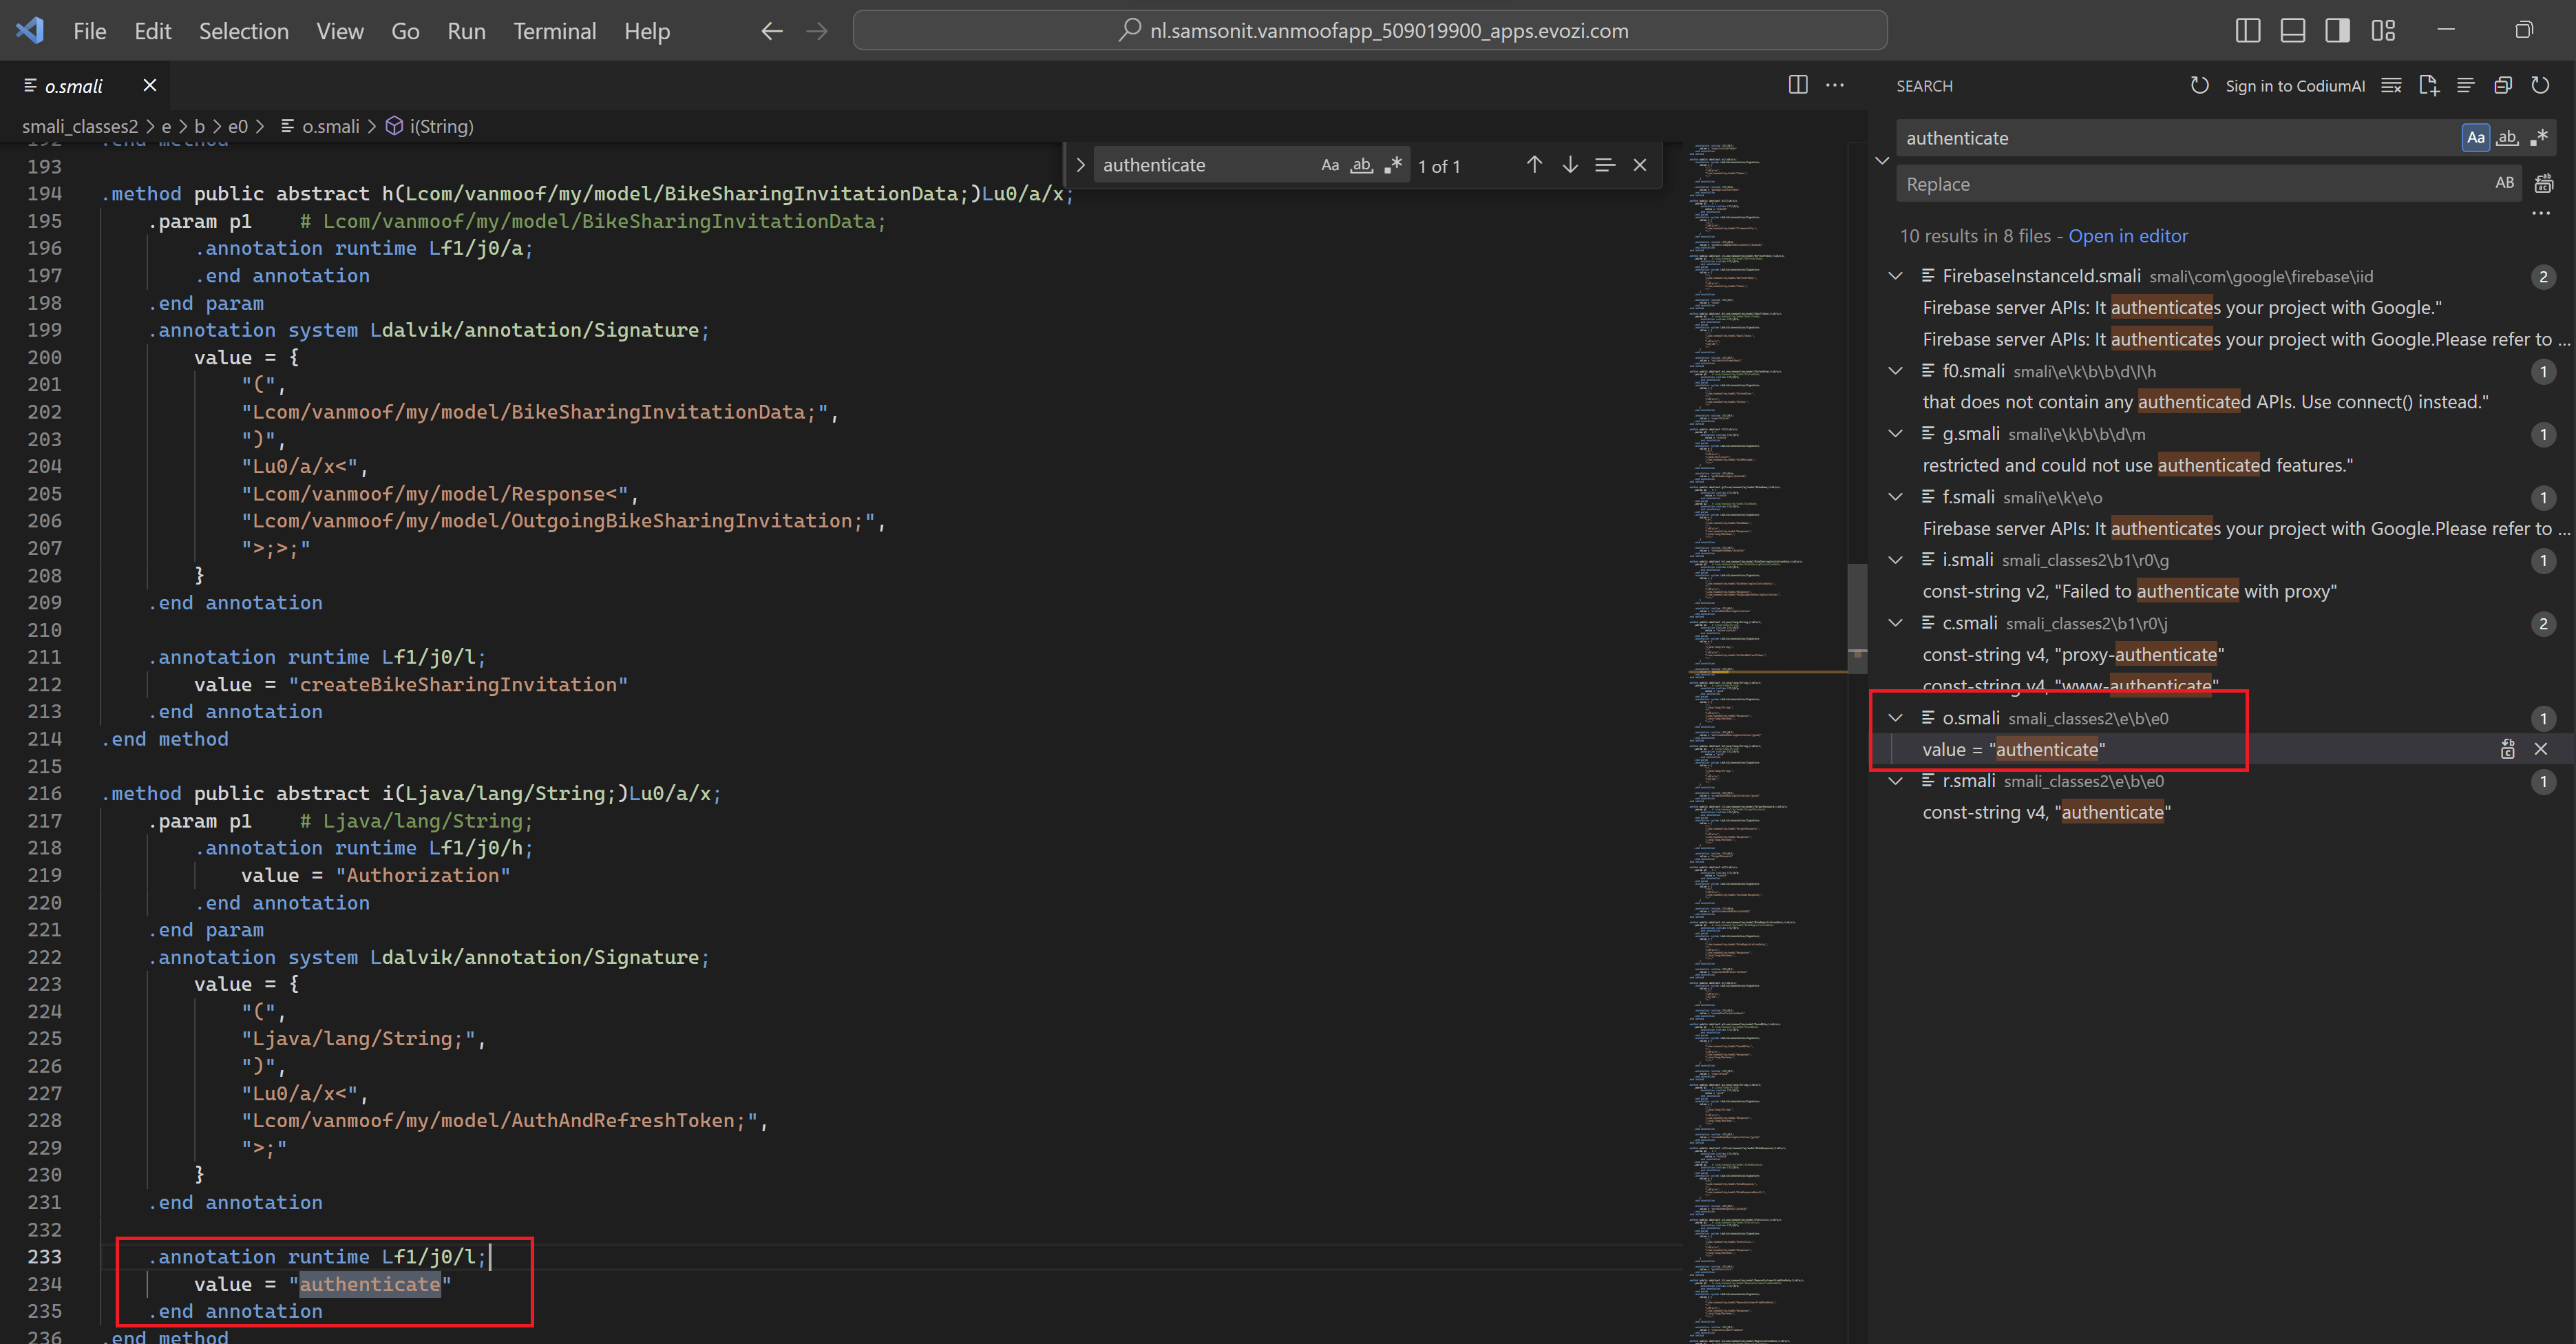
We know we need to authenticate before being able to access most of the REST API’s. When we search the files for the string “authenticate” we find an interesting file called o.smali which gives us some more clues.
From existing vanMoof API documentation we know that the following REST API will authenticate a vanMoof user and download the customers data. So we don’t need to further investigate how the vanMoof’s authentication works, by looking the decompiled apk files.
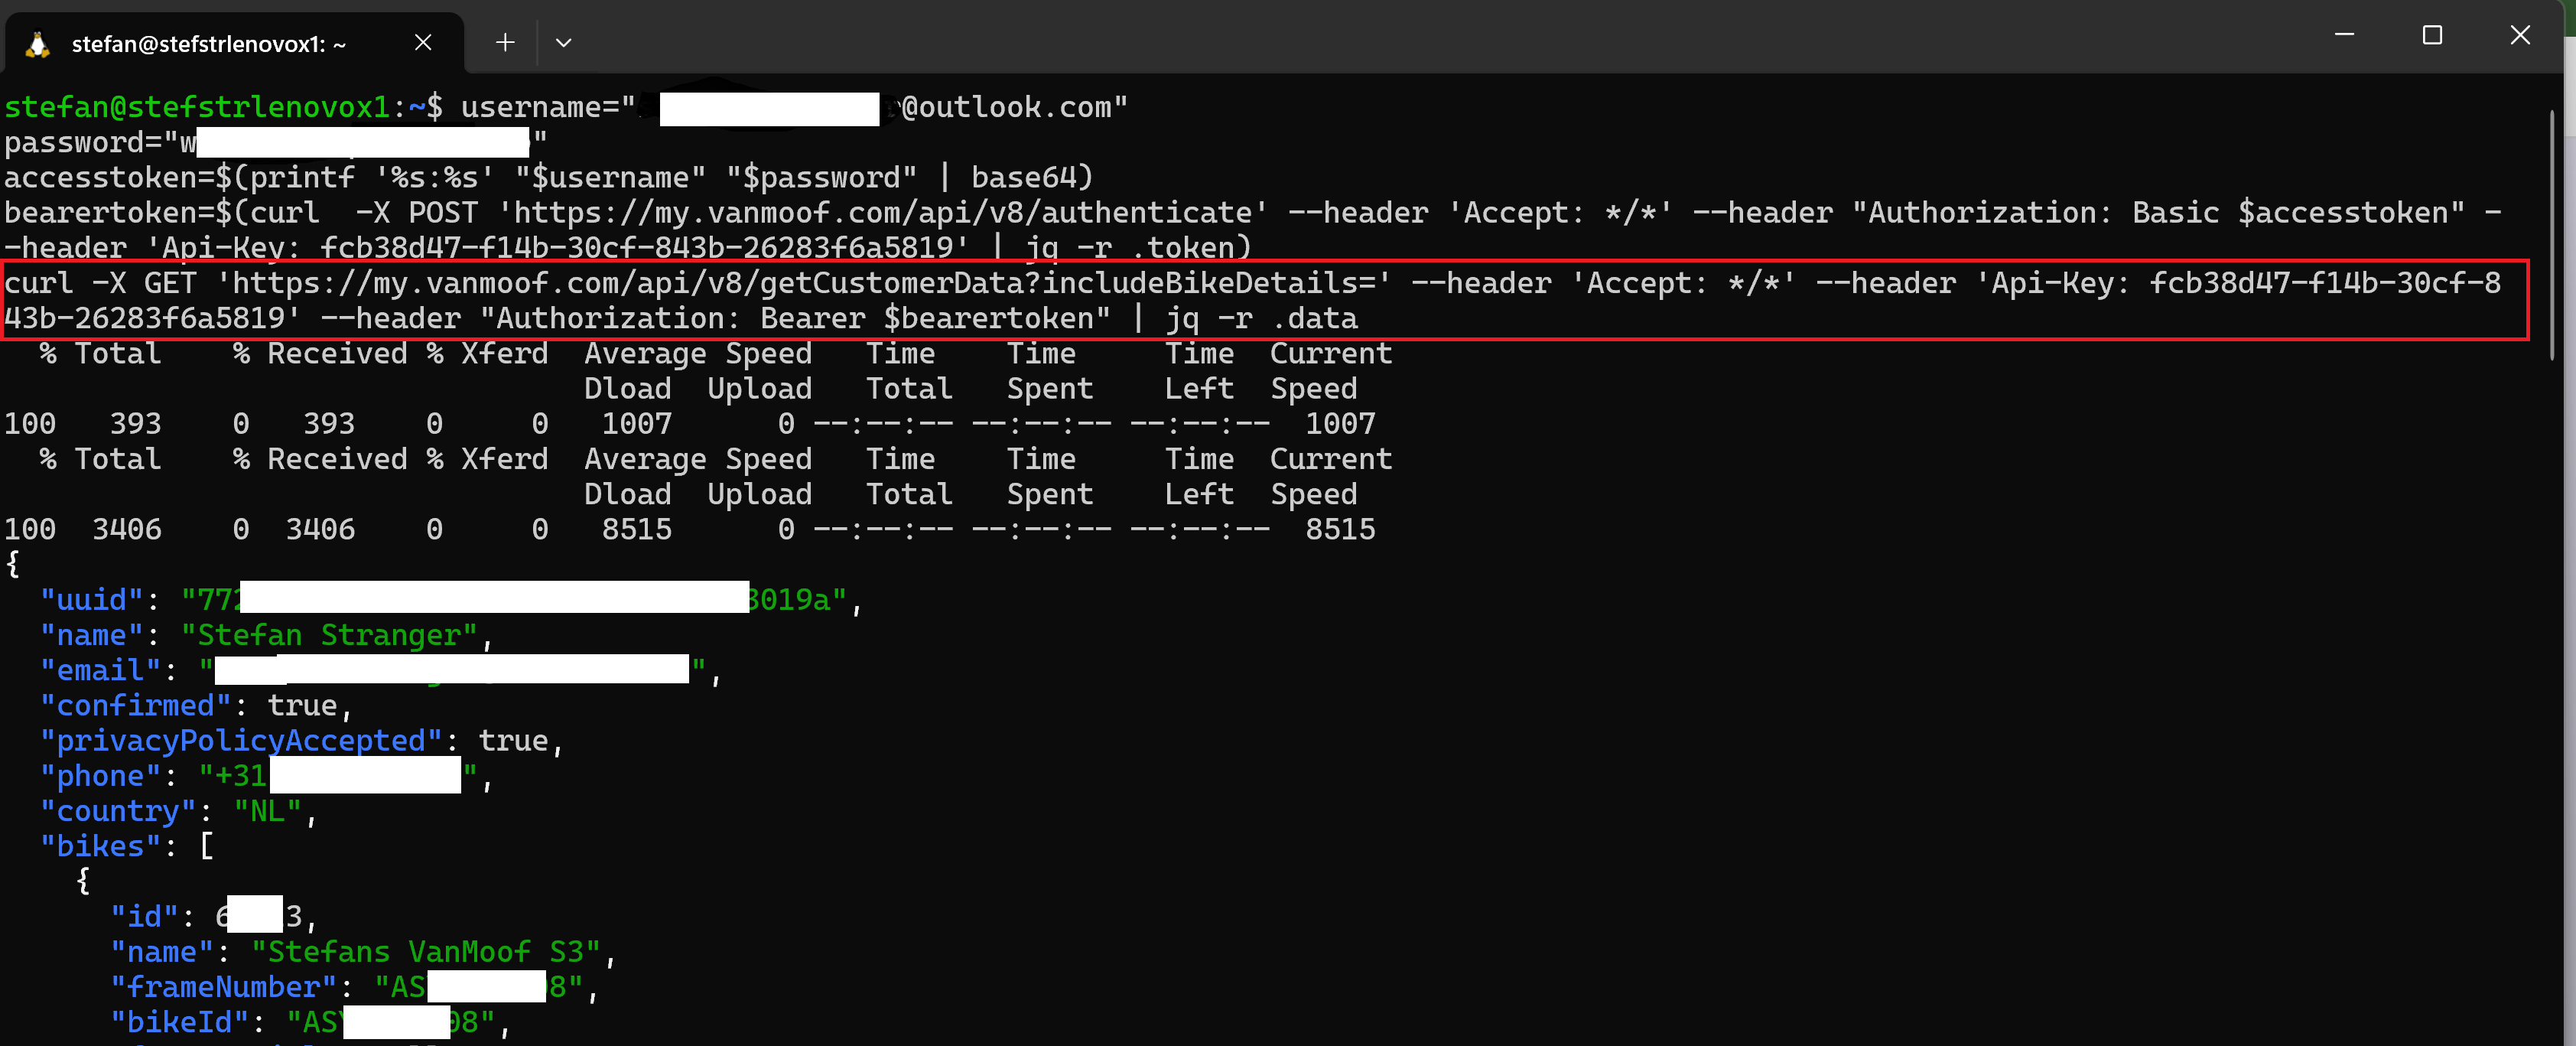
For the authorization the vanMoof’s user name and password are converted to an base64-encode string and the result of this conversion is used in the Authorization header using basic authentication. Basic authentication is a simple authentication scheme built into the HTTP protocol. The client sends HTTP requests with the Authorization header that contains the word Basic followed by a space and a base64-encoded string from the username and password.
1
2
3
4
5
username="john.doe@outlook.com"
password="<enter your password>"
accesstoken=$(printf '%s:%s' "$username" "$password" | base64)
bearertoken=$(curl  -X POST 'https://my.vanmoof.com/api/v8/authenticate' --header 'Accept: */*' --header "Authorization: Basic $accesstoken" --header 'Api-Key: fcb38d47-f14b-30cf-843b-26283f6a5819' | jq -r .token)
curl -X GET 'https://my.vanmoof.com/api/v8/getCustomerData?includeBikeDetails=' --header 'Accept: */*' --header 'Api-Key: fcb38d47-f14b-30cf-843b-26283f6a5819' --header "Authorization: Bearer $bearertoken" | jq -r .data > vanMoof.json
As you see the authentication endpoint is: “https://my.vanmoof.com/api/v8/authenticate”
If we search the o.smali file also for “getCustomerData” we again find this endpoint, so we are getting somewhere.
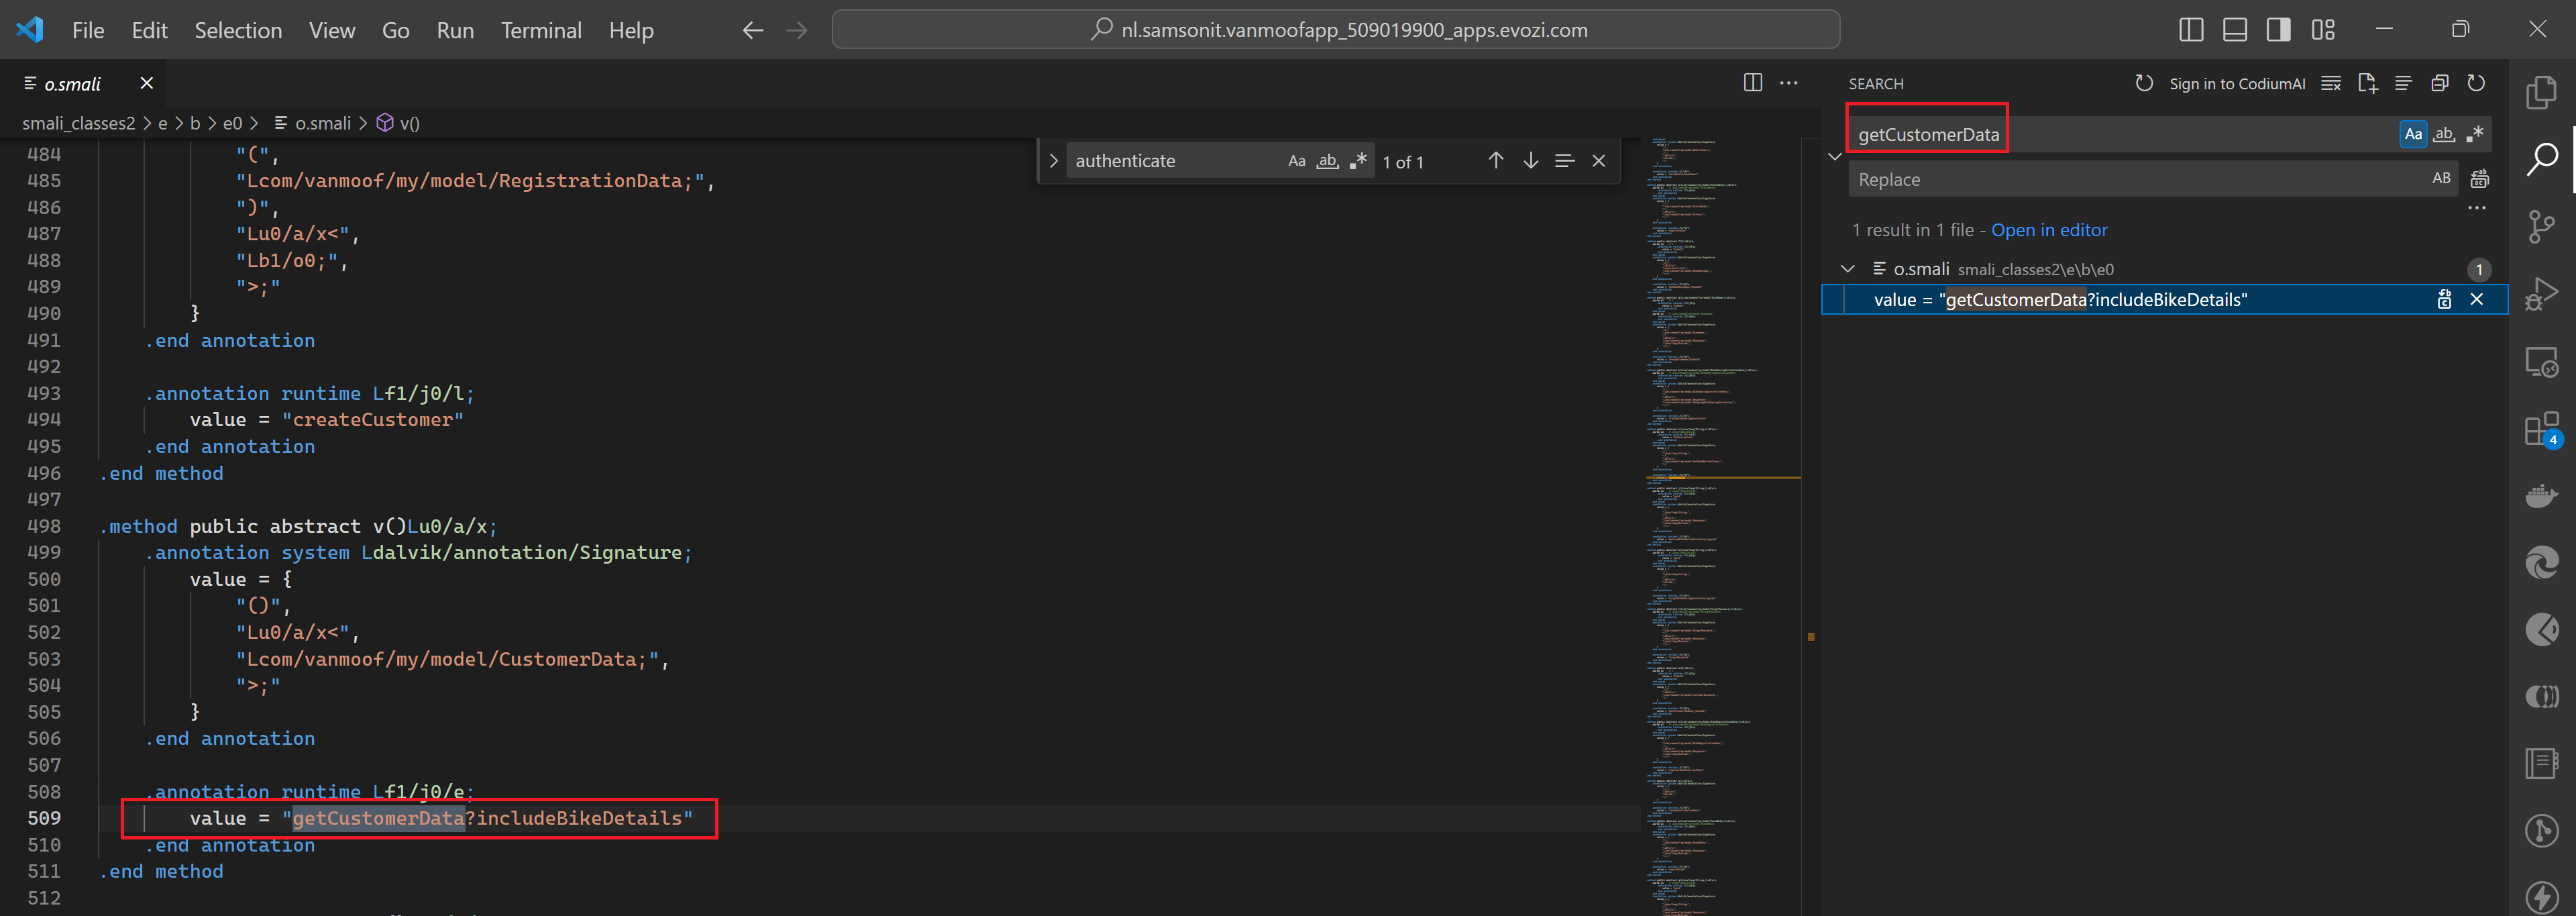
But how to find the complete uri, including the api endpoint?
Let’s try to concatenate the “getCustomerData?IncludeBikeDetails” REST API function to the base url.
We know that these functions would have to use one of the following url’s found in our earlier searches:
- https://my.vanmoof.com/api/v8
- https://tenjin.vanmoof.com/api/v1
Why not do some trial and error using above url’s?
Get Customer Data (include Bike Details)
For authentication we start using information we already have from other vanMoof API documentation.
Using https://my.vanmoof.com/api/v8 url.
Test if we can get the Customer Data using the url https://my.vanmoof.com/api/v8
Endpoint:
1
2
Method: GET
URL: https://my.vanmoof.com/api/v8/v1/getCustomerData?IncludeBikeDetails
Headers:
| Key | Value | Description |
|---|---|---|
| api-key | fcb38d47-f14b-30cf-843b-26283f6a5819 | This is the default api key found in the decompiler apk package and in the pymoof module |
| Authorization | Bearer <JWT token> | retrieved from call to https://my.vanmoof.com/api/v8/authenticate endpoint. |
Body:
1
2
3
{
	// we don't know if we need any body, so leave empty in our first test
}
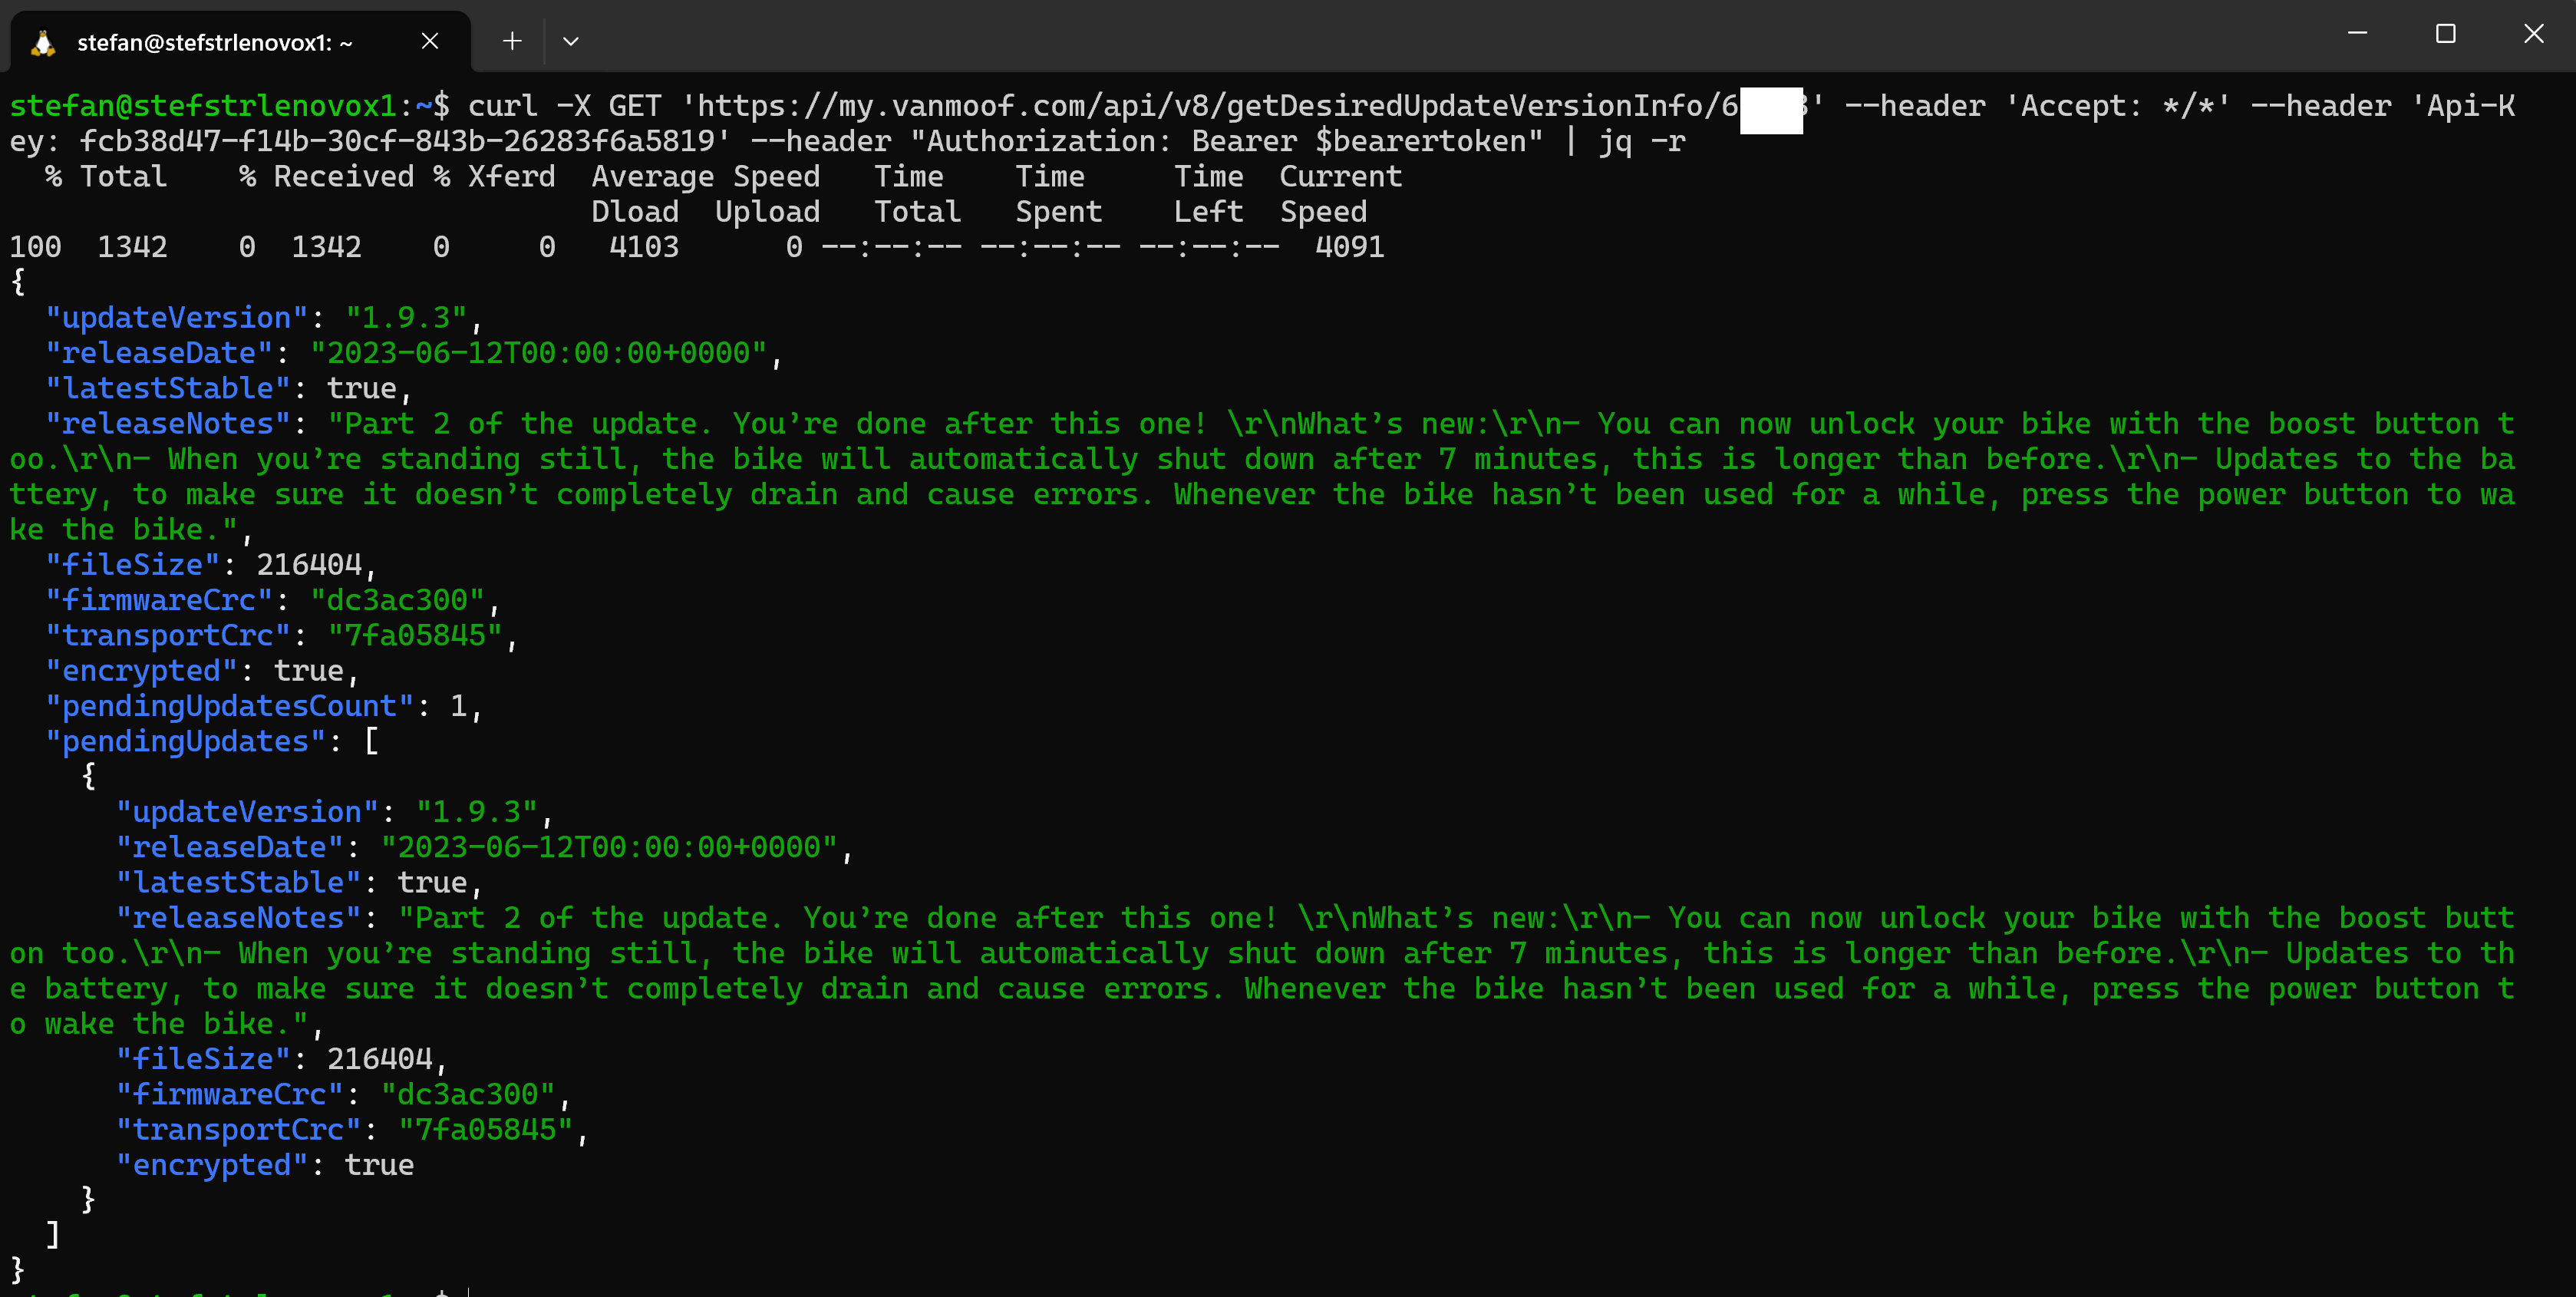
We already knew that this should work based on documentation found online, but here is the REST API call using curl.
As a final test we can try some more endpoints found in the smali file. What is the desired update version info? As we can see in below screenshot this function has the bikeId as parameter.
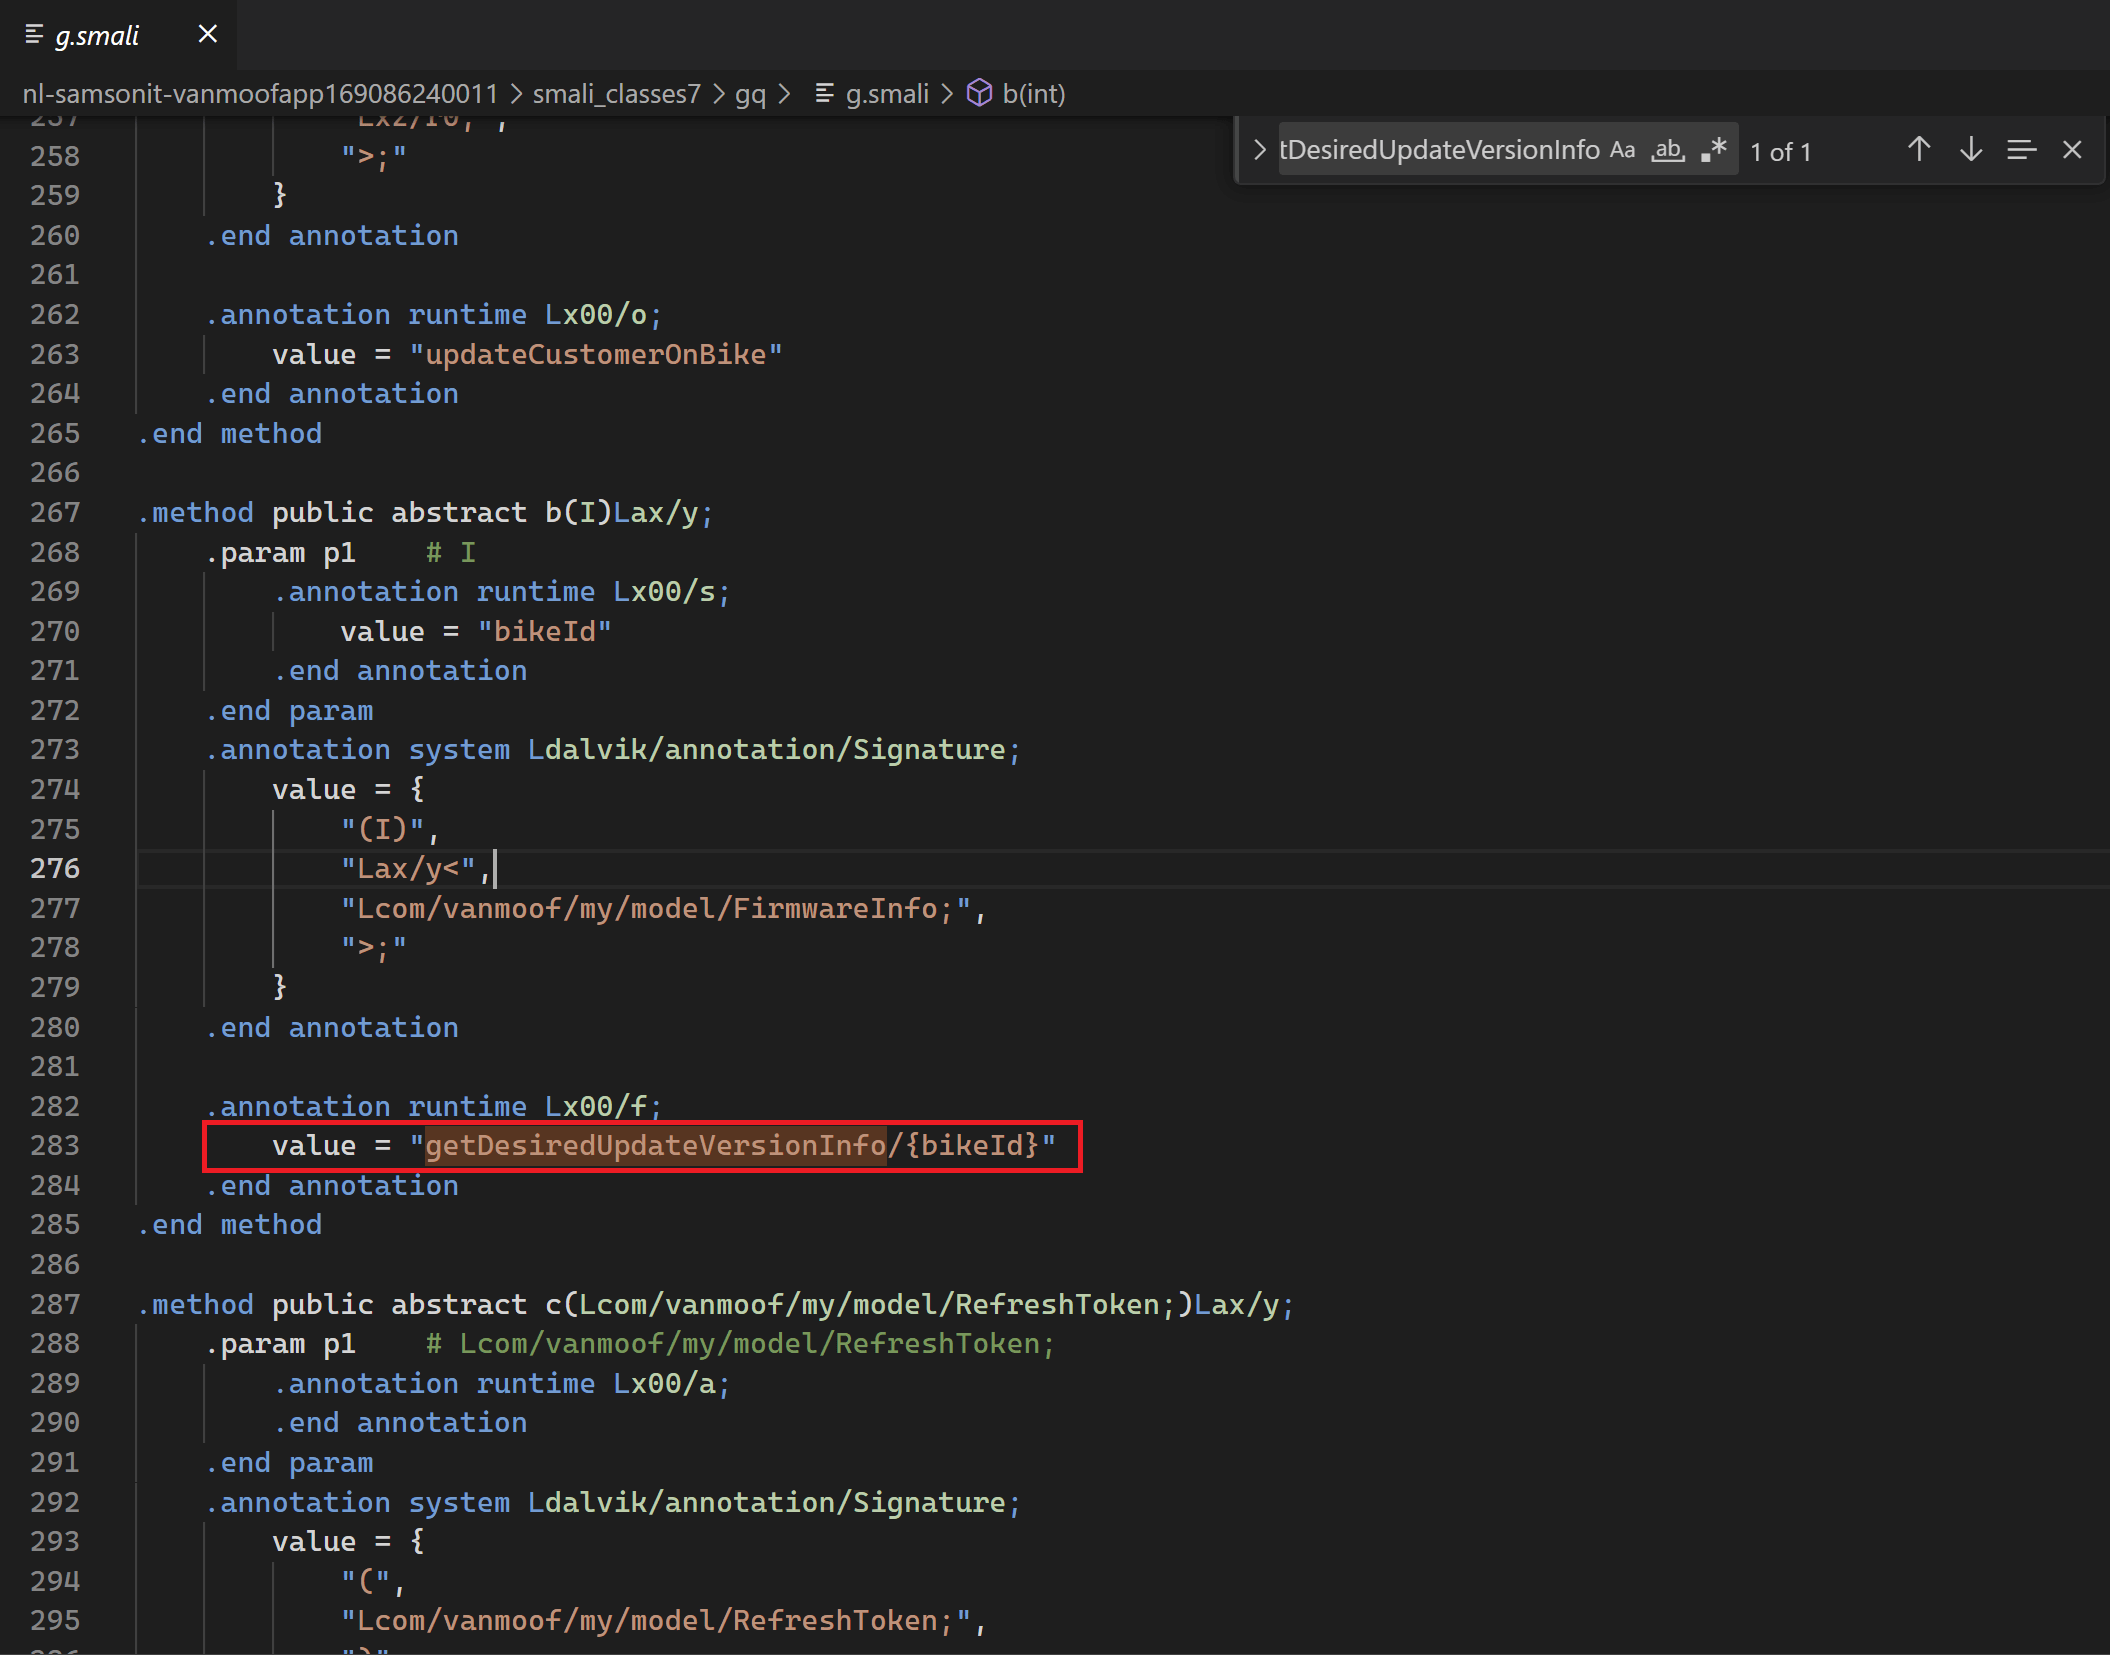
Get Desired Update Version information
Get the desired update version of information of your vanMoof bike.
Endpoint:
1
2
Method: GET
URL: https://my.vanmoof.com/api/v8/getDesiredUpdateVersionInfo/{bikeId}
Headers:
| Key | Value | Description |
|---|---|---|
| api-key | fcb38d47-f14b-30cf-843b-26283f6a5819 | This is the default api key found in the decompiler apk package |
| Authorization | Bearer <JWT token> | retrieved from call to https://my.vanmoof.com/api/v8/authenticate endpoint. |
Query params:
| Key | Value | Description |
|---|---|---|
| bikeId | BikeId is the ID of your vanMoof bike. Can be found using with Get Customer Data (include Bike Details) |
Rides
After validating some of the already know vanMoof’s REST API endpoints it is time to find the vanMoof’s rides information. We already found bike info, let’s now start searching for the rides information in the decompiled apk files.
With the following regular expression we can search for strings starting with a double quote and the strings “ride/” and “rides/”
1
"rides?/
This already gives us the file which we can further investigate.
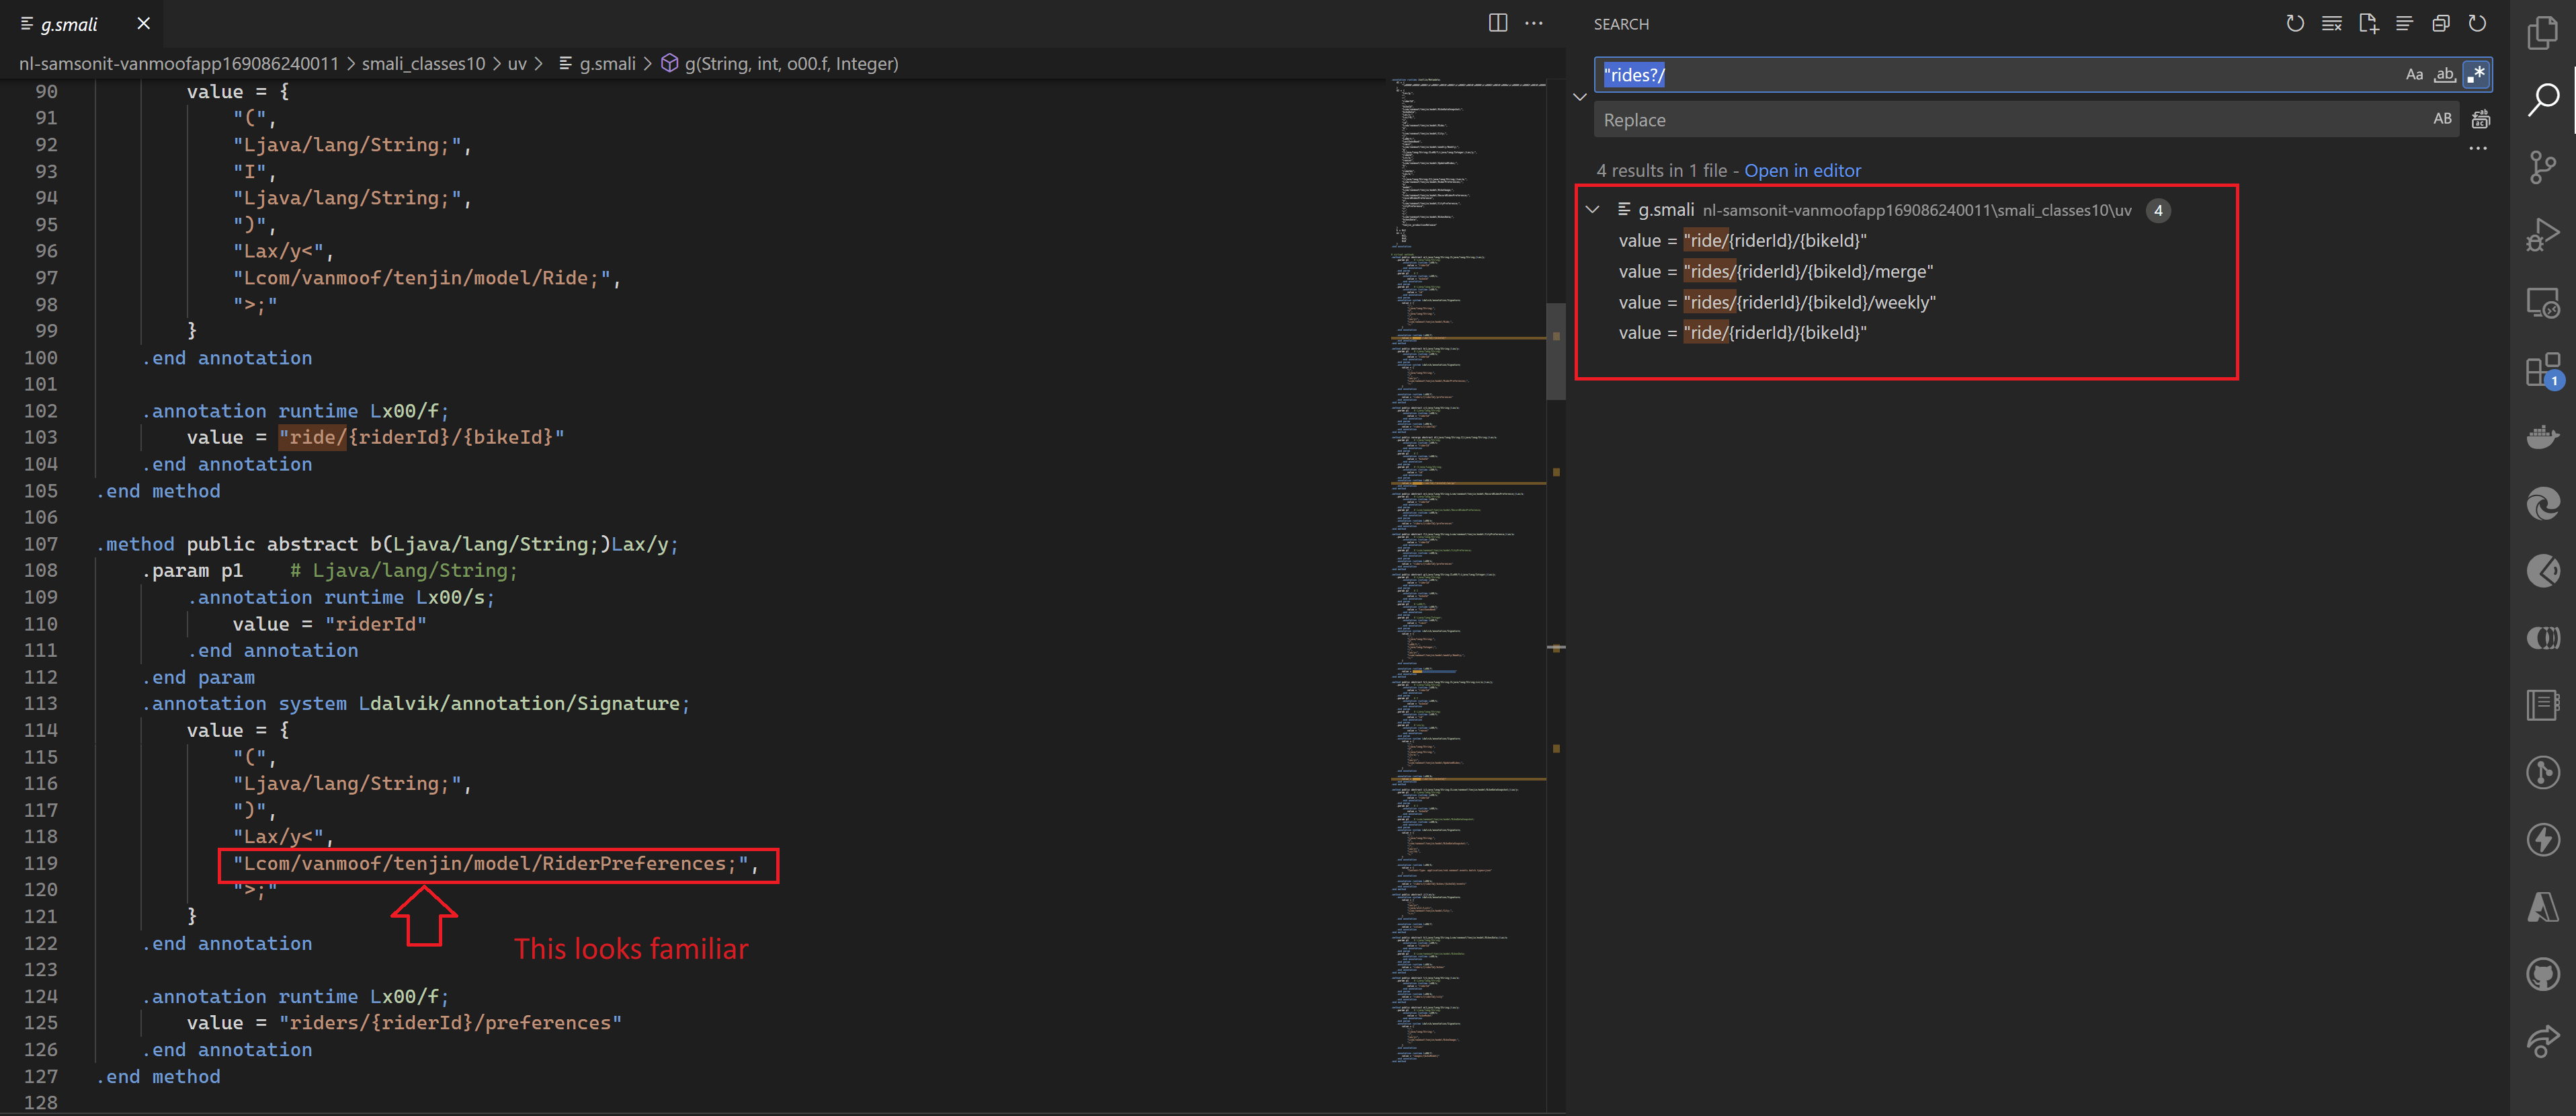
With this regular expression search we found the following paths.
- “ride/{riderI}/{bikeId}”
- “rides/{riderId}/{bikeId}/merge”
- “rides/{riderId}/{bikeId}/weekly”
- ride/{riderId}/{bikeId}
We also found another clue that these functions maybe are part of the earlier found “tenjin” api url.
Maybe do some tests with this url first.
Get Rider preferences
For authentication we start using information we already have from other vanMoof API documentation.
Using https://tenjin.vanmoof.com/api/v1 url.
Test if we can get the rider preferences using the url https://tenjin.vanmoof.com/api/v1
Endpoint:
1
2
Method: GET
URL: https://tenjin.vanmoof.com/api/v1/riders/{riderId}/preferences
Headers:
| Key | Value | Description |
|---|---|---|
| api-key | fcb38d47-f14b-30cf-843b-26283f6a5819 | This is the default api key found in the decompiler apk package and in the pymoof module |
| Authorization | Bearer <JWT token> | retrieved from call to https://my.vanmoof.com/api/v8/authenticate endpoint. |
Query params:
| Key | Value | Description |
|---|---|---|
| riderId | {riderId} | Where can we find the riderId? |
Body:
1
2
3
{
	// we don't know if we need any body, so leave empty in our first test
}
To find the riderId we could start with the earlier collected Customer Data.
Until now we have used curl to call and test the vanMoof rest apis. Using some tools, like PostMan or ThunderClient in Visual Studio Code makes calling REST APIs a bit easier. From now on I’ll be using the Visual Studio Code’s Extension called ThunderClient.
Ok let’s continue with our tests in Visual Studio Code. When we test the following endpoint using the Authorization header using basic authentication we used when getting the Customer Data (include Bike Details) we get an “Unauthorized” error. 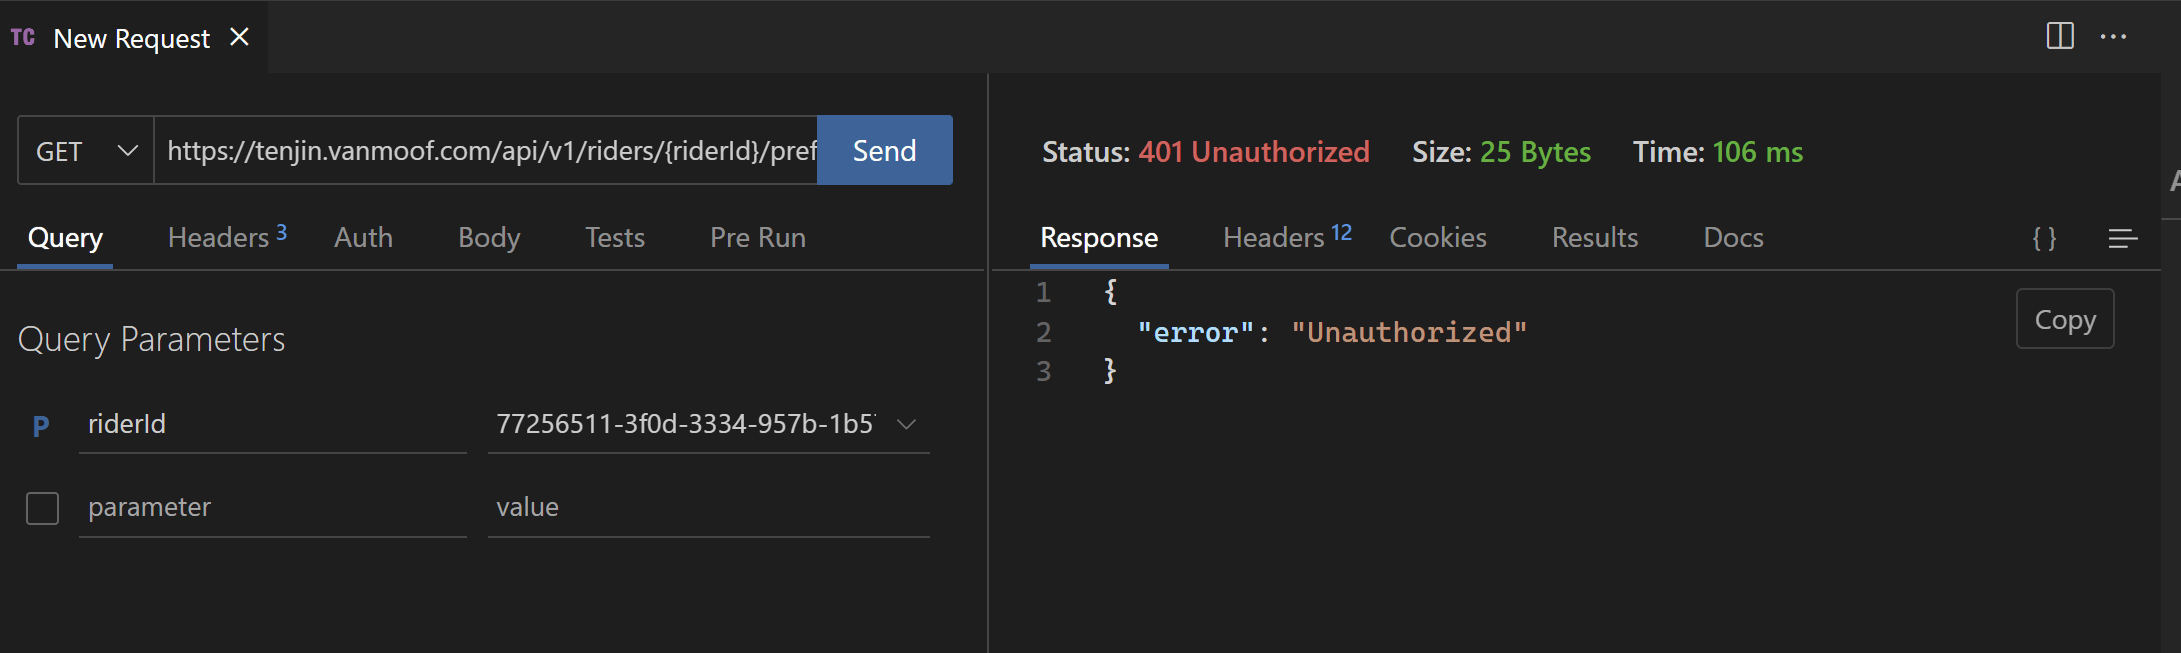
In PowerShell this call looks like this.
$headers = @{}
$headers.Add("Accept", "*/*")
$headers.Add("Authorization", "Bearer <token from authentication call>")
$headers.Add("Api-Key", "fcb38d47-f14b-30cf-843b-26283f6a5819")

$reqUrl = 'https://tenjin.vanmoof.com/api/v1/riders/<uuid from Customer Data (include Bike Details) result>/preferences'


$response = Invoke-RestMethod -Uri $reqUrl -Method Get -Headers $headers
$response | ConvertTo-Json
That didn’t work as expected. Maybe the Bearer token is incorrect?
Bearer authentication (also called token authentication) is an HTTP authentication scheme that involves security tokens called bearer tokens. The name “Bearer authentication” can be understood as “give access to the bearer of this token.” The bearer token is a cryptic string, usually generated by the server in response to a login request. The client must send this token in the Authorization header when making requests to protected resources.
Now it’s time to try some other technique to find the API endpoints, namely monitoring the application network traffic.
Disclaimer:
I’ve not always had success when trying to monitor the Android application network traffic. Especially when you try to decrypt the https network traffic. On Android 7 or newer and the app you are decrypting has target SDK > 23, the proxy (mitm) certificate will be rejected, as apps do not trust user certificates anymore.
Network monitoring
With network traffic inspection tools you can also try to analysis Network traffic to monitor incoming and outgoing network data packets. With tools like mitmproxy or CAIDO you can try to intercept, inspect, modify and replay web traffic such as HTTP/1, HTTP/2, WebSockets, or any other SSL/TLS-protected protocols. But the challenging part when using these tools is often the decryption of the https traffic.
The Android client (Phone) often does not trust the mitm certificate. If you are on Android 7 or newer and the app you are decrypting has target SDK > 23, which is usually the case, the (mitm) certificate will be rejected, as apps do not trust user certificates anymore.
Disclaimer:
When documenting this for the blog post I was not able to monitor the vanMoof Android app network traffic anymore via the mitmproxy. Not sure if I was ‘lucky’ the first time I tried, or if used a different vanMoof Android App version. I tried multiple times with different configurations but each time I tried to inspect the encrypted vanMoof’s traffic I got connections errors in the vanMoof app.
Still I think its useful to describe how to be able to monitor an Android’s Application network traffic for educational purposes. For the purpose of documentation I’ll showing how to monitor the network traffic of the Bikey App Cowboy created. They have created a simple app to enable you to save your unique digital key and keep riding your vanMoof’s bikes even if the servers go down.
High-Level steps
To monitor the Androids Application network traffic and decrypt the https traffic I followed below steps:
- Install mitmproxy. mitmproxy is a set of tools that provide an interactive, SSL/TLS-capable intercepting proxy for HTTP/1, HTTP/2, and WebSockets.
- Install Android Studio. This is the official Integrated Development Environment (IDE) for Android app development. We are going to use this for creating the virtual Android devices where we are going to install our to be monitored Android Application on.
- Create a Android Virtual Device (AVD) using a non Google image to enable root access.
- Start ADV with mitmproxy as proxy configured.
- Install mitmproxy certificate on AVD.
- Install Android application with download apk file on AVD.
- Start Android Application on AVD and start monitoring network traffic in mitmproxy.
I’m skipping the first 2 steps, because these should be simple to do on your own following the provided documentation.
1. Create a new Android Virtual Device
Create a new Virtual Device using the Virtual Device Manager.
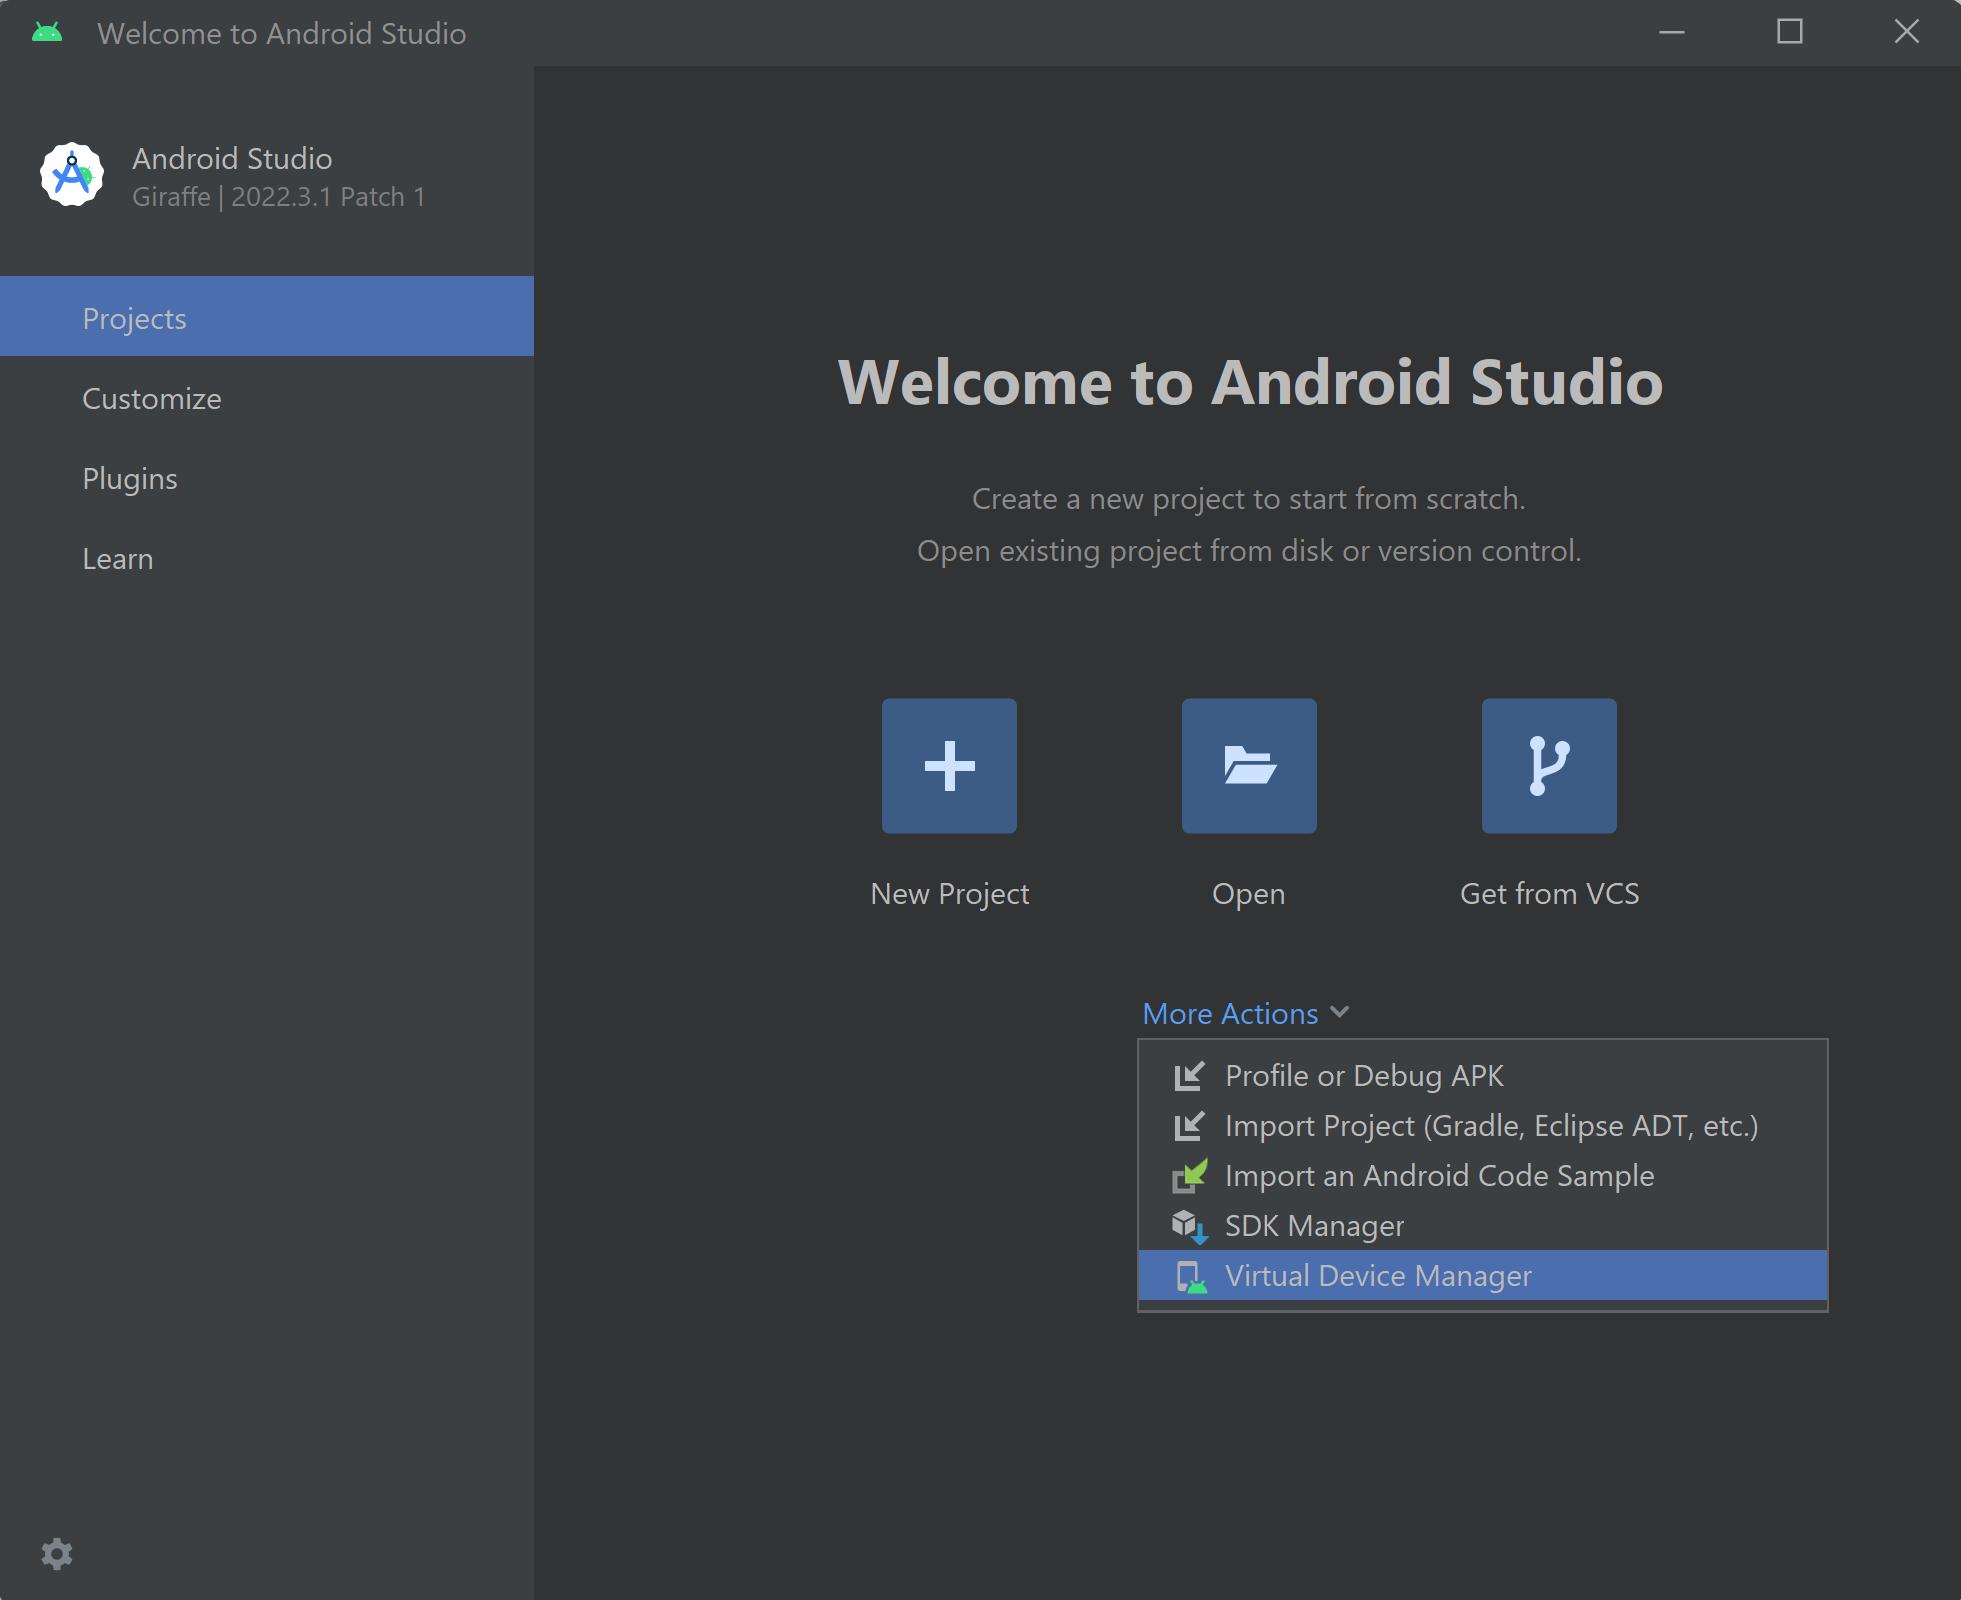
Click on “Create Device” to get started. We now need to select the Hardware and secondly we need to select the System Image (Android OS Version)
I selected the Pixel 7 for the hardware.

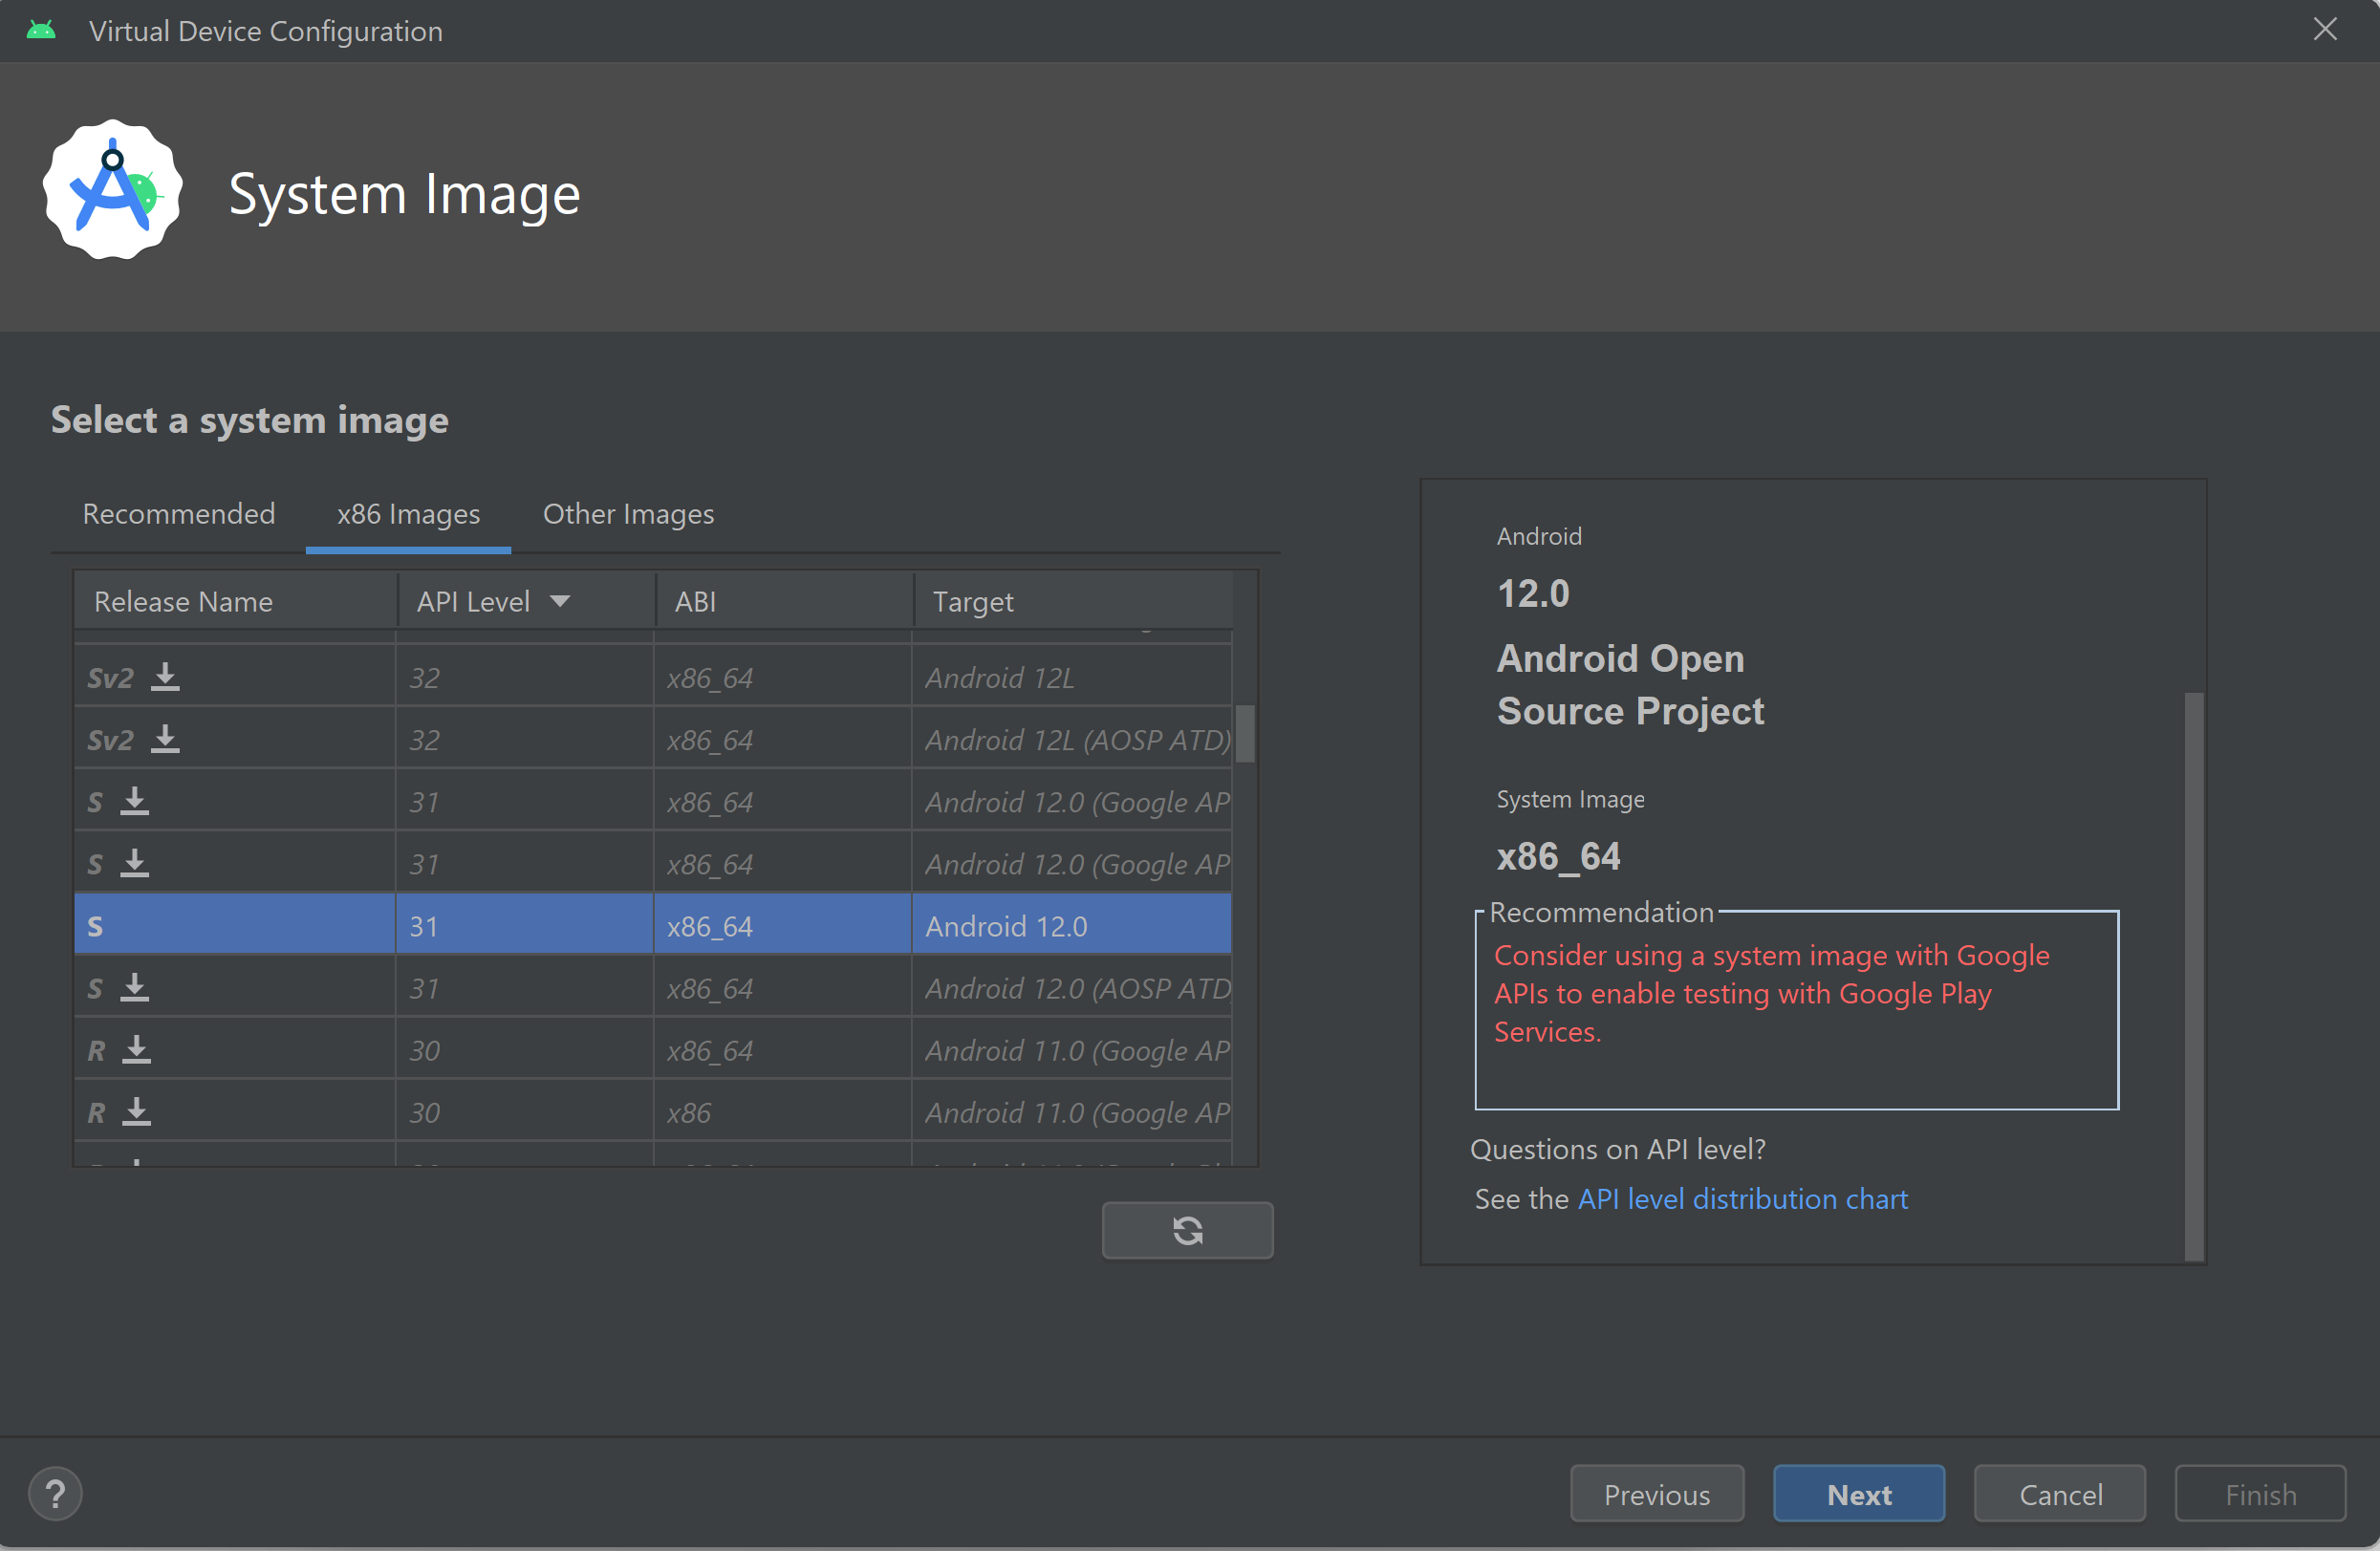
Click Next to select the System Image. Make sure you select non Google Target image! Otherwise you cannot enable root on this Android Virtual Device later!
I selected the x86 image with Release Name S and API level 31 and Target OS Android 12.0.
The final step is giving this Android Virtual Device (AVD) a name and hit finish.
2. Start Android Virtual Device with mitmproxy configured
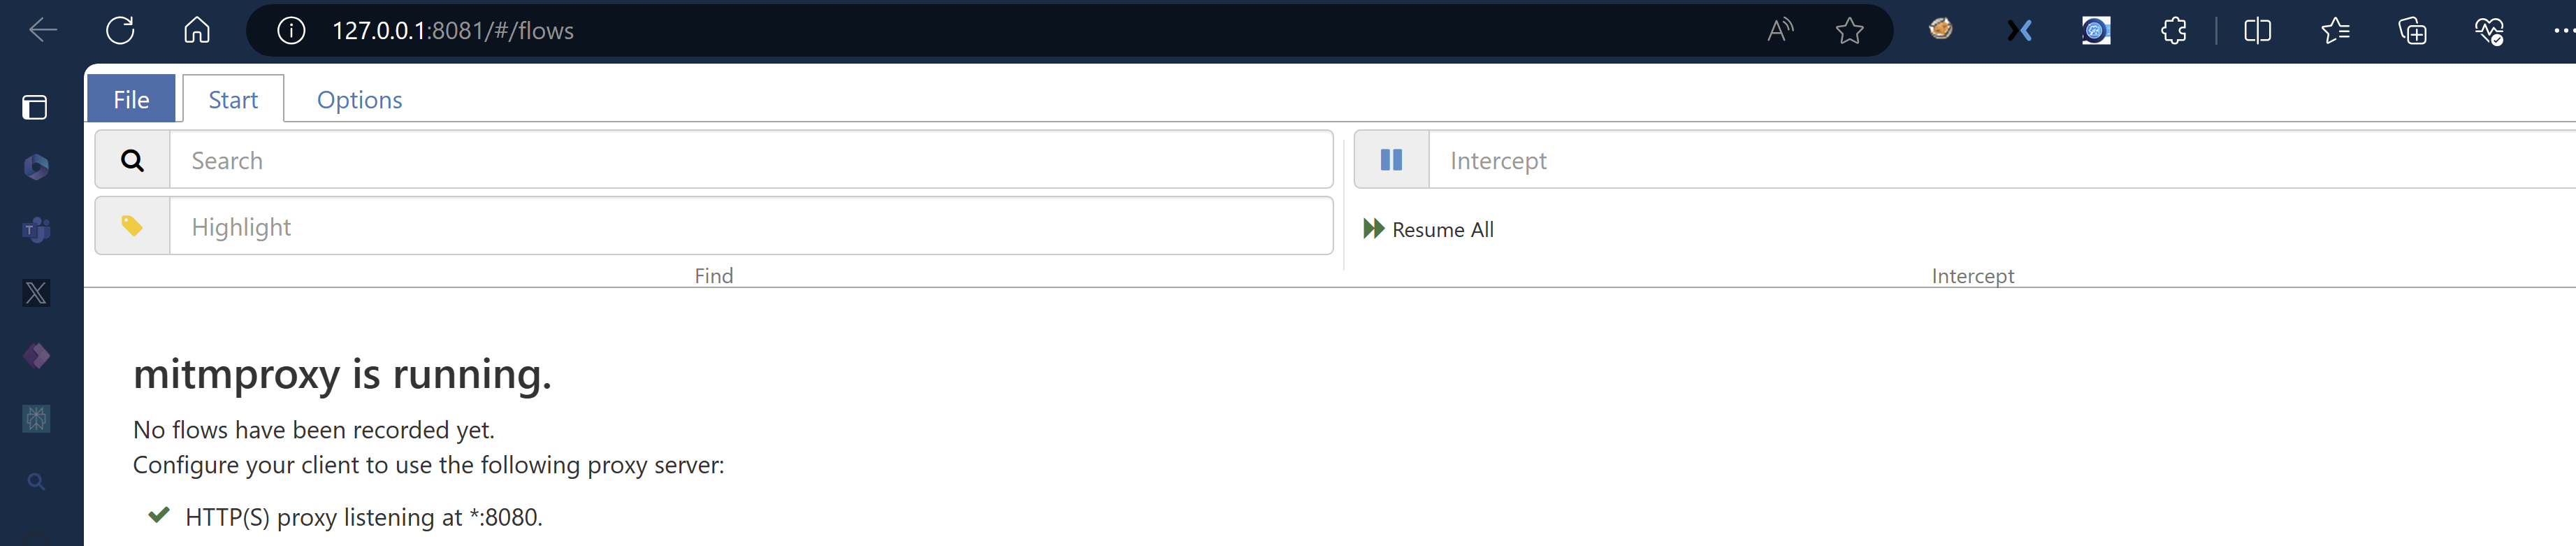
The first step is to start the earlier installed mitmweb (webui). A browser window should be opened showing that the mitmproxy is running.
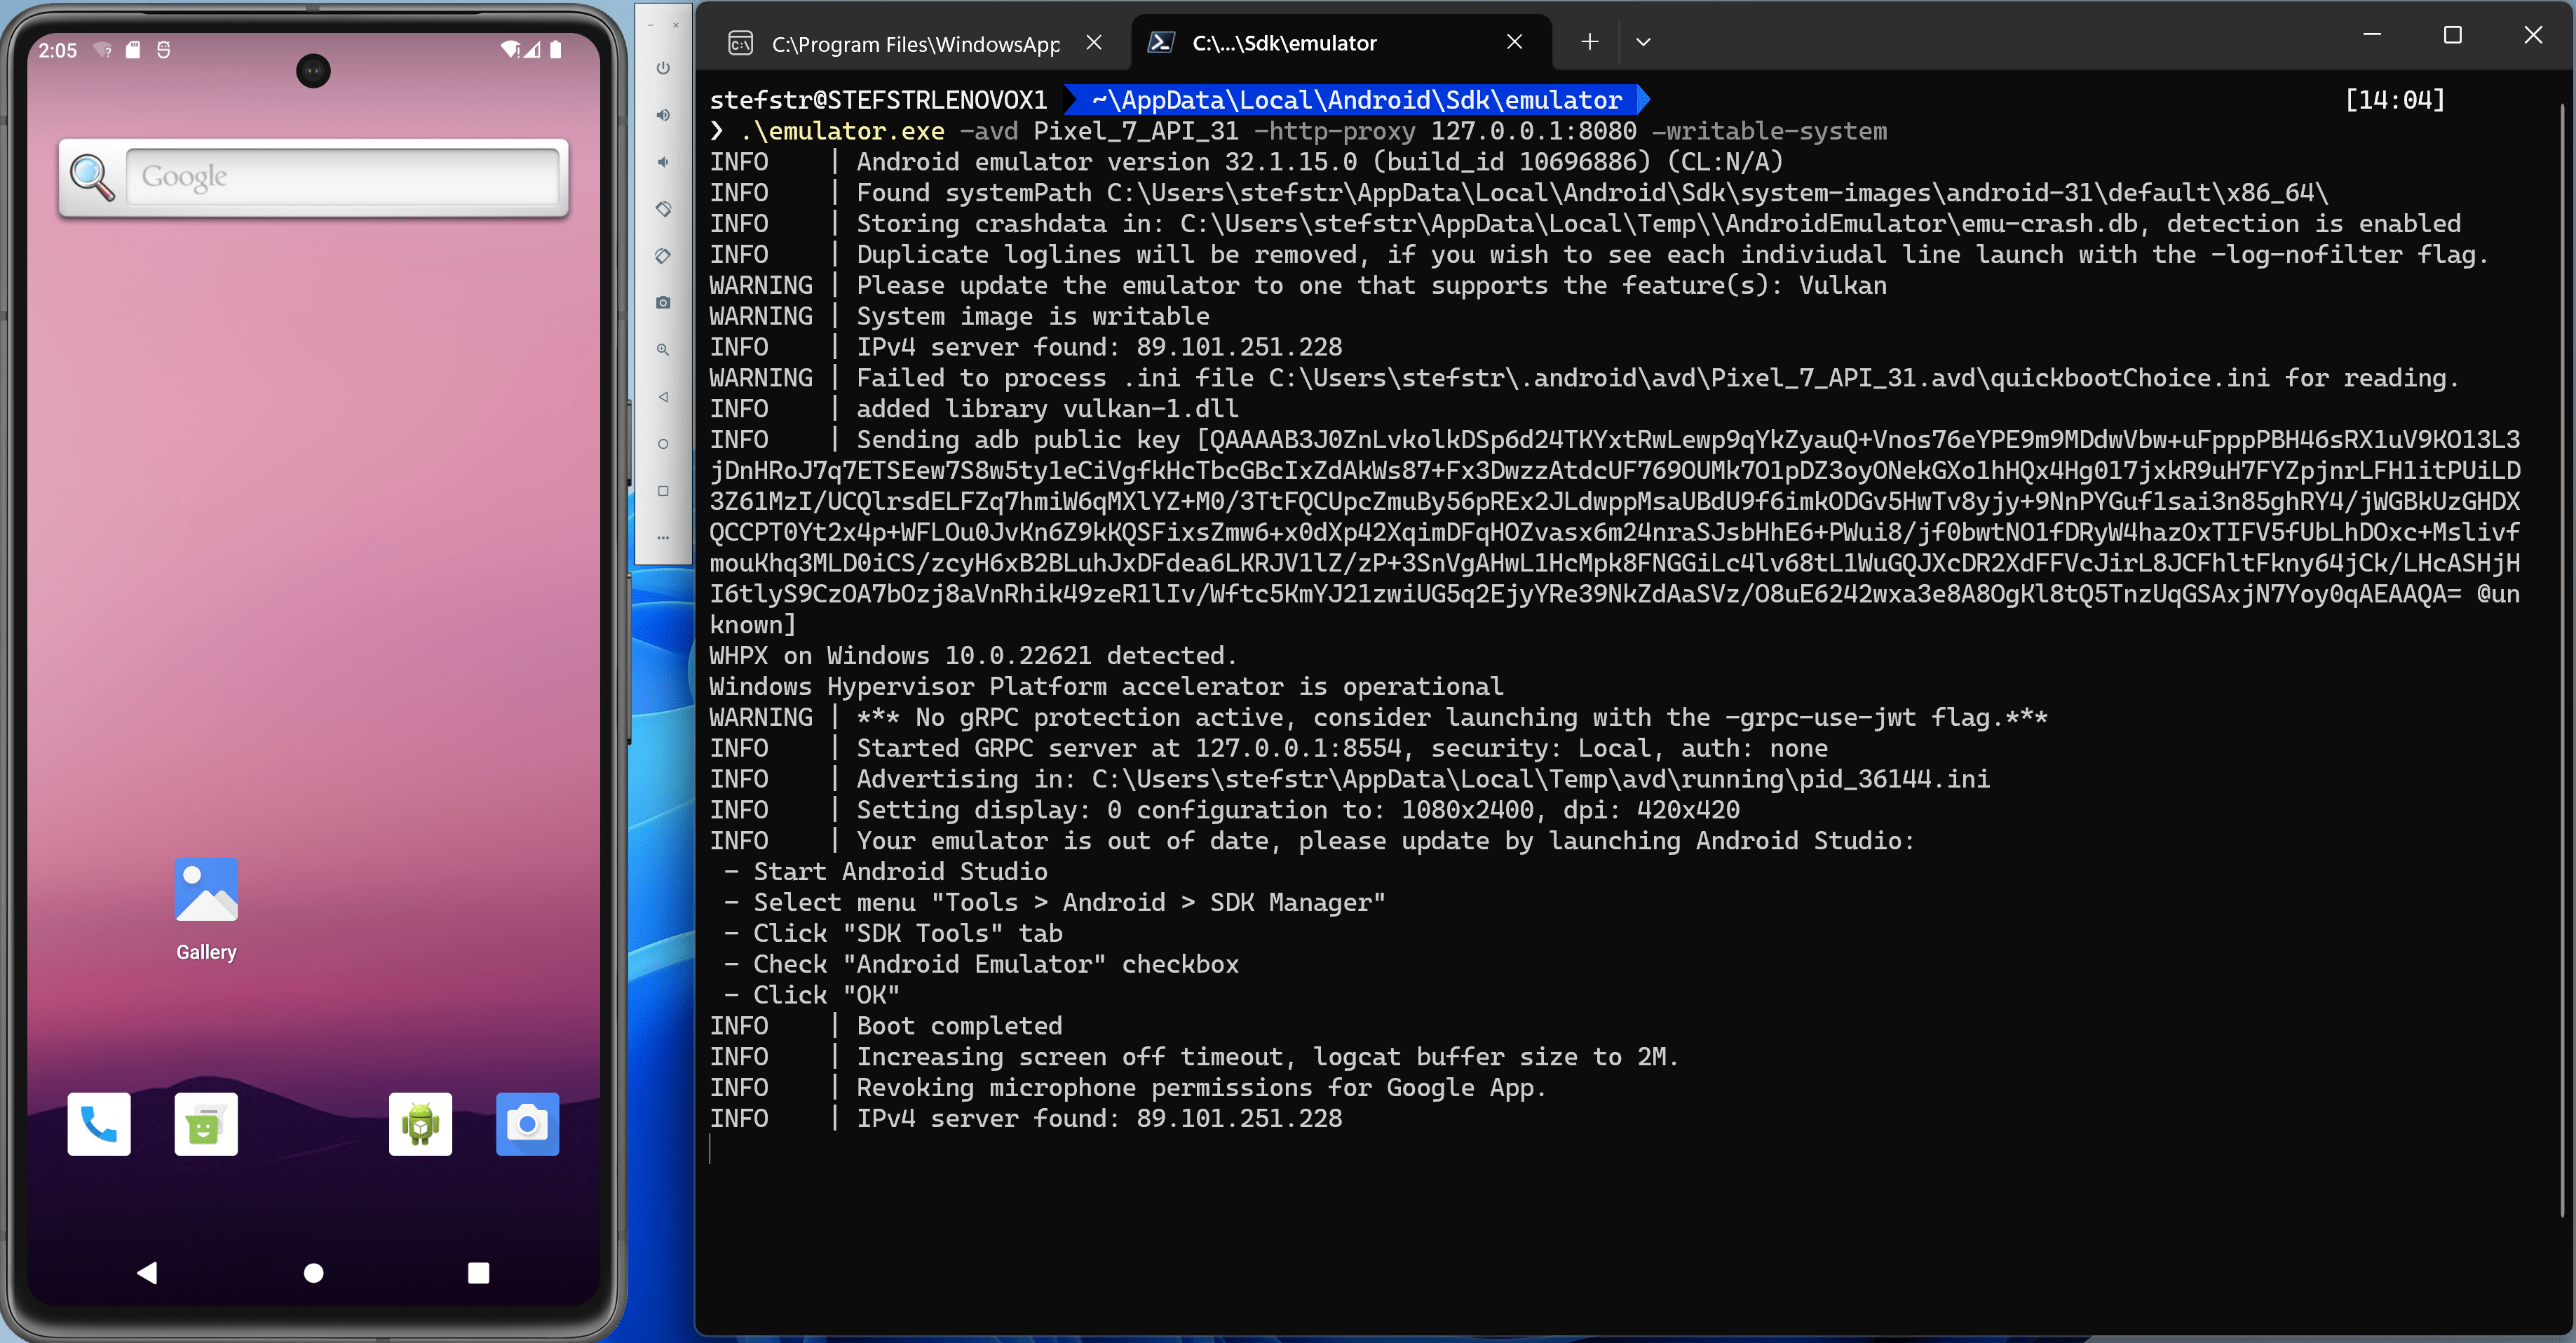
Now it’s time to start the AVD from the command prompt with the following command.
You can find the name of the AVD, you just created with the following command:
.\emulator.exe -list-avds
On Windows the command emulator.exe is located in your “~\AppData\Local\Android\Sdk\emulator” folder.

Start the AVD with the following command:
.\emulator.exe -avd Pixel_7_API_31 -http-proxy 127.0.0.1:8080 -writable-system
The AVD Should not be started.
3. Install mitmproxy certificate
The next step is to install the mitm proxy certificate on the AVD.
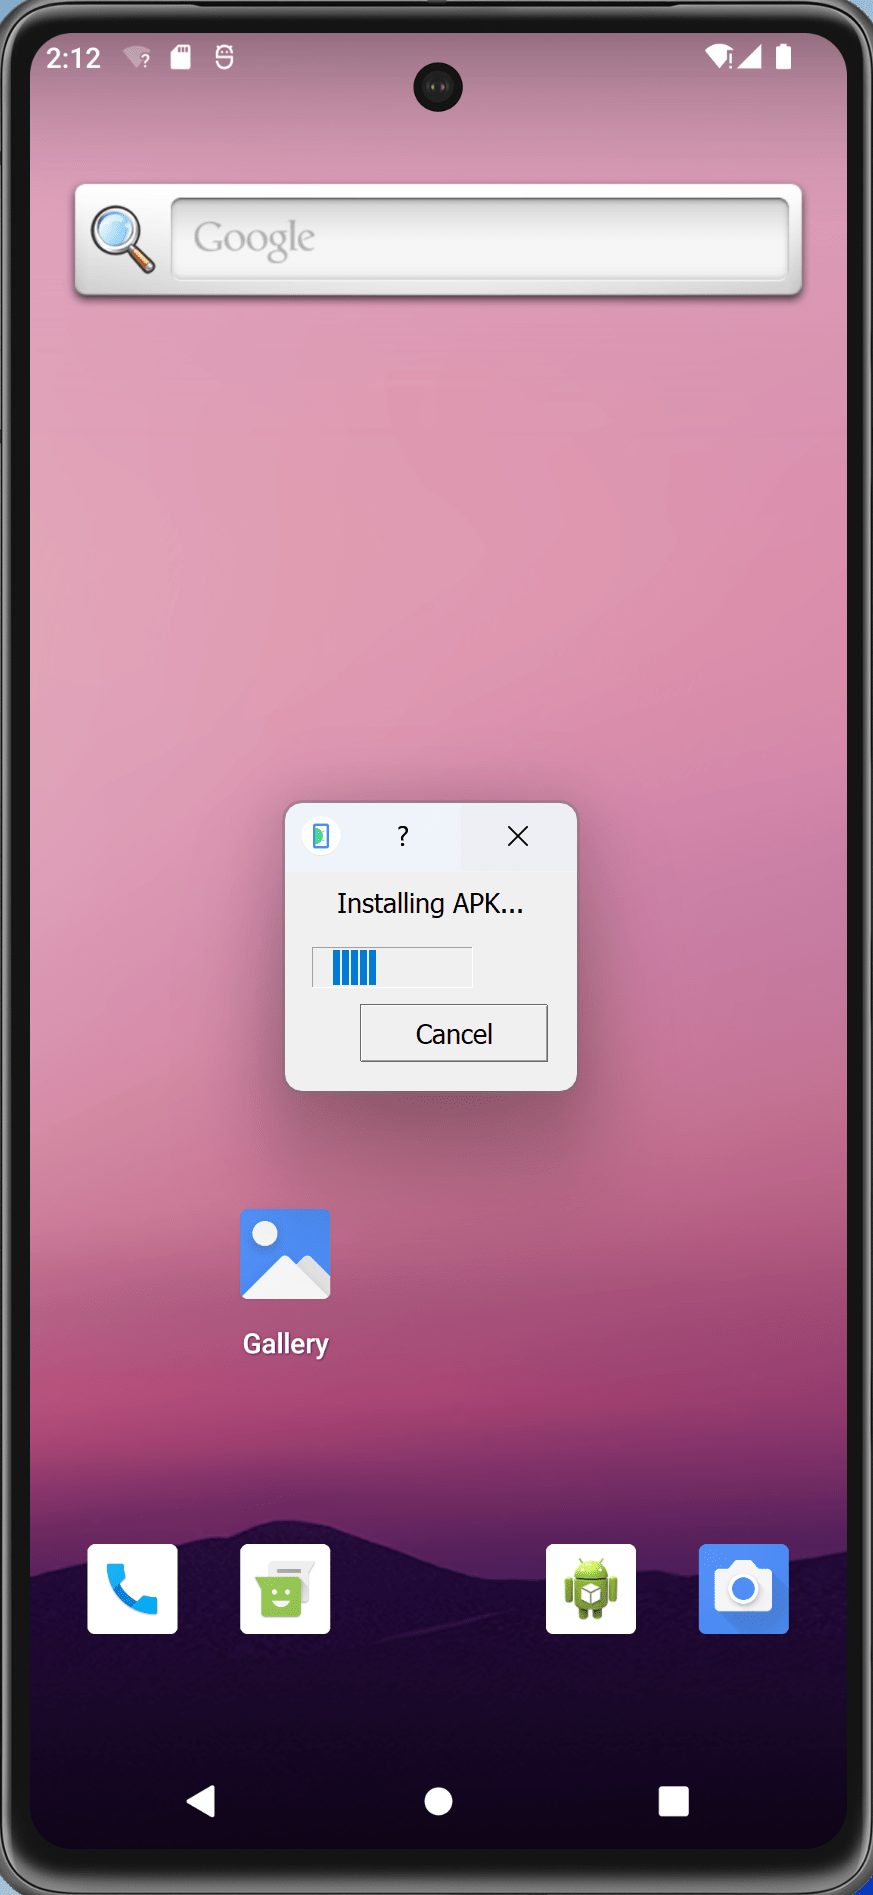
a. Install DuckDuckGo browser via downloaded apk on AVD. We need this to have a browser to access the mitm.it website to download the certificate.
Download via: https://apkcombo.com/duckduckgo/com.duckduckgo.mobile.android/
You can just drag and drop the downloaded apk file on the AVD.
b. Install mitmproxy certificate as User.
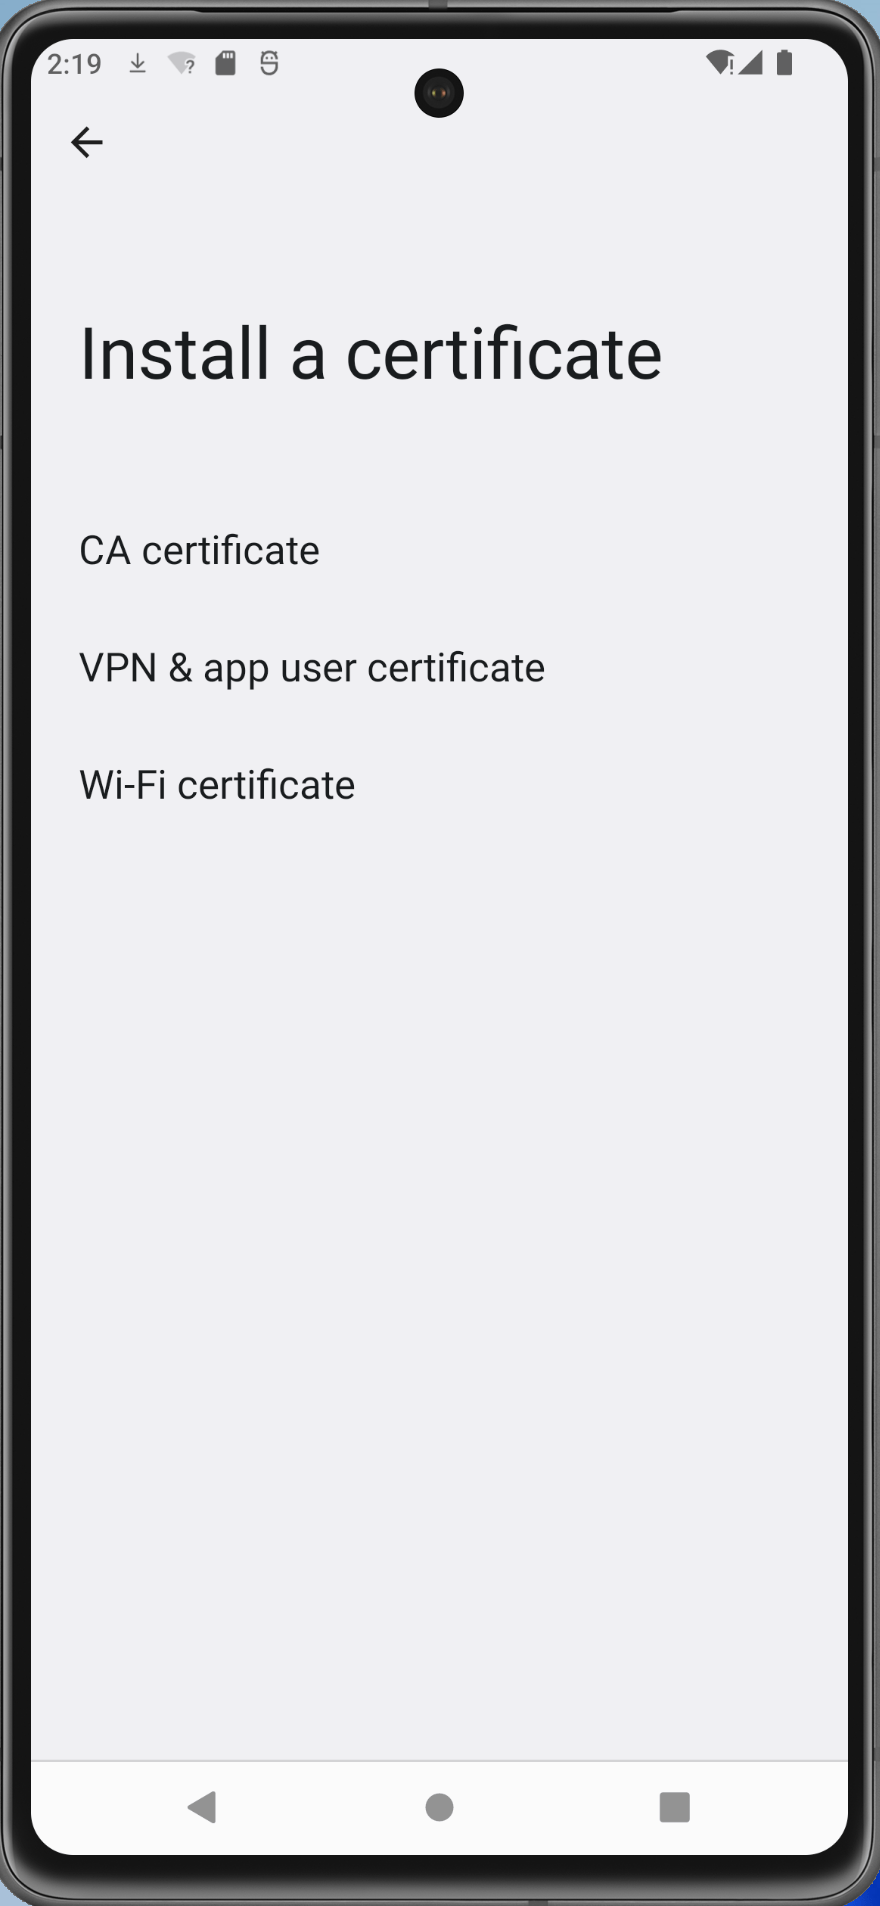
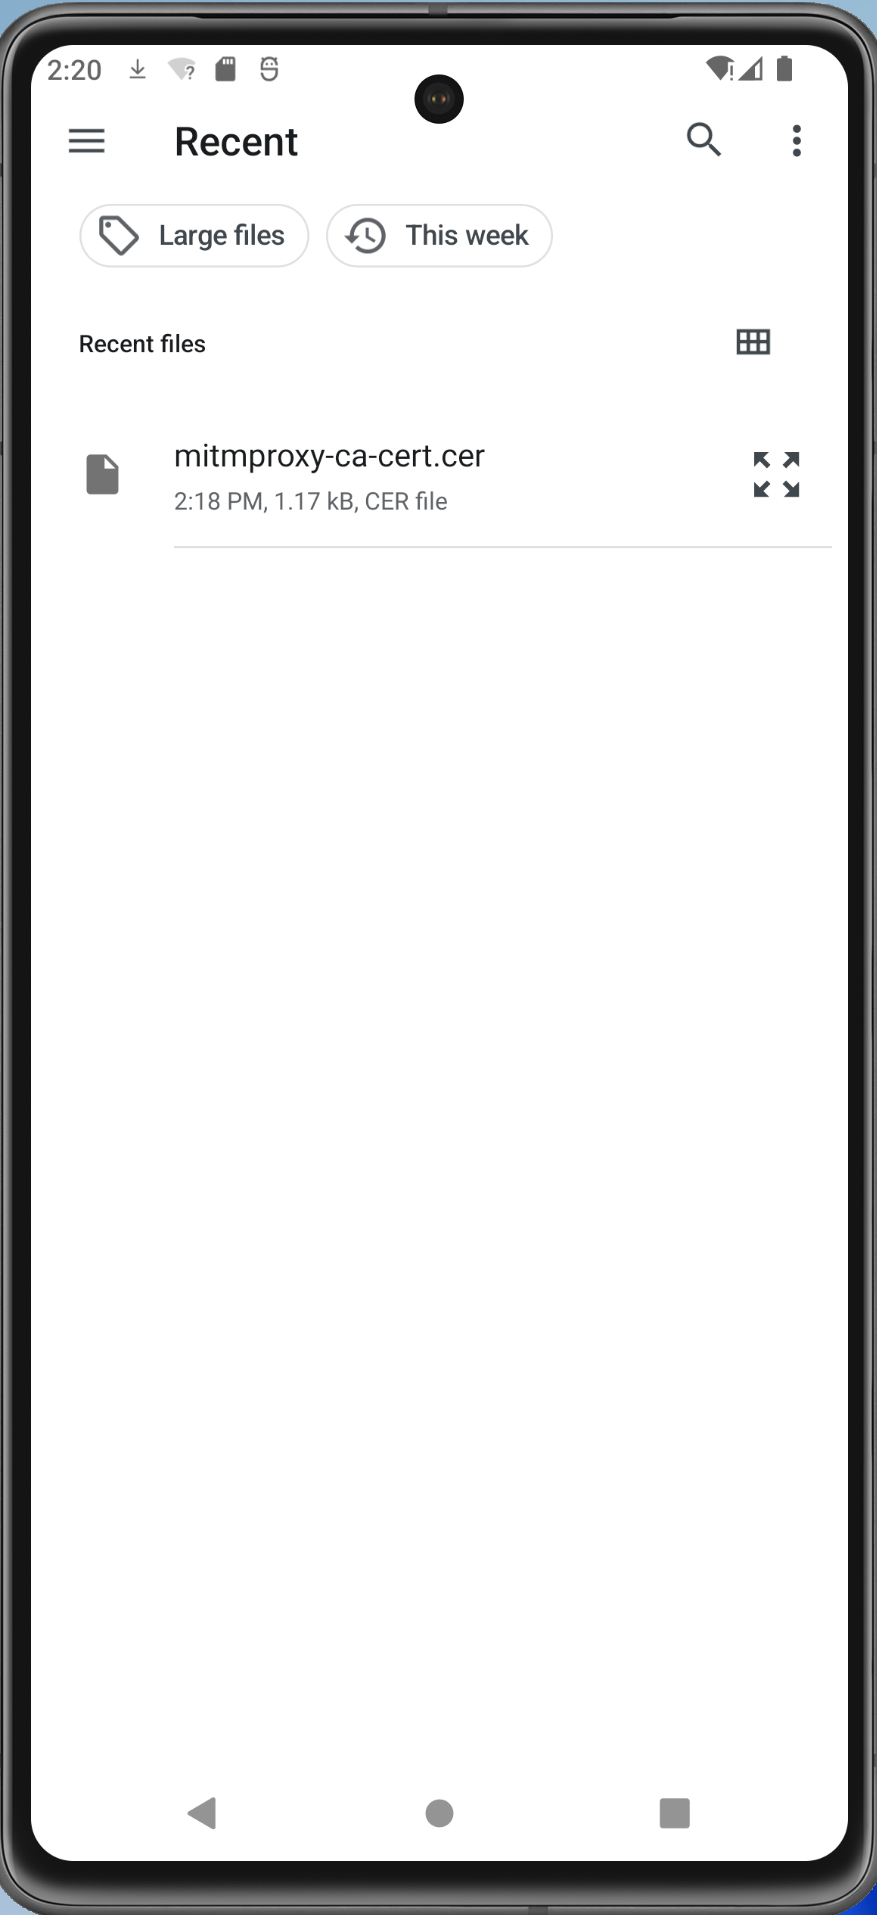
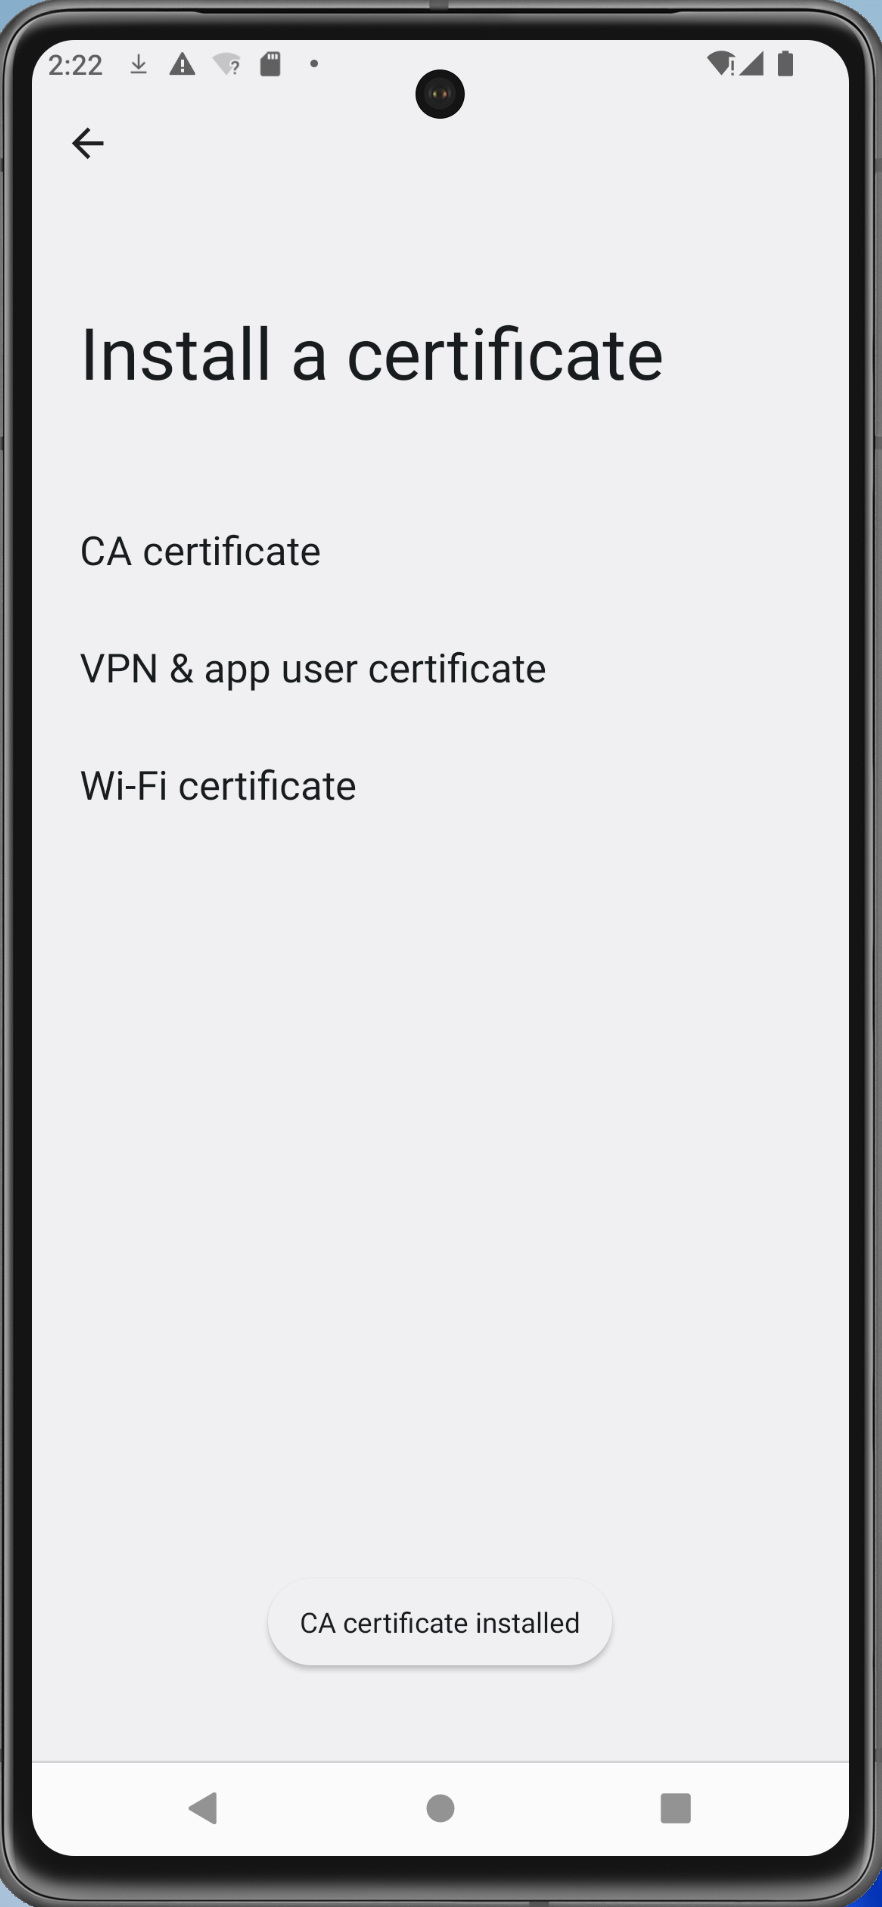
Go to mitm.it in your browser (DuckDuckGo) and download the certificate.
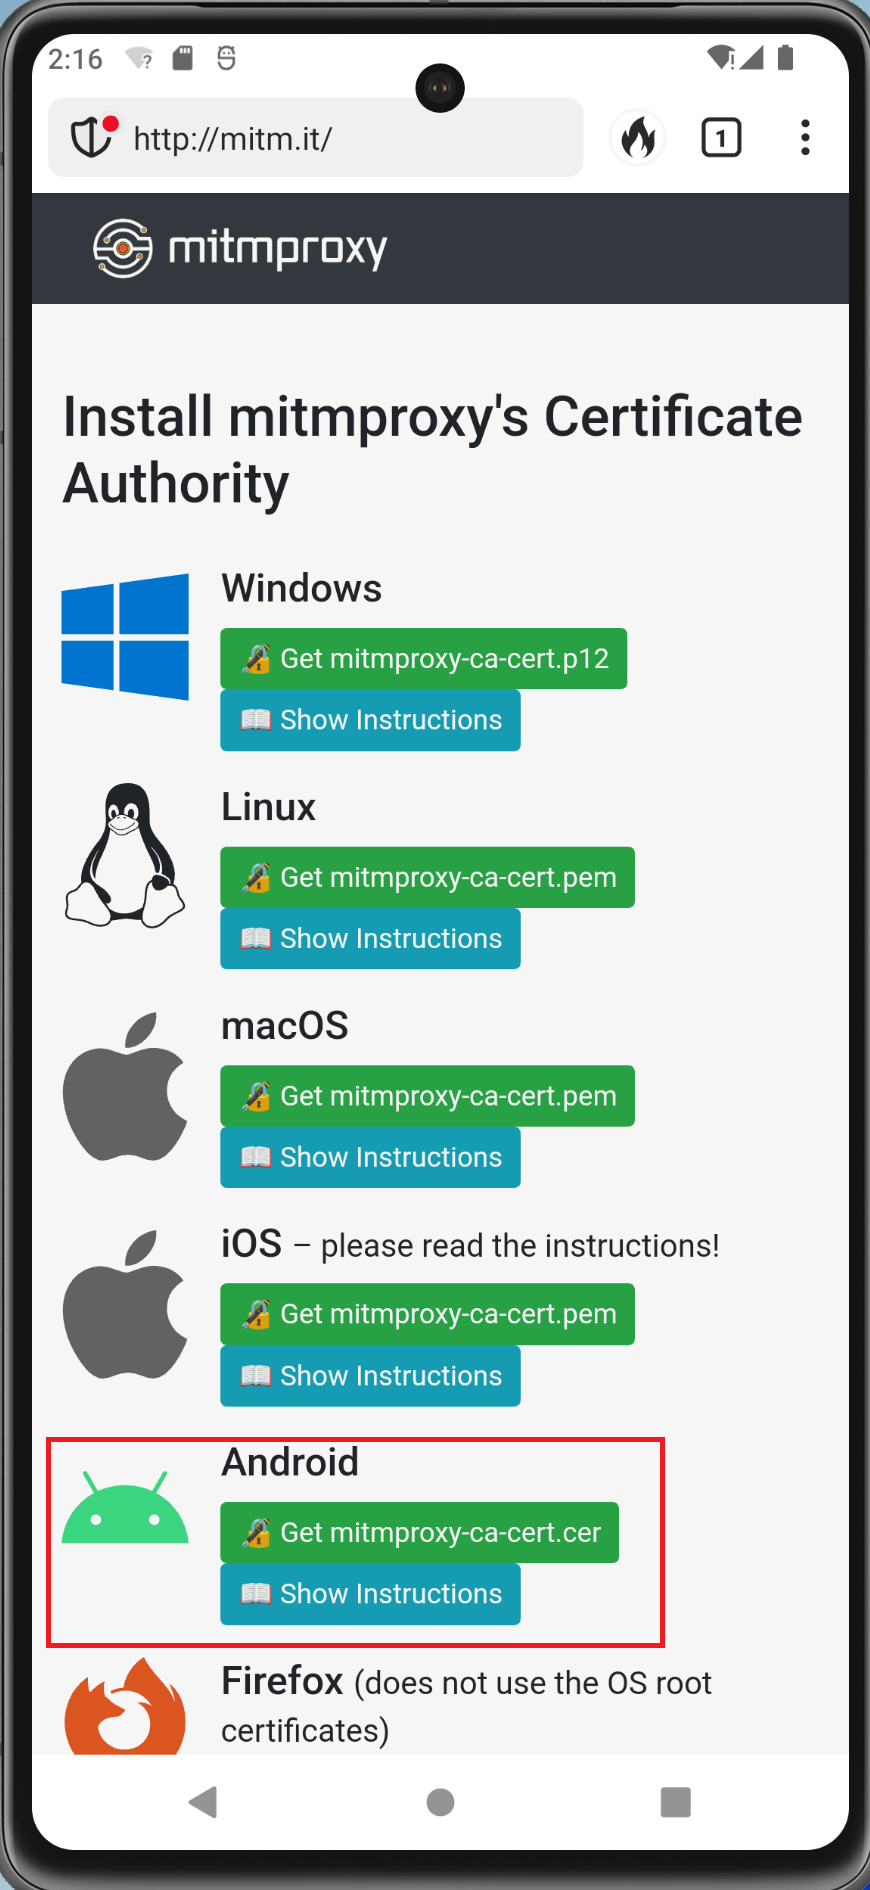
Install the certificate via Settings -> Security -> Advanced -> Encryption and credentials -> Install a certificate -> CA certificate. Select the option Install Anyway.

b. Move the User Certificate to Root CA store
1
2
3
4
5
6
7
8
9
Run the following command from the command line from the ~\AppData\Local\Android\Sdk\platform-tools folder.

```batch
   ./adb.exe root
   ./adb.exe shell avbctl disable-verification
   ./adb.exe reboot
   ./adb.exe remount
   ./adb.exe -s emulator-5554 shell
```
c. Copy the installed user certificate to the ca root certificates folder.
1
2
3
4
5
Run within the AVD:
```batch
 # su
 # whoami
 # cp /data/misc/user/0/cacerts-added/* /system/etc/security/cacerts    ```
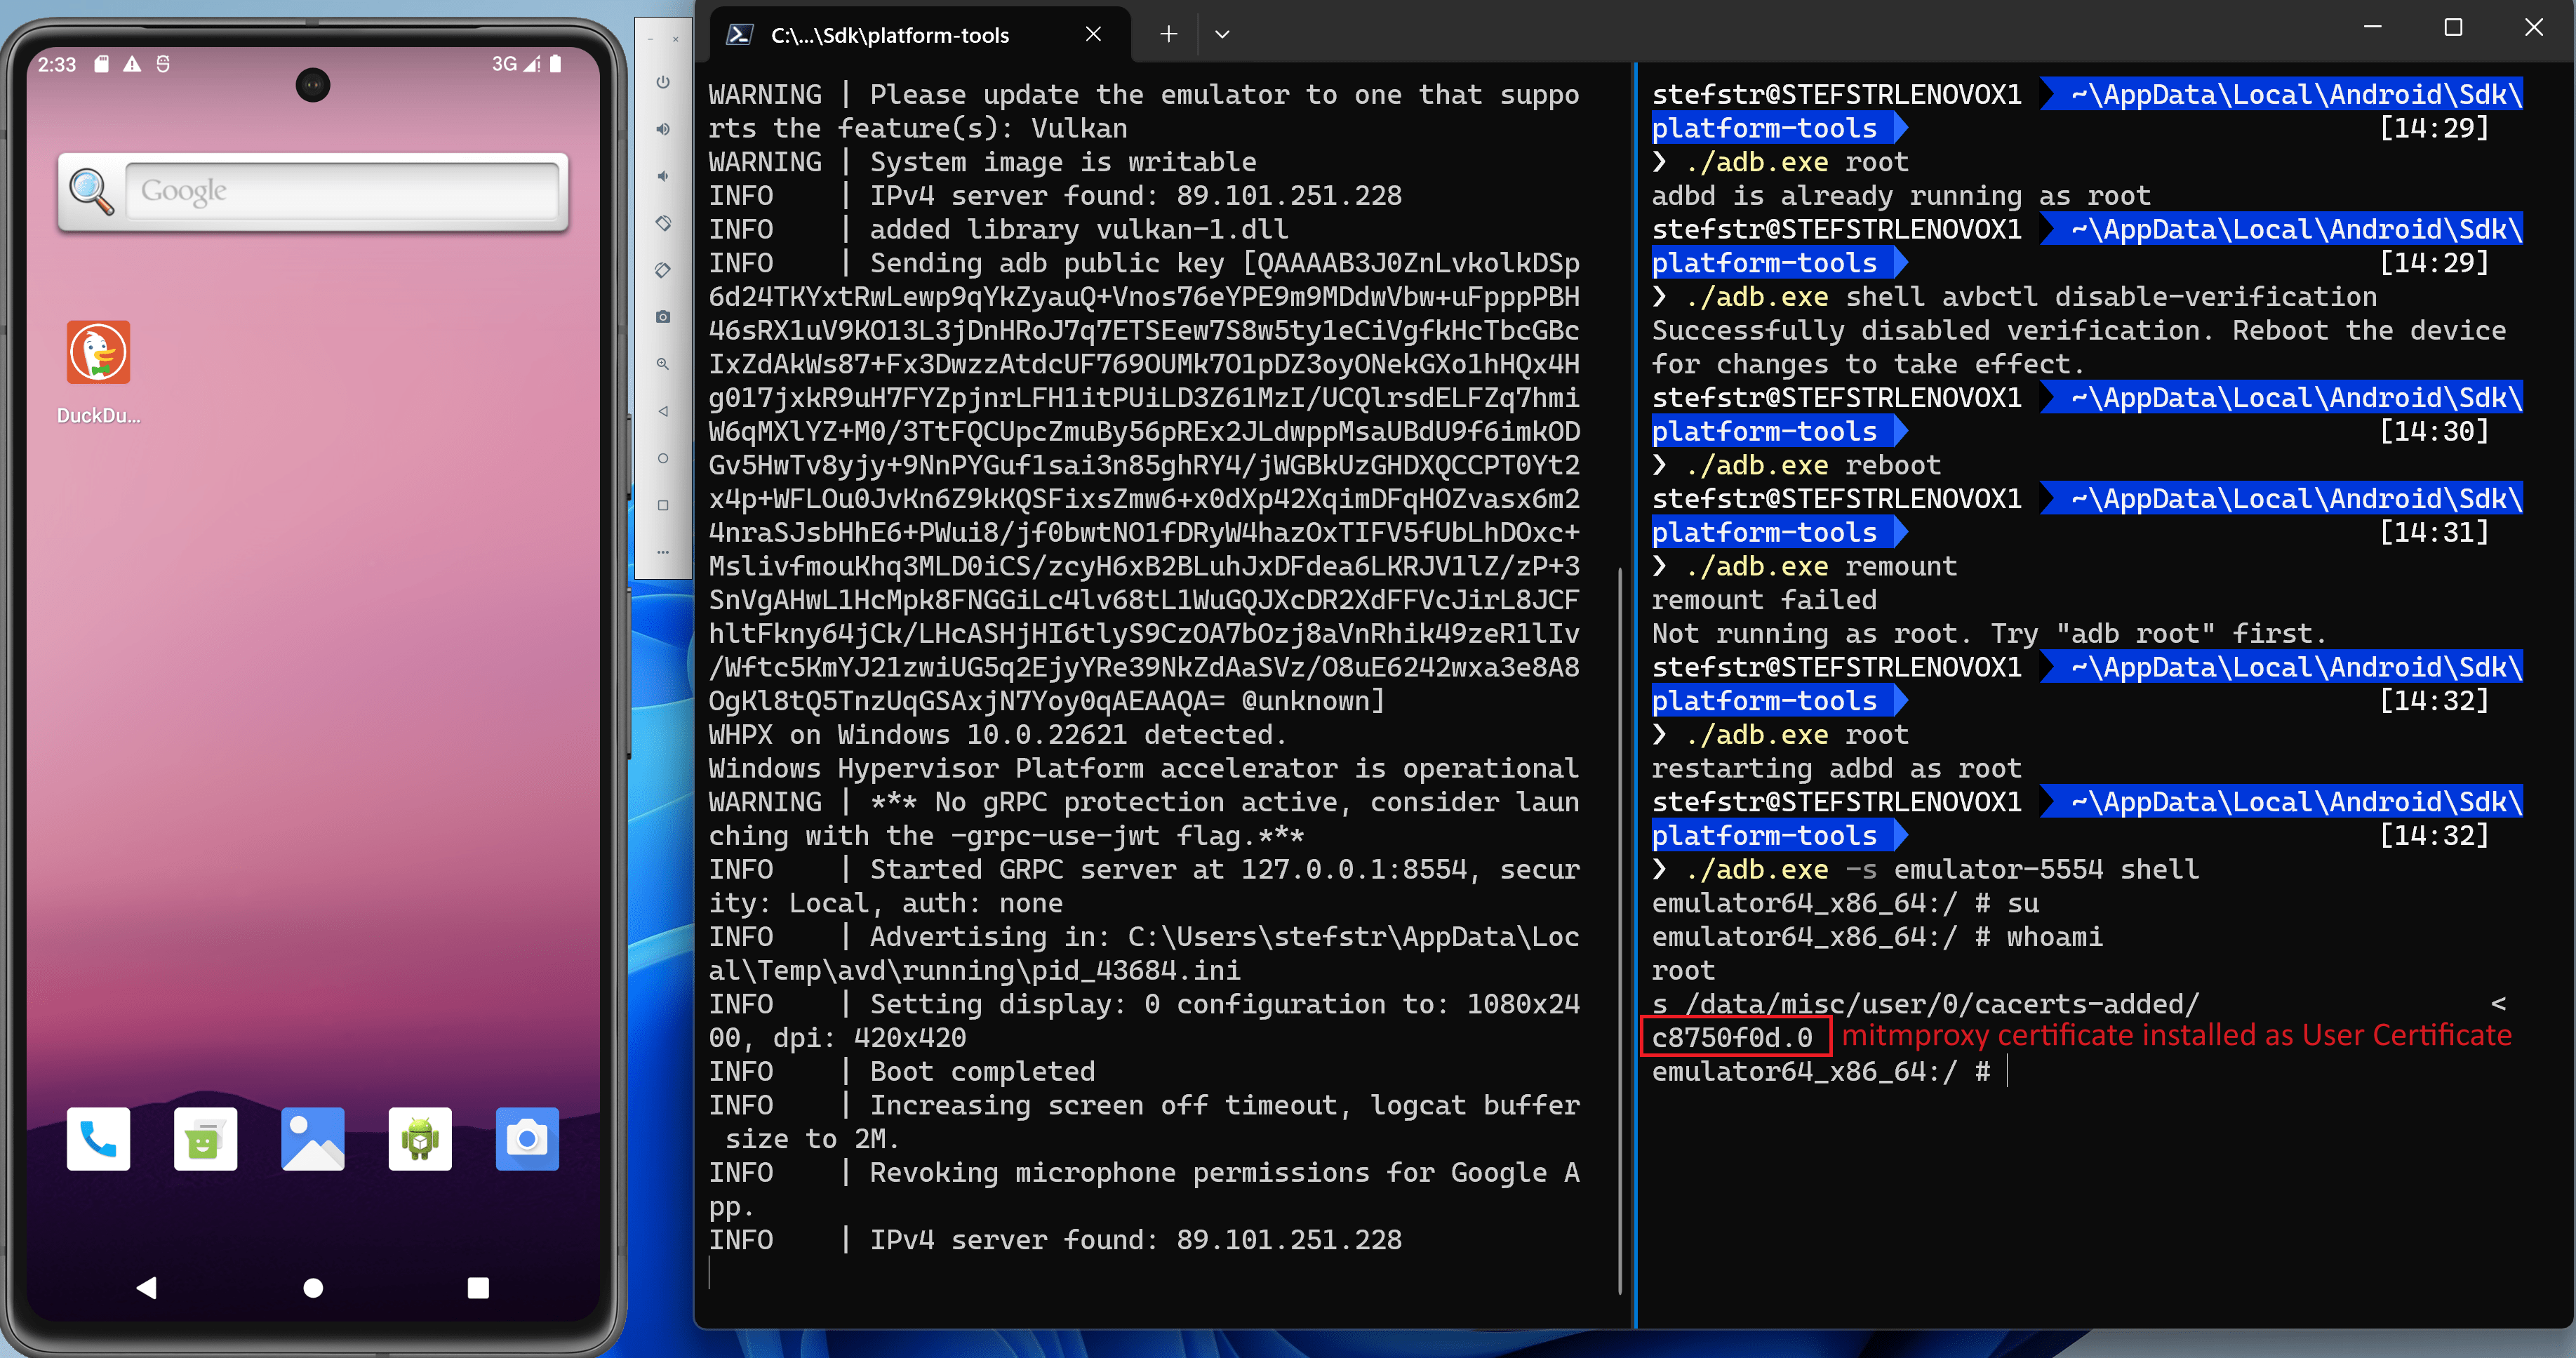
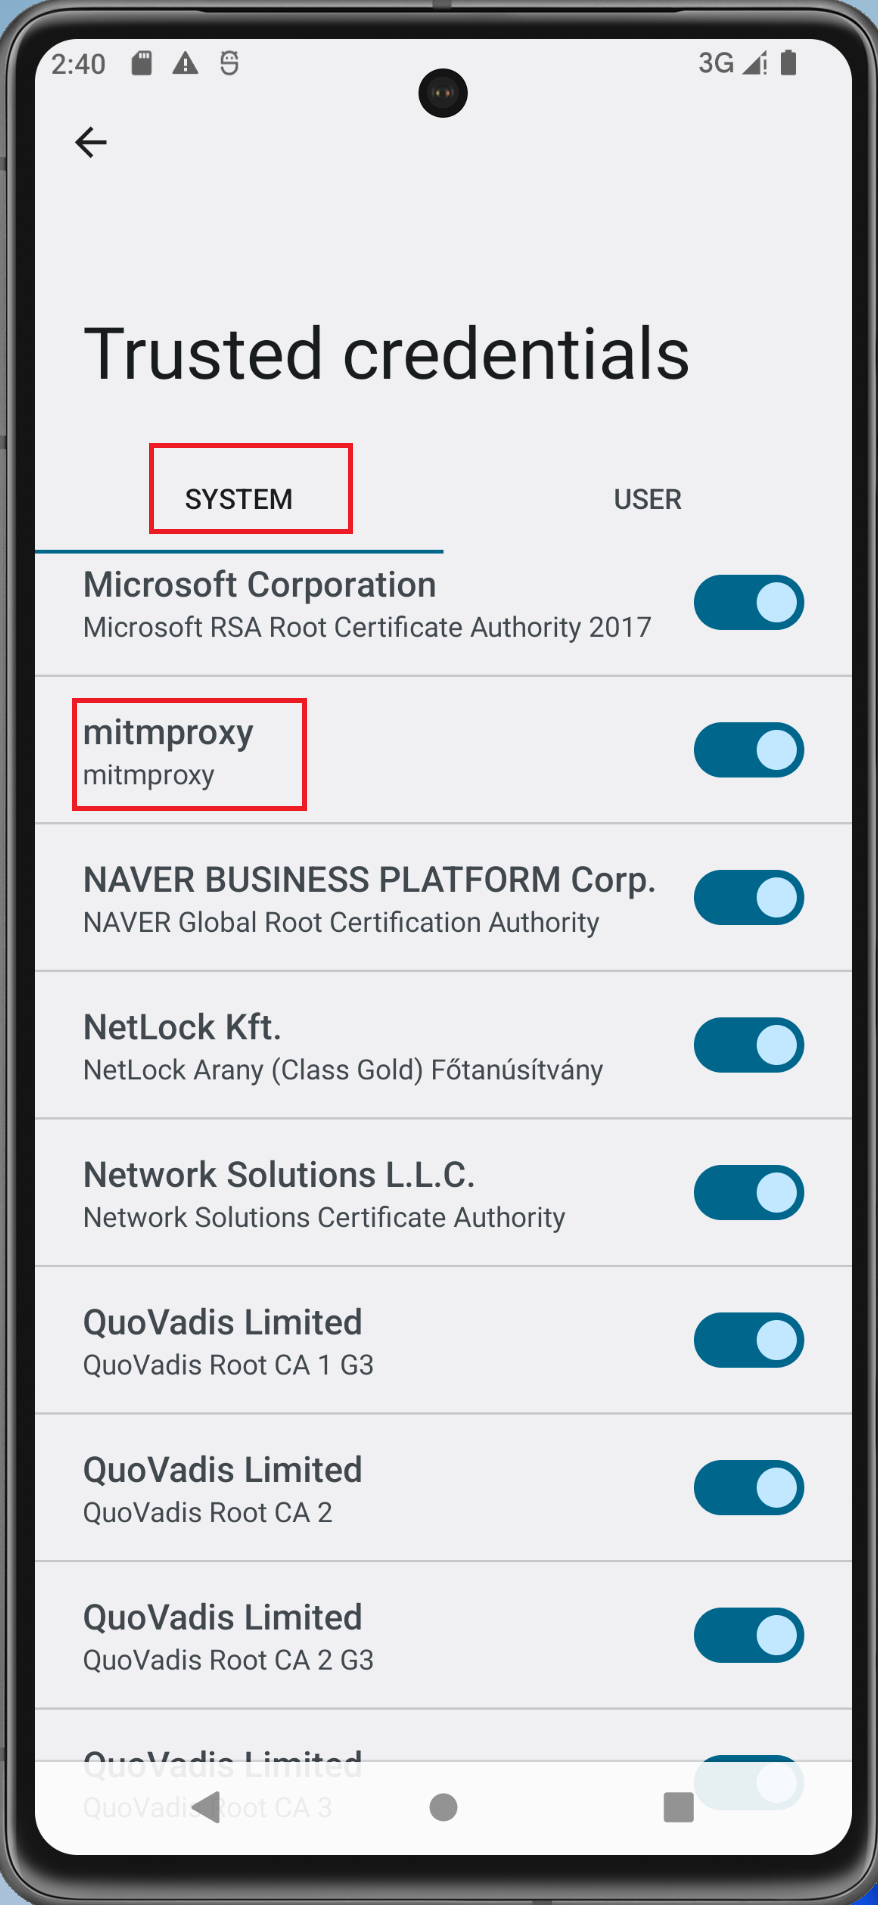
Screenshot of moved certificate.
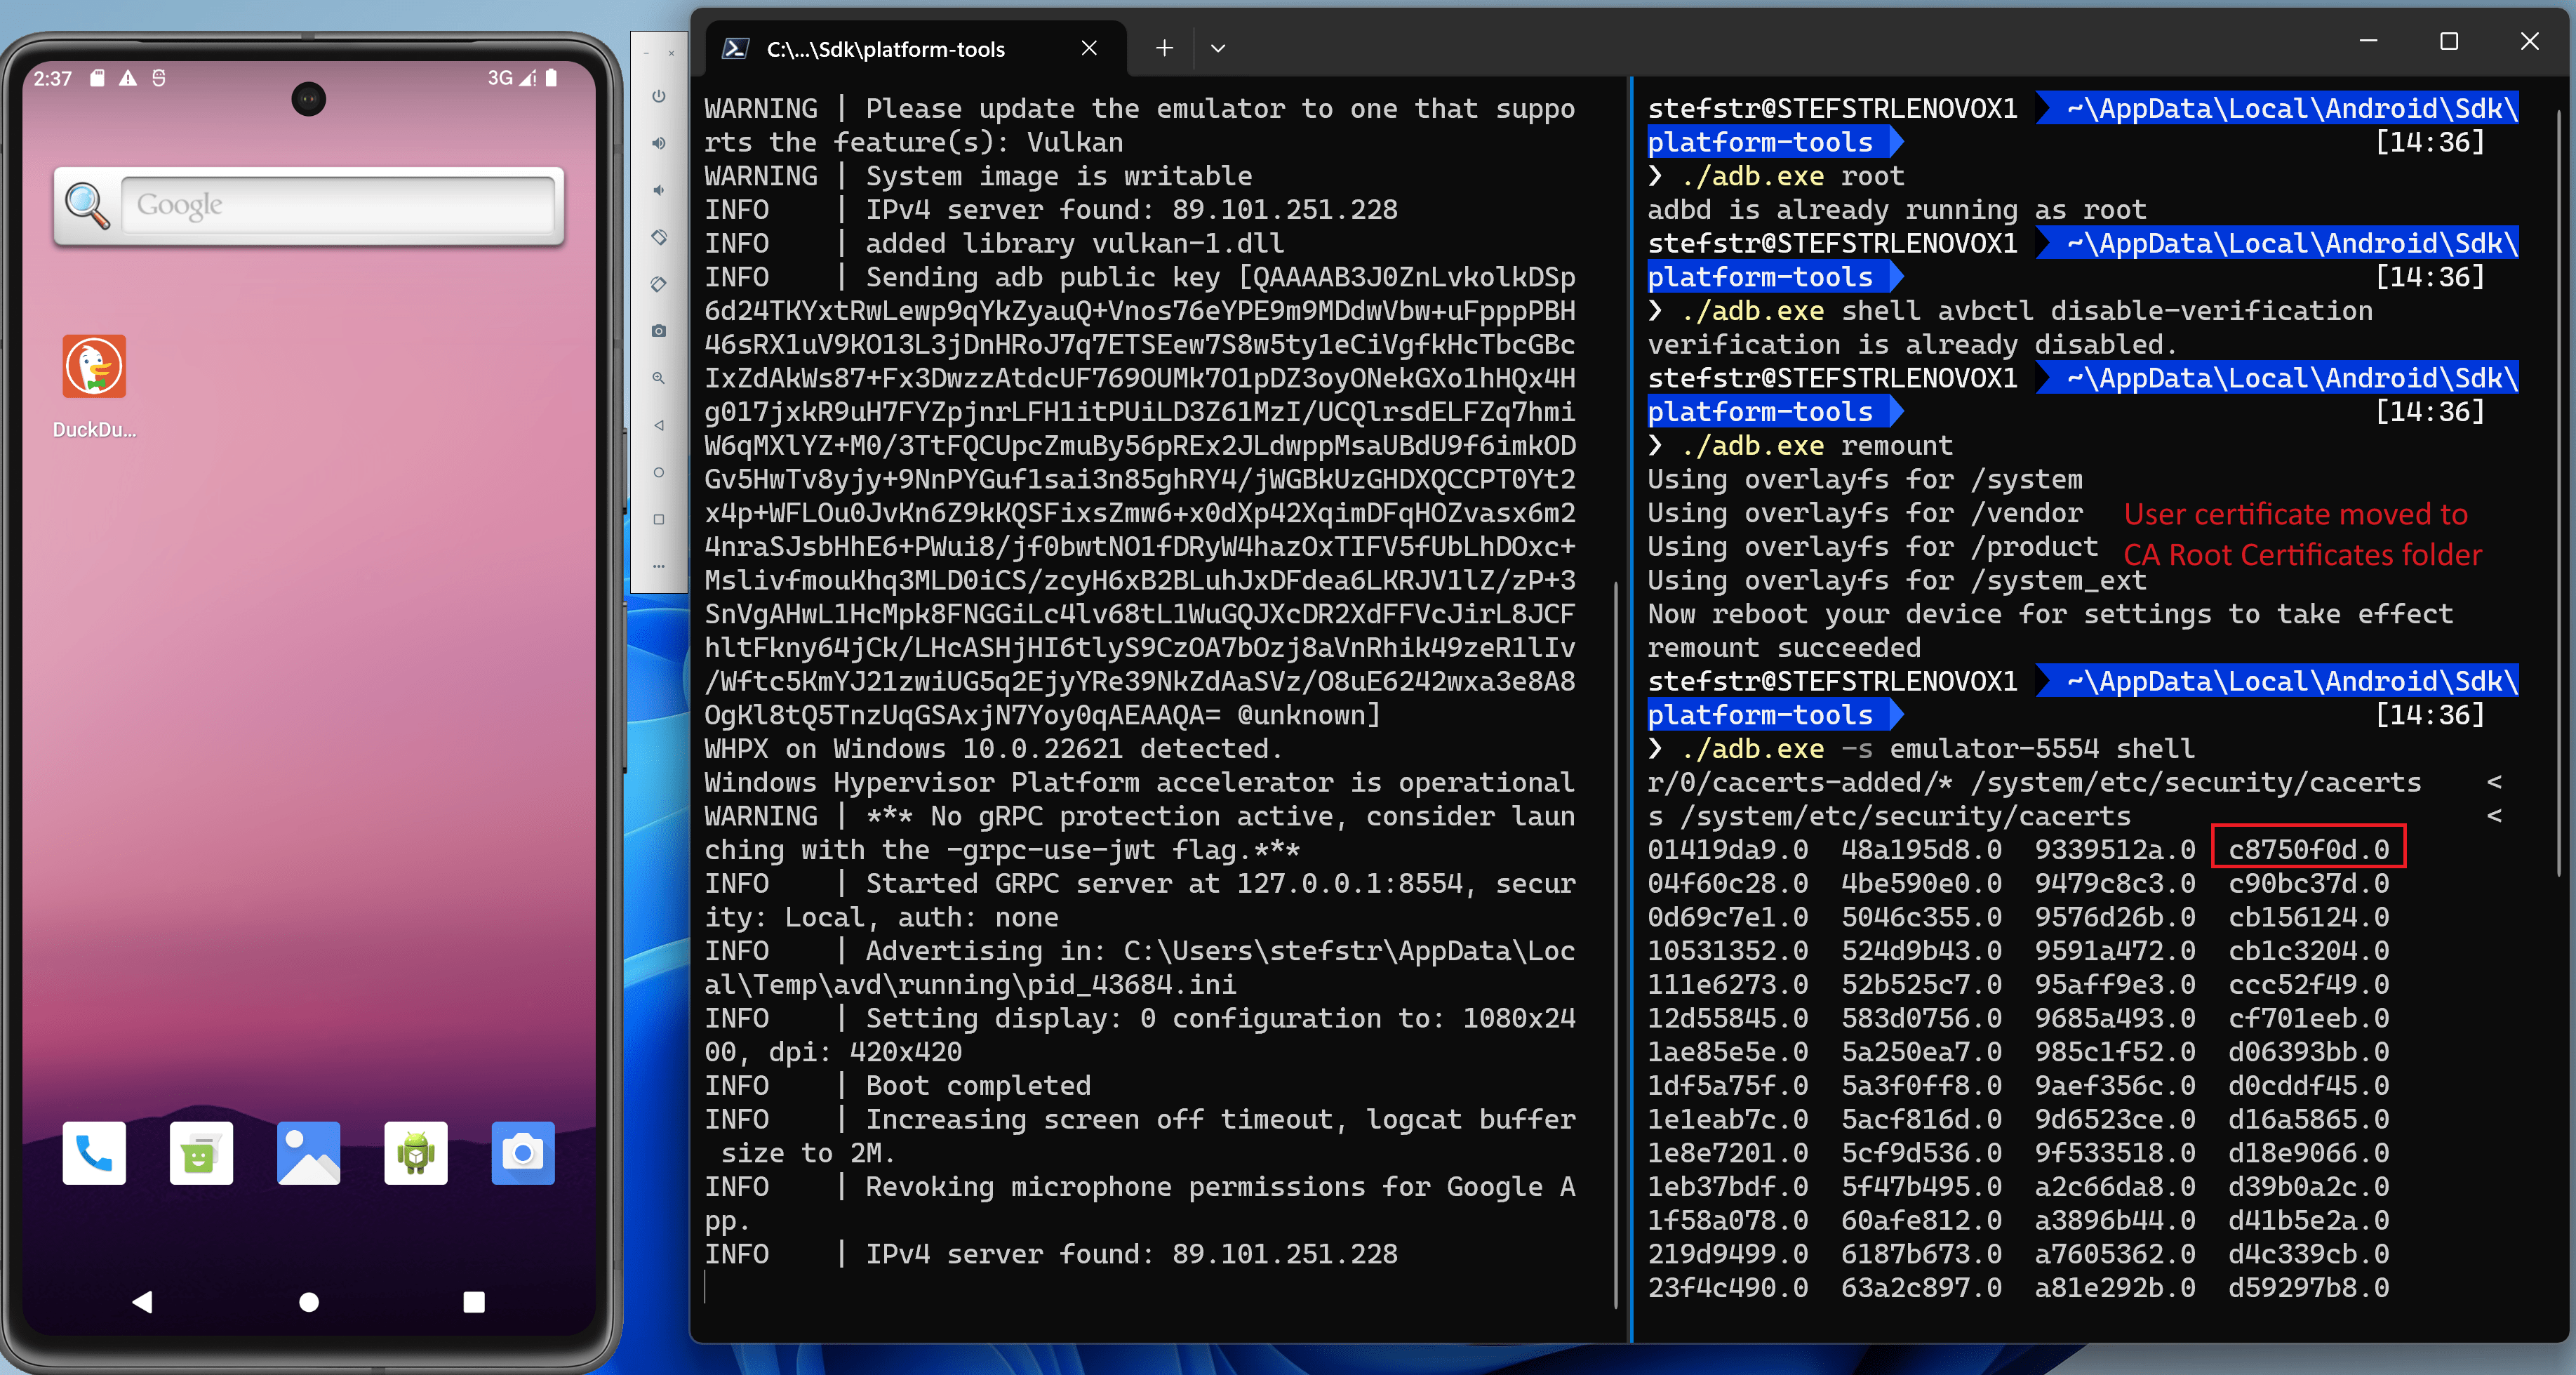
The AVD now has the mitmproxy certificate as trusted system credential.
References:
- https://gist.github.com/pwlin/8a0d01e6428b7a96e2eb?permalink_comment_id=3499340&wt.mc_id=SEC-MVP-5004985#gistcomment-3499340
- https://github.com/mitmproxy/mitmproxy/issues/2054
4. Install Android Application on AVD
Install the Android Application apk file for which you want to monitor and inspect the traffic on the AVD by dragging and dropping it onto the AVD, just as we did for the DuckDuckGo browser.
Launch the application and start monitoring the network traffic in your mitmproxy browser window.
5. Start monitoring network traffic in mitmproxy.
Start the Bikey Android Application while the mitmproxy is running and configured for the AVD to use.
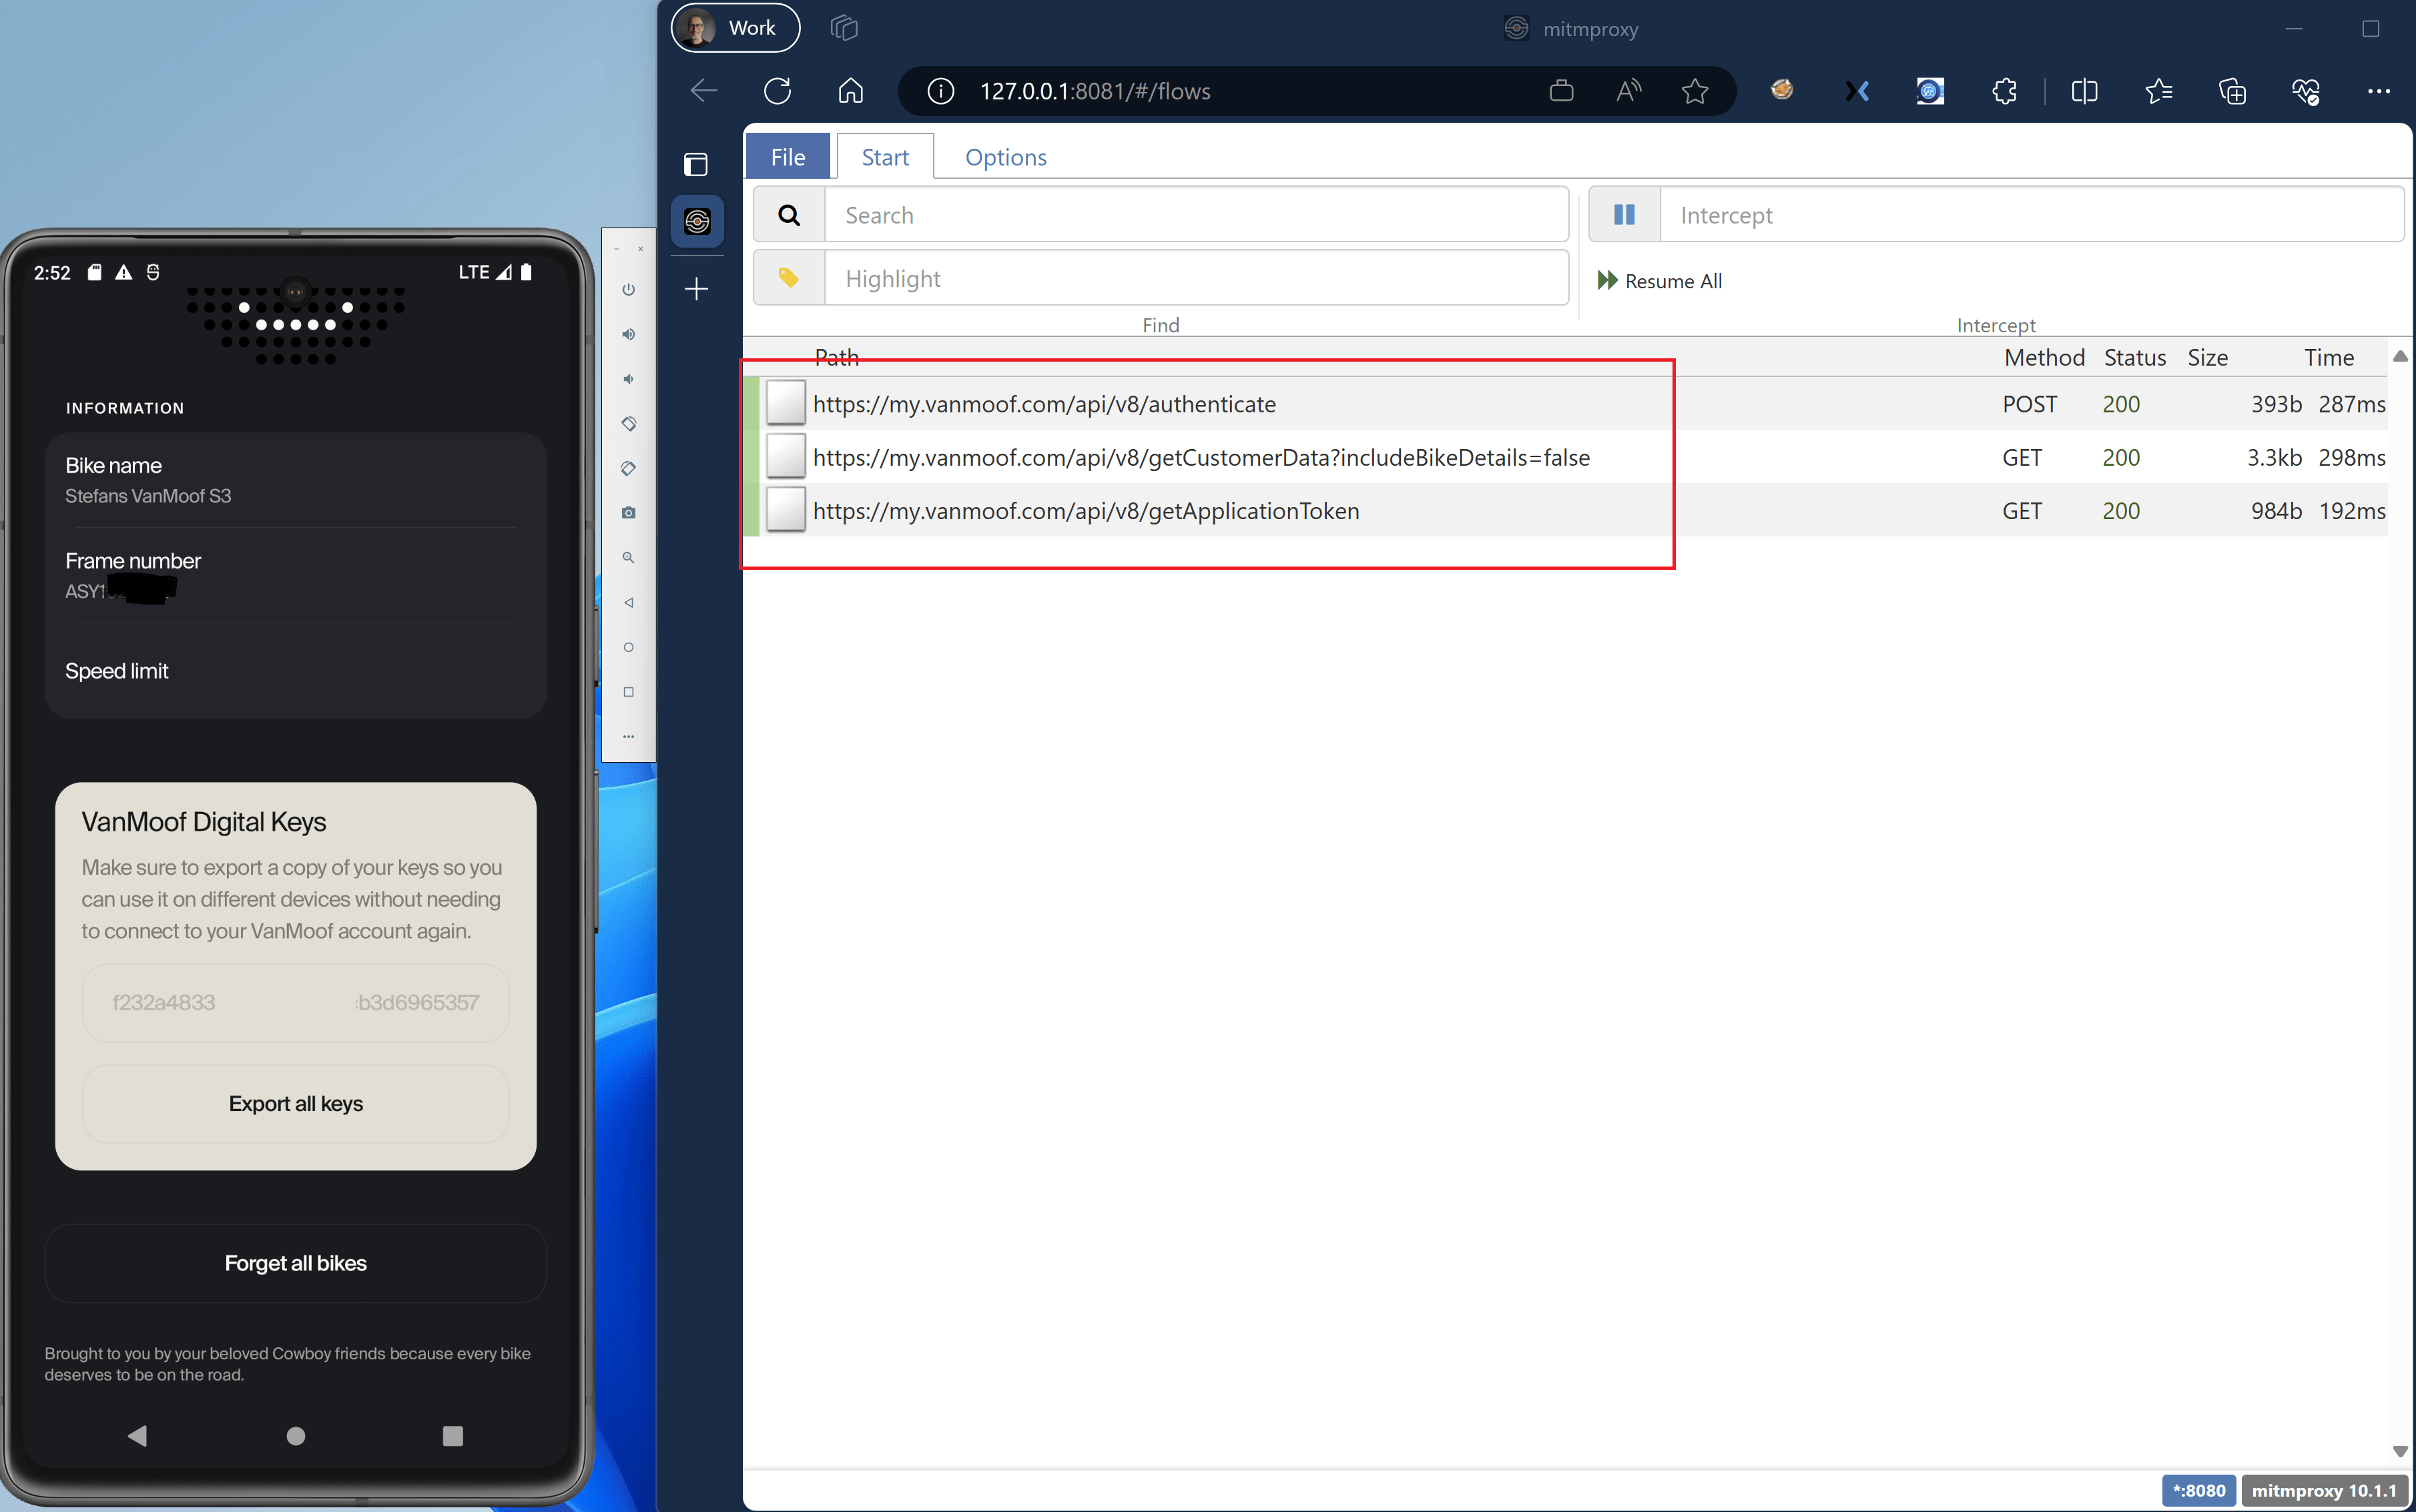
You should now see the network traffic appear in the mitmproxy browser window.
Click each line to get more information on the rest api call being made by the Android Application running on the AVD.
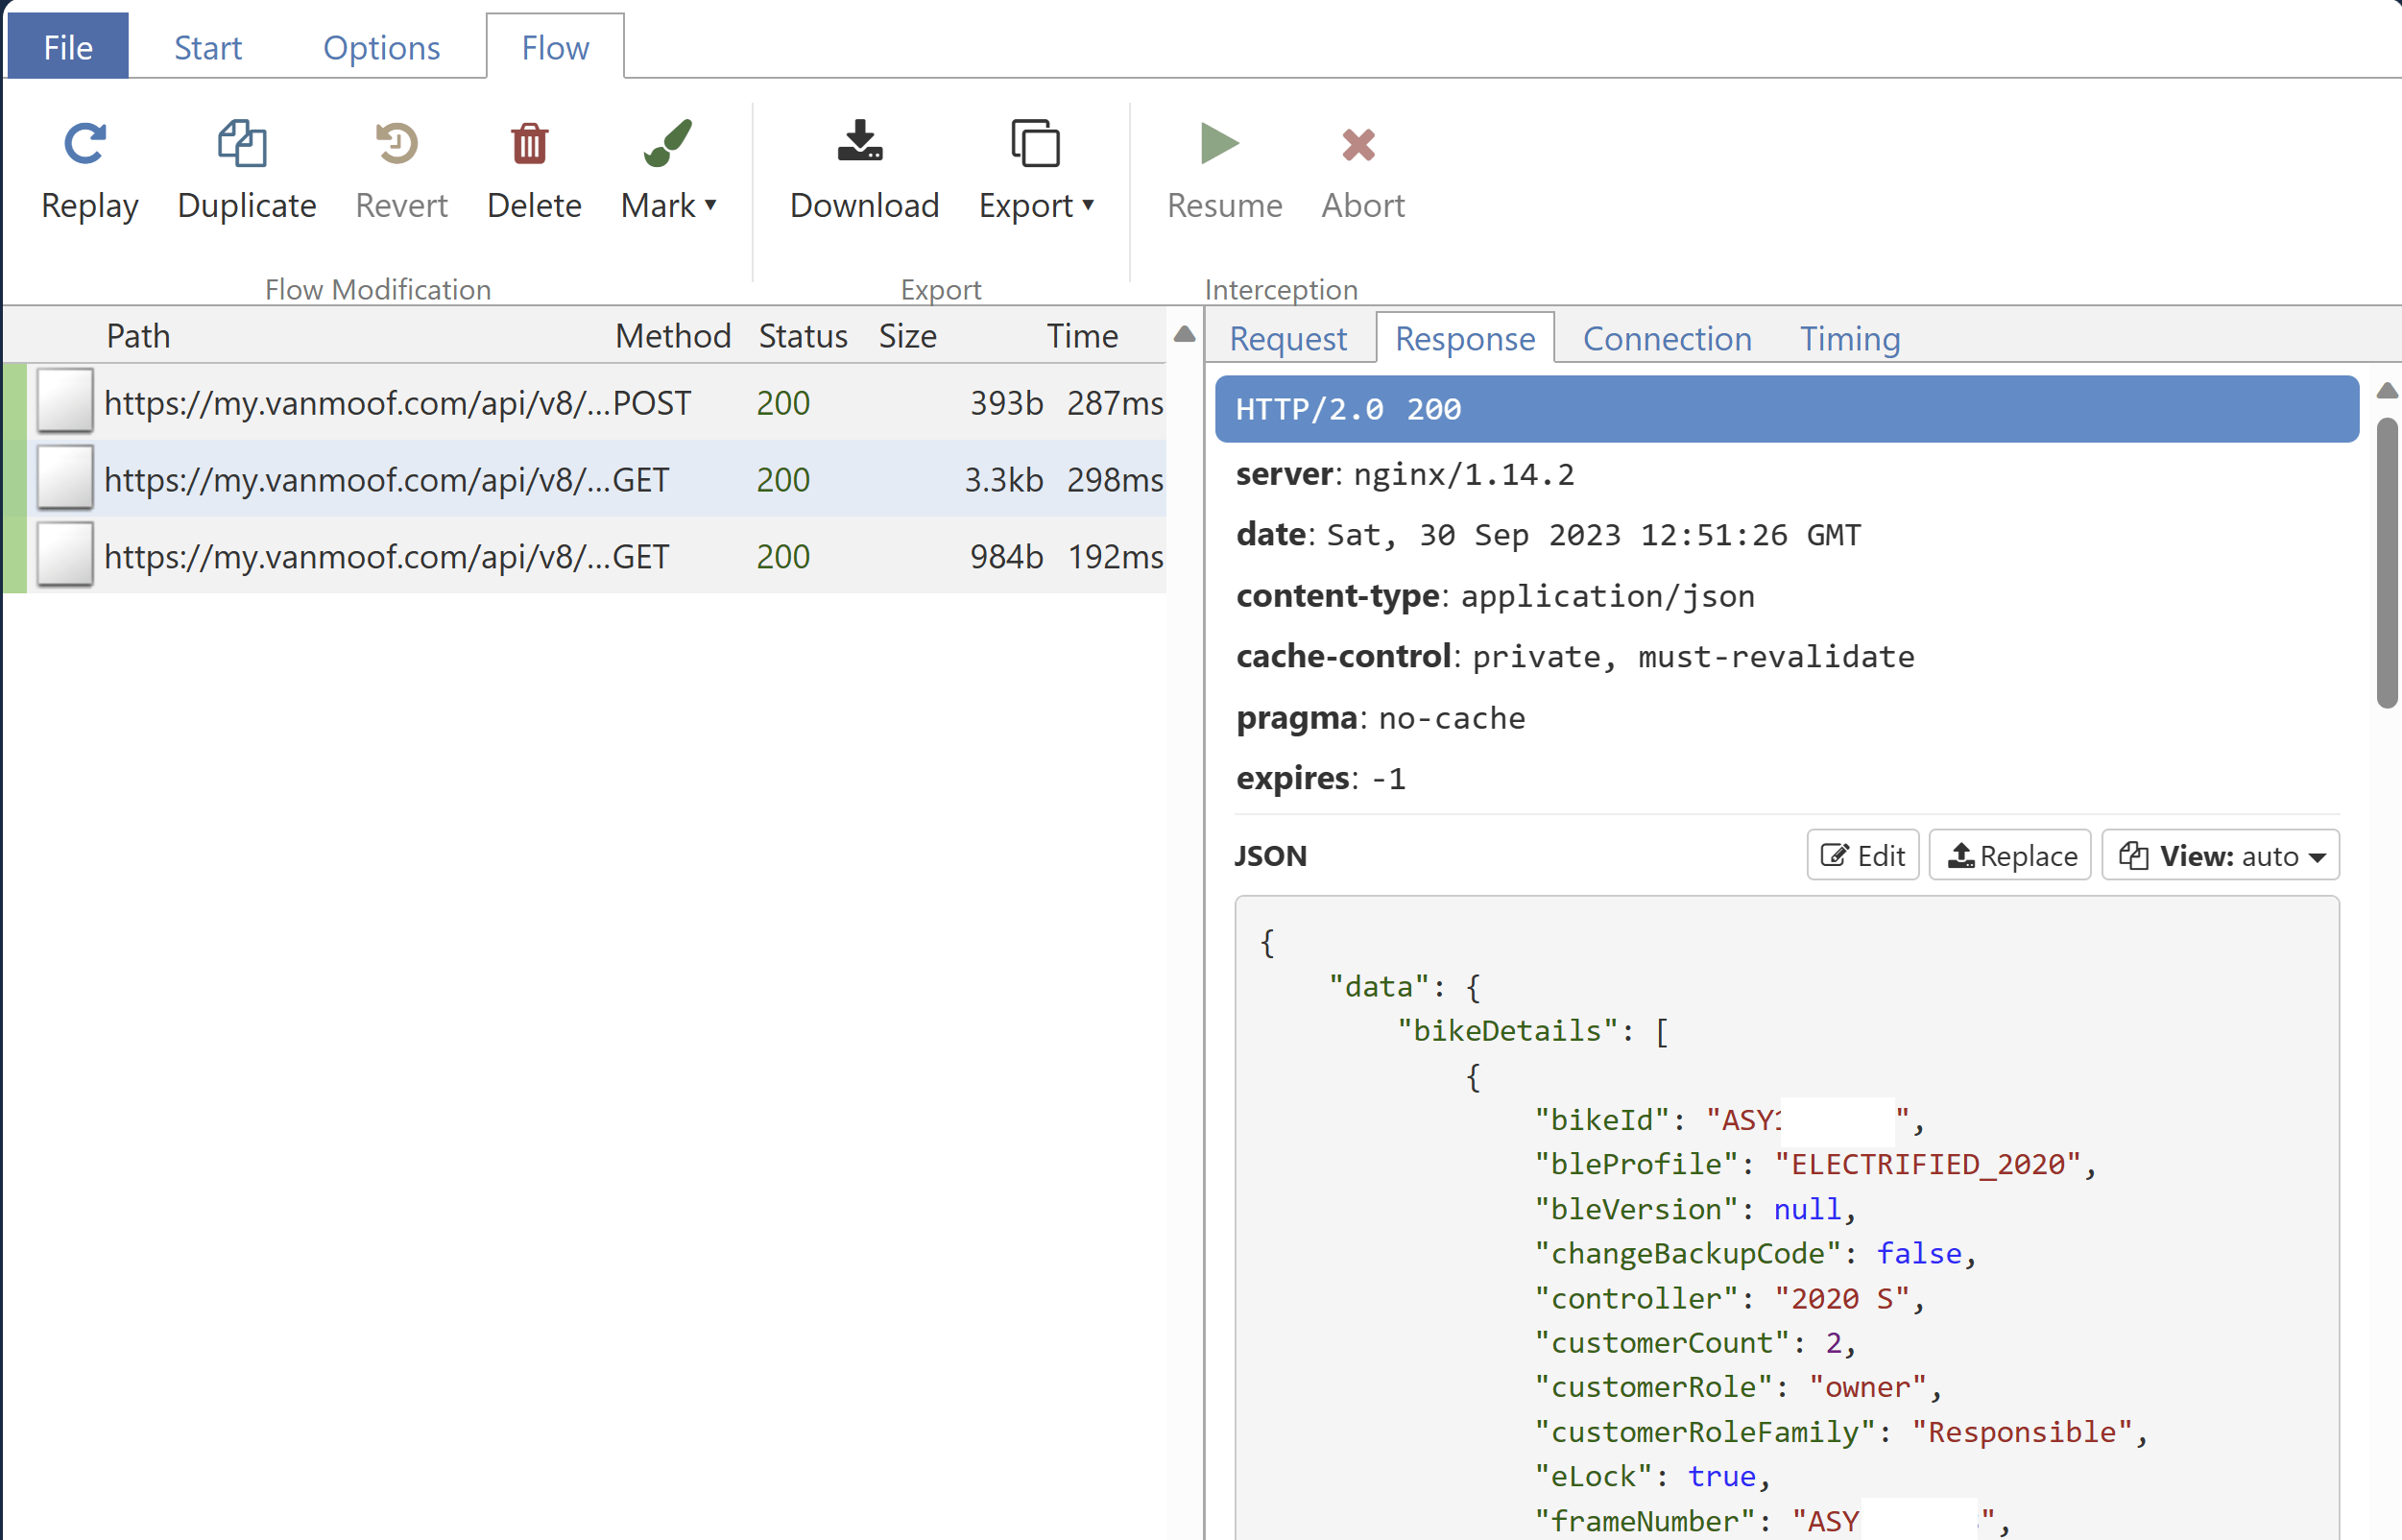
As you see mitmproxy is able to decrypt the https traffic generated by the Android Application running on the AVD with the mitmproxy certificate installed.
Hope this information was helpful. Let me know what you think in the comments.