Building an Harness Agent with Microsoft Agent Framework
Introduction
I was at AgentCon Utrecht yesterday. Eduard van Valkenburg a Senior Software Engineer at Microsoft - CoreAI and Semantic Kernel & Agent Framework team demoed the Microsoft Agent Framework v1.0, and the Harness Agent pattern was the thing that stuck with me most on the drive home.
I’ve been building agentic solutions for a while now, from CrewAI investment analysis workflows to MCP servers for Azure Verified Modules. Each time, I end up solving the same problems from scratch: context window management, tool approval flows, planning state, todo tracking. The Harness Agent is Microsoft’s answer to that, it is the layer where model reasoning connects to real execution: shell and filesystem access, approval flows, and context management across long-running sessions.
This post walks through how to build a Harness Agent with a terminal UI console — the same pattern Eduard demoed live. I’ll use the official research assistant sample as the starting point and explain every piece of it.
What is an Harness?
An agent harness is the software infrastructure that wraps around an AI model, managing its context, tools, execution, and safety to make it function reliably as an agent rather than just a model.
Probably without knowing you are using harnesses all the time. I’m writing this blog post in VScode and Github Copilot in VSCode has a (coding) harness. What developers actually interact with is the coding harness: the layer that assembles context, exposes tools, runs the agent loop, interprets tool calls, and turns a model’s output into something useful inside the editor.
Or if you are using OpenClaw, like I do, this is also an harness on top of an model running on an agent.
With the Microsoft Agent Framework Agent Harness feature we can build our own agent harnesses.
What is the Microsoft Agent Framework Agent Harness?
create_harness_agent is a factory function in the Microsoft Agent Framework that assembles a fully configured agent pipeline from a single chat client. Here’s what you get out of the box:
| Feature | What it does |
|---|---|
| TodoProvider | Agent can create, track, and complete work items |
| AgentModeProvider | Switches between plan mode (interactive) and execute mode (autonomous) |
| SkillsProvider | File-based skill discovery — agent loads skills progressively |
| CompactionProvider | Automatic context-window management |
| InMemoryHistoryProvider | Session history persisted per service call |
| OpenTelemetry | Built-in observability via AgentTelemetryLayer |
| Looping | Re-invokes agent automatically while a condition is met |
| Tool approval | “Don’t ask again” standing rules with heuristic auto-approval |
The pattern I find most interesting is the plan/execute mode split. The agent starts in plan mode, it reasons, creates todos, figures out what needs to happen. You then tell it to execute. It works through the todo list autonomously, looping until every item is done.
This is the “dark factory” pattern in practice: you give intent, the agent handles implementation.
Let’s build our first Agent Harness.
Pre-requisites
Before you start, you’ll need:
- Python 3.11 or later
- uv package manager
- An Azure AI Foundry project with a model deployed
- Azure CLI authenticated (az login)
# Verify your Azure login
az account show
Step 1 - Project Setup
# Create and enter project directory
mkdir harness-demo
cd harness-demo

# Initialize the project
uv init

# Create the virtual environment
uv venv
Heads up — use the
mainbranch, not the PyPI release. As of June 2026 the integrated looping API (loop_should_continue,loop_next_message,todos_remaining_message) and the TextualconsoleTUI used below only exist on the unreleasedmainbranch of the framework. The latest PyPI release (agent-framework1.9.0) does not include them yet — so we pullagent-framework-coreandagent-framework-foundrystraight from git.
Replace the dependencies in your pyproject.toml and add a [tool.uv.sources] section that points both packages at the repo’s main branch:
1
2
3
4
5
6
7
8
9
10
11
12
13
[project]
dependencies = [
    "agent-framework-core",
    "agent-framework-foundry",
    "azure-identity>=1.26.0b2",
    "python-dotenv>=1.2.2",
    "rich>=15.0.0",
    "textual>=8.2.7",
]

[tool.uv.sources]
agent-framework-core = { git = "https://github.com/microsoft/agent-framework.git", subdirectory = "python/packages/core", branch = "main" }
agent-framework-foundry = { git = "https://github.com/microsoft/agent-framework.git", subdirectory = "python/packages/foundry", branch = "main" }
Then install everything:
uv sync
Because this tracks
main, a lateruv syncwill pull the newest commit, which can introduce breaking changes. Pin to a specific commit (rev = "<sha>") instead ofbranch = "main"if you want a reproducible build.
Step 2 - Vendor the console UI
The terminal UI the script imports — from console import run_agent_async, build_observers_with_planning — is sample code that lives in the repo, not a published package. Copy it into your project:
# Clone just the python tree (shallow + sparse) next to your project
git clone --depth 1 --filter=blob:none --sparse https://github.com/microsoft/agent-framework.git ..\agent-framework
git -C ..\agent-framework sparse-checkout set python/samples/02-agents/harness/console

# Copy the console package into your project
Copy-Item -Recurse ..\agent-framework\python\samples\02-agents\harness\console .\console
You should now have a console\ folder sitting next to your script.
Step 3 - Environment Variables
Create a .env file in your project root:
1
2
FOUNDRY_PROJECT_ENDPOINT=https://your-project.services.ai.azure.com/api/projects/your-project-name
FOUNDRY_MODEL=your-model-deployment-name
You find FOUNDRY_PROJECT_ENDPOINT in the Azure AI Foundry portal under your project → Settings → Connection string. The model name is the deployment name, not the model family name.
Step 4 - The Agent Code
Create harness_demo.py. The whole thing is a single create_harness_agent call wired into the console UI — the harness handles tools, memory, compaction and the plan/execute loop; you just supply the instructions.
1
2
3
4
5
6
7
8
9
10
11
12
13
14
15
16
17
18
19
20
21
22
23
24
25
26
27
28
29
30
31
32
33
34
35
36
37
38
39
40
41
42
43
44
45
46
47
48
49
50
51
52
53
54
55
56
57
58
59
60
61
62
63
64
65
66
67
68
69
70
71
72
73
74
75
76
77
78
79
80
81
82
83
84
85
86
87
88
89
90
91
92
93
94
95
96
97
98
99
100
101
102
103
104
105
106
# /// script
# requires-python = ">=3.10"
# dependencies = [
#     "agent-framework-core",
#     "agent-framework-foundry",
#     "textual>=6.2.1",
#     "rich>=13.7.1",
#     "azure-identity",
#     "python-dotenv",
# ]
#
# [tool.uv.sources]
# agent-framework-core = { git = "https://github.com/microsoft/agent-framework.git", subdirectory = "python/packages/core", branch = "main" }
# agent-framework-foundry = { git = "https://github.com/microsoft/agent-framework.git", subdirectory = "python/packages/foundry", branch = "main" }
# ///

import asyncio

from agent_framework import (
    create_harness_agent,
    todos_remaining,
    todos_remaining_message,
)
from agent_framework.foundry import FoundryChatClient
from azure.identity import AzureCliCredential
from console import build_observers_with_planning, run_agent_async
from dotenv import load_dotenv

# ── Agent instructions
# This is where you define what your agent does.
# Keep it focused — the Harness wires up the how (tools, memory, compaction).
# You own the what.

AZURE_ADVISOR_INSTRUCTIONS = """\
## Azure Architecture Advisor

You are an Azure architecture advisor. When given a scenario or question,
research it thoroughly and provide practical, actionable recommendations.

### How to work

Use plan mode to break down the question into research tasks.
Use execute mode to work through each task systematically.

### Quality standards

- Always cite your sources inline.
- When multiple valid approaches exist, explain the tradeoffs. Do not just
  pick one and pretend the others don't exist.
- Flag when a recommendation depends on context you don't have
  (team size, compliance requirements, cost constraints, etc.).
- Be specific. "Use Azure Container Apps" is more useful than
  "consider containers".

### Output format

Use Markdown. Clear section headings, inline citations, bullet points
for lists of options or steps. End with a brief summary of key
recommendations and any open questions.
"""


async def main() -> None:
    load_dotenv()

    # Create the Azure AI Foundry chat client.
    # Uses AzureCliCredential — run `az login` first.
    client = FoundryChatClient(credential=AzureCliCredential())

    # Create the harness agent.
    # max_context_window_tokens and max_output_tokens enable automatic
    # compaction — the agent manages its own context window.
    agent = create_harness_agent(
        client=client,
        max_context_window_tokens=128_000,
        max_output_tokens=16_384,
        name="AzureAdvisor",
        description=(
            "Azure architecture advisor that plans and executes "
            "research tasks."
        ),
        agent_instructions=AZURE_ADVISOR_INSTRUCTIONS,
        # Looping: while in execute mode with open todos, keep going
        # automatically. loop_next_message injects a reminder listing
        # remaining todos each pass. loop_max_iterations is the safety
        # cap — prevents infinite loops.
        loop_should_continue=todos_remaining(looping_modes=["execute"]),
        loop_next_message=todos_remaining_message,
        loop_max_iterations=10,
    )

    # Run the harness console.
    await run_agent_async(
        agent,
        session=agent.create_session(),
        observers=build_observers_with_planning(agent),
        initial_mode="plan",           # Start in plan mode
        title="Azure Architecture Advisor",
        placeholder="Describe your scenario or ask your question...",
        max_context_window_tokens=128_000,
        max_output_tokens=16_384,
    )


if __name__ == "__main__":
    asyncio.run(main())
Step 5 - Run it
az login
uv run harness_demo.py
The Textual-based console opens in your terminal. You’ll see:
- A chat input at the bottom
- The agent’s current mode (plan / execute) in the header
- Todo items appearing and being checked off as the agent works
- Full tool call visibility — you see exactly what the agent does
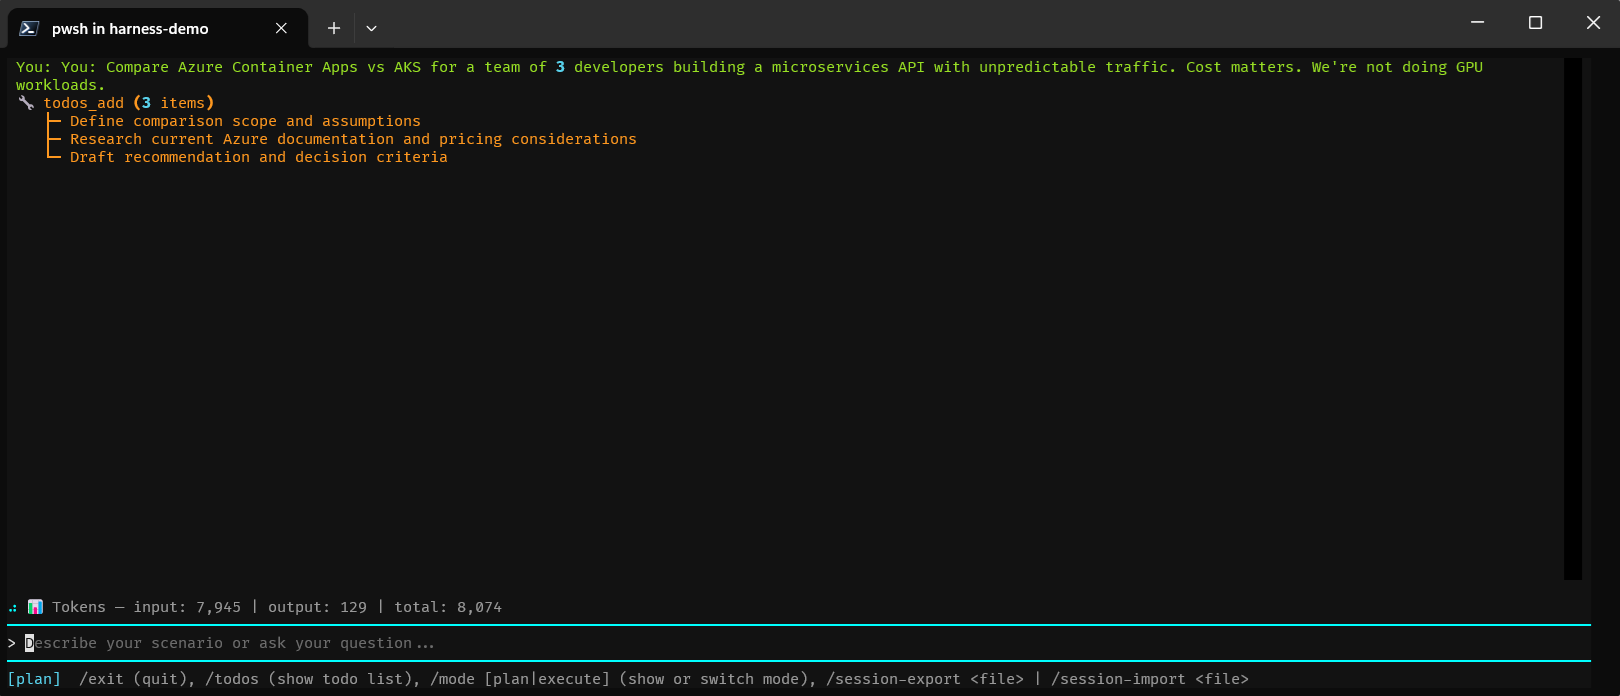
The agent starts in plan mode. Describe a scenario (“design a multi-region web app on Azure”), let it build a todo list, then switch it to execute mode — it loops through the todos autonomously until the list is empty.
Step 6 - Try it out
Some prompts to test the plan/execute loop:
Architecture decision:
1
Compare Azure Container Apps vs AKS for a team of 3 developers building a microservices API with unpredictable traffic. Cost matters. We're not doing GPU workloads.
Migration scenario:
1
2
We're moving an on-premises .NET 4.8 web app to Azure. The app uses
SQL Server and Windows Auth. What are our options?
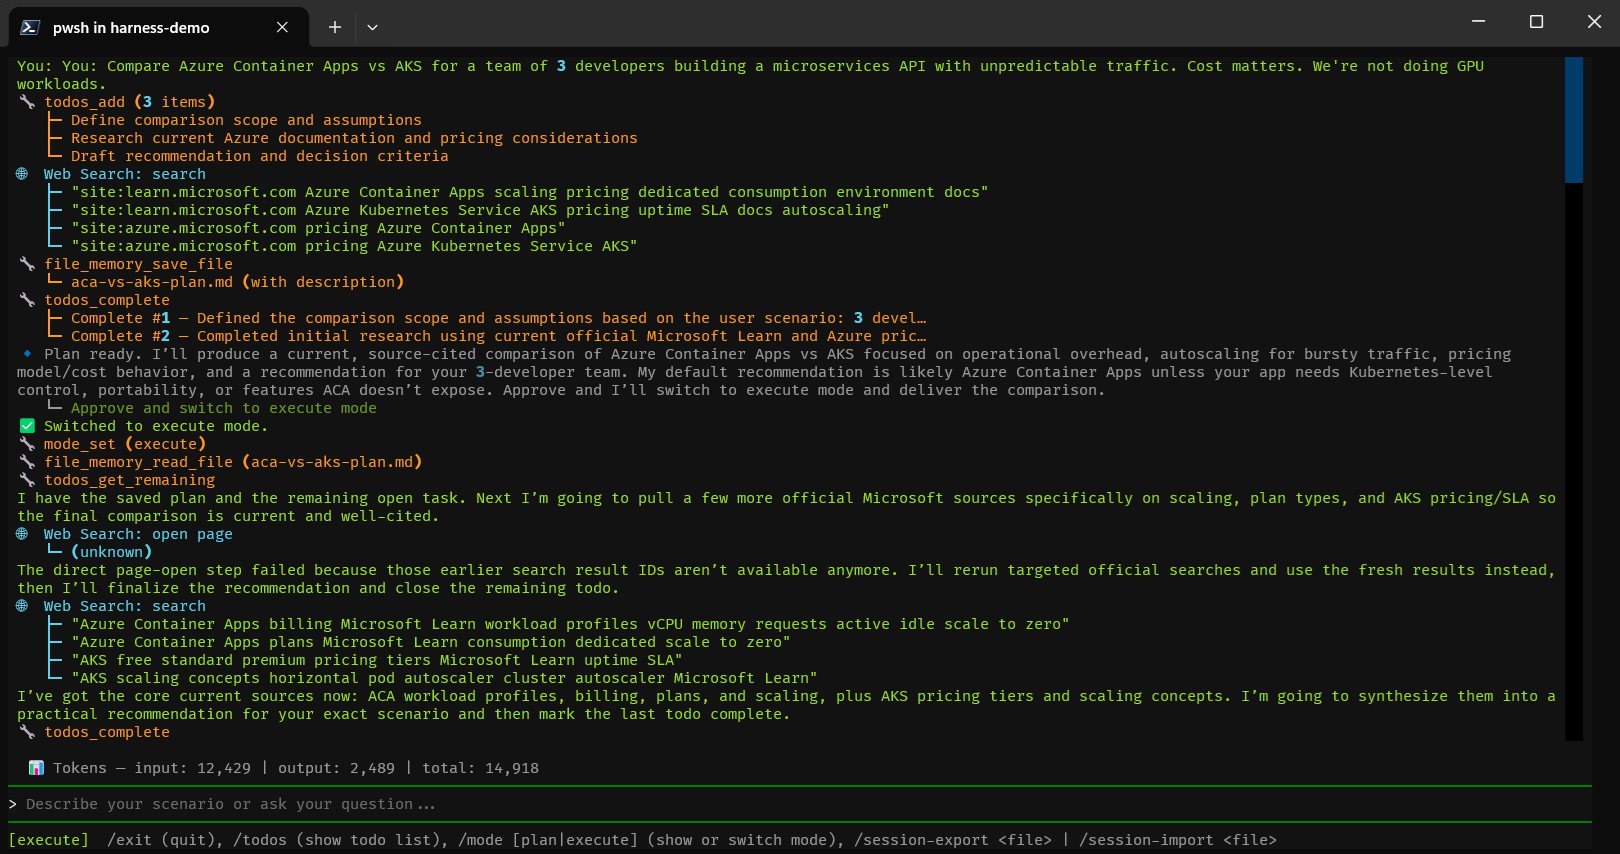
Once the agent finishes planning (you’ll see todos appear), type:
1
execute
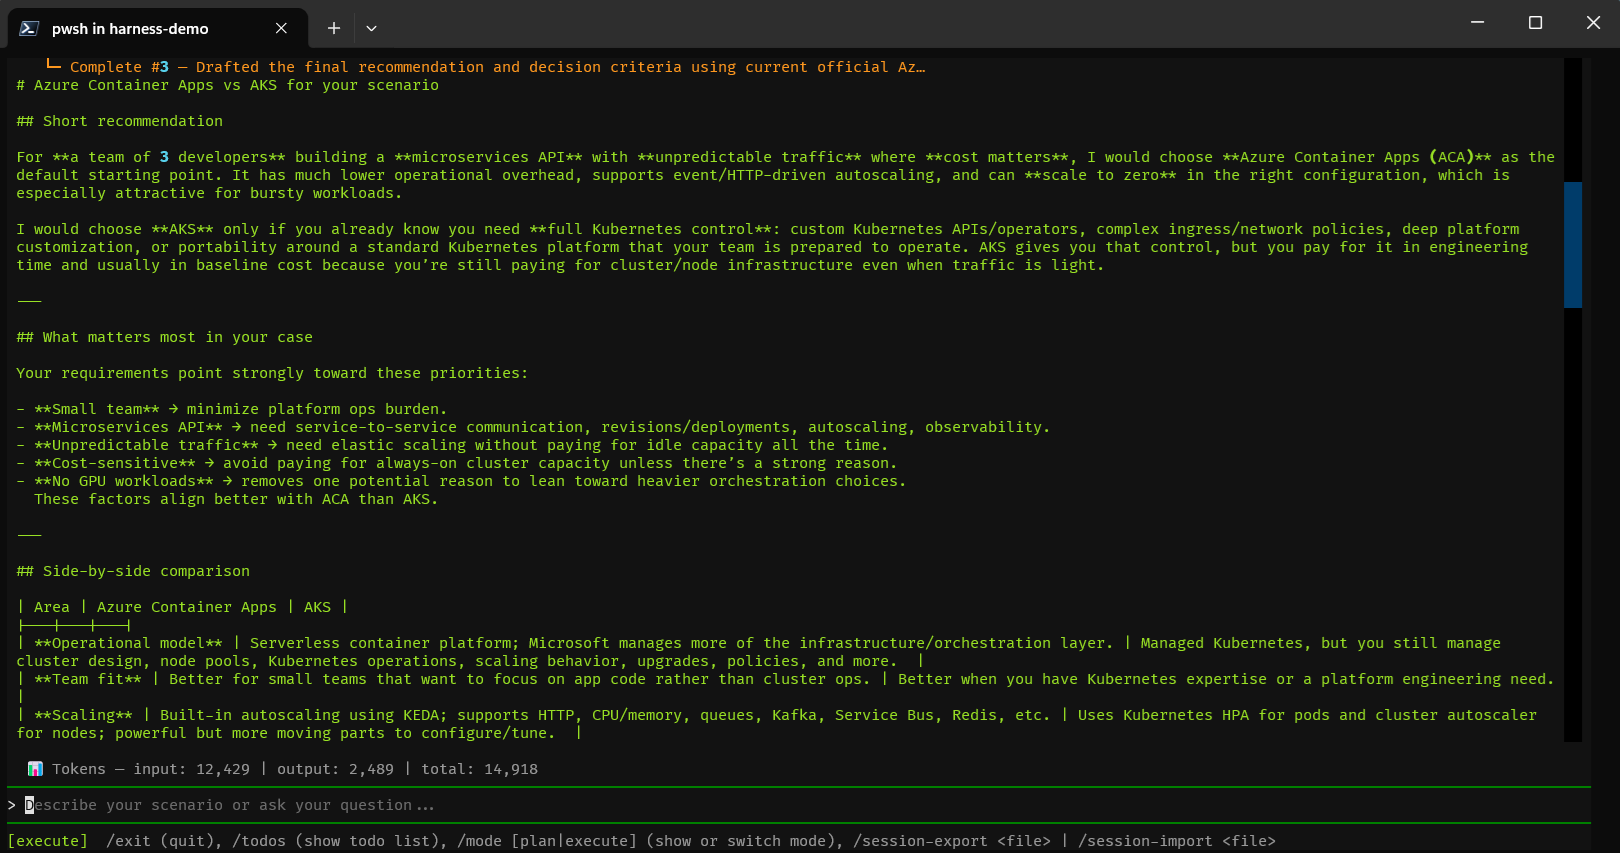
Watch it work through the list autonomously.
What’s Actually Happening Under the Hood
The part I find genuinely clever is the mode system. In plan mode, the agent creates todos but doesn’t execute them — it’s thinking, not acting. In execute mode, the loop_should_continue predicate fires: if there are still open todos, the framework re-invokes the agent automatically with a reminder of what’s left.
This means you get a natural review gate. You can inspect the plan before anything happens. If the todos look wrong, correct them before switching to execute mode.
The CompactionProvider is also doing real work here. At 128K tokens you’re not going to hit the limit on most sessions, but in longer research tasks the agent can hit it. Compaction kicks in automatically — it compresses the history while preserving tool call results, so the agent keeps its context without you managing it.